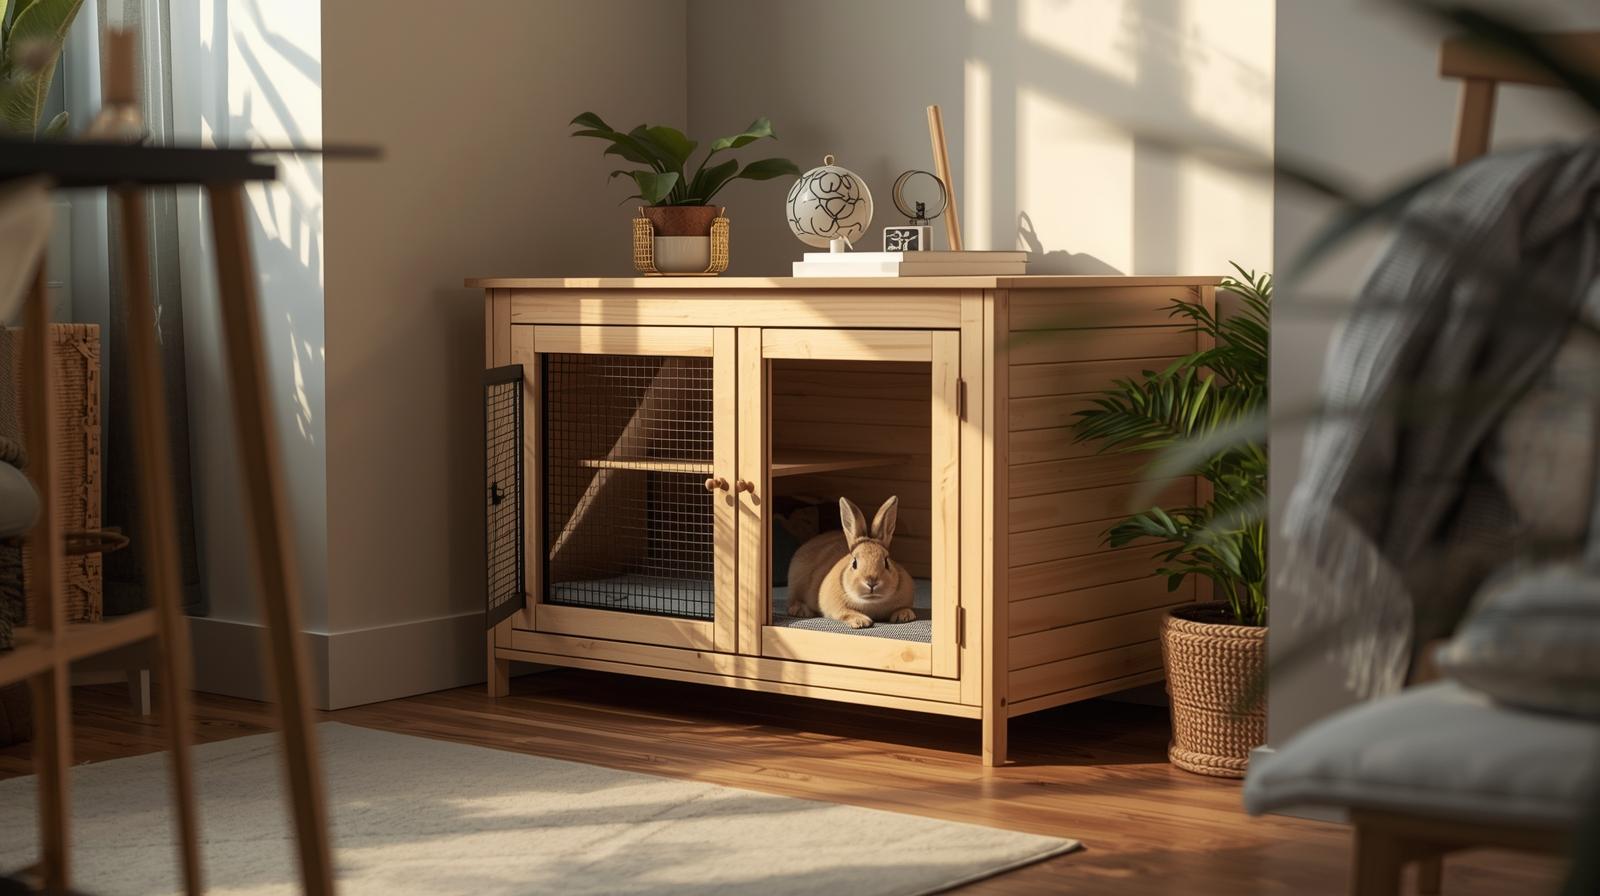
Did you know that over 70% of rabbit owners keep their pets indoors? This ensures their safety and comfort. Building a DIY indoor rabbit house is a great way to give your pet a cosy home, even in small apartments.
You can make your rabbit cage diy project fit your apartment’s size. This way, your pet will have enough room to move. With the right small space wood plans, you can create a safe and comfy home for your rabbit.
Key Takeaways
- Learn how to build a DIY indoor rabbit house for small apartments.
- Discover the benefits of keeping your rabbit in a safe and cosy indoor environment.
- Explore various small-space wood plans for your rabbit enclosure.
- Understand the importance of proper housing for your pet rabbit.
- Get tips on creating a comfortable and secure living space for your rabbit.
Why Build Your Own Indoor Rabbit House for Small Spaces
Building a custom indoor rabbit house diy project is a great way to create a perfect home for your rabbit. It fits your small apartment’s unique layout perfectly.
Creating your own indoor rabbit house has many benefits. It’s a fun and rewarding DIY project. Plus, you can design it to fit your specific needs and space.
Cost Savings Compared to Store-Bought Options
One big advantage of building your own rabbit house is the cost savings. Store-bought cages can be pricey, even for high-quality, spacious ones. By making your own compact rabbit hutch diy, you save money and create a bigger, more comfy space for your rabbit.
Customisation for Your Apartment Layout
Another great thing about a DIY indoor rabbit house is the customisation. You can design it to fit your apartment’s layout perfectly. This is super useful in small apartments where space is tight. You can use small space wood plans to make a cosy home for your rabbit.
Better Quality Control and Materials
When you build your own rabbit house, you choose the materials. This means you can pick safe, durable, and easy-to-clean materials. You can avoid harmful materials like certain woods or toxic finishes. This way, you create a healthy and comfy environment for your pet.
Building your own indoor rabbit house ensures your rabbit has a safe, comfy, and spacious home. With careful planning and attention to detail, you can make a beautiful and functional rabbit house diy project. You’ll be proud to show it off in your home.
Planning Your Indoor Rabbit House DIY Small Space Project
Creating a successful indoor rabbit house DIY project starts with careful planning. You must think about your rabbit’s needs before you start. It’s crucial to plan well to meet both your and your rabbit’s needs.
Measuring Your Available Space
First, measure the area for your rabbit house. Note the height, width, and depth to figure out the maximum size. Also, measure doorways or hallways that the house will go through.
- Use a tape measure for accurate dimensions.
- Think about space for food dishes and toys.
- Remember any obstacles like heating vents or outlets.
Determining the Right Size for Your Rabbit
Rabbits need room to move. The House Rabbit Society suggests a space where they can stand, stretch, and move easily. A 2x4x4 feet enclosure is a good start, but bigger is better.
- Learn about your rabbit’s breed’s space needs.
- Think about your rabbit’s adult size, not just now.
- Consider a multi-level enclosure for more space.
Choosing a Design Style That Matches Your Decor
Your rabbit house can match your apartment’s style. Pick a design that fits your decor. Think about colours, materials, and styles that will look good.

- Pick materials that are tough and easy to clean.
- Add a personal touch with decorations.
- Make sure the design has good ventilation and cleaning access.
With careful planning, you can make a safe, cosy, and stylish home for your rabbit. It will fit perfectly in your small apartment.
Essential Materials for Your Compact Rabbit Hutch
Creating a safe and comfortable environment for your rabbit starts with selecting the right materials for your compact rabbit hutch.
Wood Selection and Quantities
When building your compact rabbit hutch, the type and quantity of wood are key. You need wood that is durable, easy to work with, and safe for your rabbit.
Recommended Wood Types for Indoor Use
For indoor rabbit hutches, use woods like pine, cedar, or poplar. These woods are durable and pest-resistant. Make sure the wood is free from knots and cracks to keep your rabbit safe.
Calculating Board Feet Needed
To figure out how much wood you need, calculate the board feet required. Add 10% to your measurements for cuts and waste. An online board foot calculator can help with this.
Hardware and Fasteners Needed
You’ll also need various hardware and fasteners to assemble your rabbit hutch. The right hardware ensures the structure is sturdy and secure.
Screws, Nails, and Brackets
For assembling the frame and attaching the wire mesh, you’ll need screws, nails, and brackets. Stainless steel or galvanised hardware is recommended to prevent rust and corrosion.
Hinges and Latches for Doors
To create functional doors, you’ll need hinges and latches. Choose hinges that are sturdy and easy to install. For latches, opt for rabbit-safe designs that won’t harm your pet if they accidentally touch or try to nibble on them.
Wire Mesh and Flooring Materials
Wire mesh is essential for providing ventilation and visibility in your rabbit hutch. When selecting wire mesh, ensure it’s made from a durable, non-toxic material.

Finishing Materials and Non-Toxic Sealants
To protect the wood and ensure your rabbit’s safety, you’ll need to apply non-toxic finishing materials. Consider using natural oils or water-based stains that are safe for your rabbit to chew on.
| Material | Description | Quantity |
|---|---|---|
| Wood (Pine/Cedar/Poplar) | For the frame and structure | Based on design dimensions |
| Wire Mesh | For ventilation and visibility | Enough to cover all sides |
| Screws/Nails/Brackets | For assembly | As required by design |
| Hinges/Latches | For doors | 2 hinges and 1 latch per door |
| Non-Toxic Sealants | For wood protection | Enough to cover all wood surfaces |
Tools Required for Building a Rabbit House Indoors
Getting the right tools is key to a DIY rabbit house project. You need various tools to make sure your rabbit’s home is safe, strong, and cosy.
Basic Power Tools You’ll Need
Power tools help you cut and put together your rabbit house quickly. You’ll need a few important ones:
- Circular Saw or Mitre Saw: For making precise cuts in wood.
- Cordless Drill and Driver Bits: For drilling holes and driving screws.
Circular Saw or Mitre Saw
A circular saw or mitre saw is crucial for cutting wood to the right size. A circular saw is good for straight cuts. A mitre saw is better for angled cuts.

A cordless drill is a must for drilling holes and screwing things together. Look for a drill with adjustable torque and different driver bits for screws.
Hand Tools and Measuring Equipment
You’ll also need hand tools for small tasks and measuring tools for accuracy.
- Tape Measure: For measuring and marking wood accurately.
- Hammer: For tapping pieces into place.
- Level: To ensure the structure is level and plumb.
Safety Equipment and Protective Gear
When using power tools, safety comes first. You’ll need:
- Safety Glasses: To protect your eyes from debris.
- Hearing Protection: To safeguard your hearing when using loud power tools.
- Dust Mask: To prevent inhaling dust and particles.
With the right tools and safety gear, you’re ready to build a cosy and safe indoor rabbit house.
Taking Measurements and Cutting Your Wood Pieces
Getting the right measurements is key to a great DIY rabbit house. You need to measure carefully and cut your wood accurately. This makes sure your rabbit enclosure is safe and comfy.
Creating a Cut List for Efficiency
Start by making a detailed cut list before you cut anything. It helps you organise your wood and cut the right sizes. Break down your design into parts and figure out each piece’s size. Remember to include the wood’s thickness and any joints.
For example, a simple rectangular hutch might need:
| Component | Quantity | Dimensions |
|---|---|---|
| Floor Panel | 1 | 24″ x 36″ |
| Side Panels | 2 | 24″ x 18″ |
| Back Panel | 1 | 36″ x 18″ |
Marking and Measuring Techniques
To cut accurately, mark your wood well. Use a sharp pencil and a ruler or tape to draw lines. For even more precision, use a speed square to make sure your lines are square.
Using a Speed Square for Accuracy
A speed square is great for marking cut lines. Place it on your wood and draw along its edge. This makes a precise line that’s square to the wood.
Double-Checking All Measurements
Always double-check your measurements before cutting. Remember, “Measure twice, cut once” to avoid mistakes. Make sure your measurements are right to avoid redoing cuts.

Safe Cutting Practices for Small Spaces
When cutting in small spaces, safety is crucial. Keep your area clean and well-lit. Use a stable surface and a clamp to hold your wood. Always wear safety glasses and a dust mask to protect yourself.
Labelling Pieces for Easy Assembly
After cutting, label your wood pieces. This makes assembly easier by showing which piece goes where. Use a marker or label maker to mark each piece clearly. It saves time and reduces frustration during assembly.
Step-by-Step Assembly of the Base Frame
A strong base frame is key to your indoor rabbit house. Here’s how to build it. The base frame is the foundation, making sure your hutch is stable and lasts long.
Building the Bottom Platform
The bottom platform is the start of your rabbit hutch. It’s a rectangular base with cross supports for extra strength.

Creating the Rectangular Base
To make the rectangular base, cut four pieces of wood to size. Use a mitre saw or circular saw for clean cuts.
- Cut two pieces for the length and two for the width.
- Assemble the pieces with wood glue and 2-inch wood screws.
- Make sure the corners are square by checking the diagonals.
Adding Cross Supports
Cross supports are key to the base’s stability. They stop the platform from warping and add more surface area.
- Cut more wood pieces to fit inside the base.
- Place them evenly apart, about every 12 inches.
- Hold them in place with wood screws.
Attaching the Corner Posts
Corner posts give vertical support to the hutch. They’re crucial for its structure.
Securing Vertical Supports
To secure the vertical supports, follow these steps:
- Cut four posts to the desired height.
- Attach them to the base corners with 3-inch wood screws.
- Use metal brackets for extra strength.
Checking for Plumb Alignment
The corner posts must be plumb for the hutch’s stability.
- Use a level tool to check alignment.
- Adjust the posts if needed.
- Secure them with concrete or more brackets.
Adding Support Braces for Stability
Support braces are essential for the hutch’s structure.
Cut wood pieces to fit diagonally between the posts. Secure them with wood screws.
Ensuring the Frame is Square and Level
Lastly, make sure the whole frame is square and level.
| Check | Description | Status |
|---|---|---|
| Square | Measure diagonals to ensure they are equal. | Pass/Fail |
| Level | Use a level tool on the base platform. | Pass/Fail |
By following these steps, your rabbit hutch base frame will be sturdy and well-built.
Constructing the Walls and Installing Wire Mesh
Now that the base frame is ready, it’s time to build the walls and add wire mesh. This step is key to creating a safe space for your rabbit.
Cutting and Attaching the Back Panel
Start by cutting the back panel to fit perfectly. Use a saw for clean cuts. Make sure it fits well against the base frame. Then, attach it with screws or nails, ensuring it’s secure and straight.
Installing Side Wall Frames
Building the Frame Structure
Make the side wall frames from wooden slats. Cut them to the right length and shape them into frames. Use a square to check that the corners are right angles.
Attaching to the Base
After making the frames, attach them to the base. Use screws or nails for a strong hold. Make sure they’re evenly spaced and match the back panel.
Securing Wire Mesh for Ventilation
Cutting Mesh to Size
Cut the wire mesh to fit, leaving some extra. This ensures full coverage and easy attachment.
Stapling Techniques for Durability
Attach the wire mesh with a staple gun. Start from the middle and move outwards. This keeps the mesh tight and prevents escape.
Creating an Access Door with Hinges
An access door is vital for cleaning and interacting with your rabbit. Attach hinges and secure it to the frame. Ensure the door is strong and has a good latch to keep it closed.
| Component | Material | Quantity |
|---|---|---|
| Back Panel | Plywood | 1 |
| Side Wall Frames | Wooden Slats | 4 |
| Wire Mesh | Galvanized Wire | 1 roll |
| Access Door | Plywood or Wood | 1 |
Adding the Roof and Interior Features
Now that the walls of your rabbit house are up, it’s time to add the roof and some essential interior features. This step is crucial for providing your rabbit with a safe and comfortable living space.
Building and Securing the Top Panel
The roof is a critical component of your rabbit house, protecting your pet from the elements. You have two primary options to consider: a fixed roof or a hinged top.
Fixed Roof vs. Hinged Top Options
A fixed roof provides a sturdy, permanent cover for your rabbit house. It’s simpler to construct but less convenient for cleaning and maintenance.
A hinged top, on the other hand, allows for easy access to the interior, making it simpler to clean and interact with your rabbit. It requires more complex construction and secure hinges to ensure it stays in place.
Attaching the Roof Securely
Regardless of the type of roof you choose, it’s essential to attach it securely to the walls of the rabbit house. Use appropriate screws or nails to ensure the roof is firmly in place.
Installing a Removable Cleaning Tray
A removable cleaning tray is a vital feature for maintaining hygiene in your rabbit house. It allows you to easily clean out waste and soiled bedding. Ensure the tray is made from a durable, non-toxic material and is designed to slide in and out smoothly.
Adding Interior Levels or Platforms
Adding interior levels or platforms can enhance your rabbit’s living space, providing more area to explore and exercise. These can be made from wood or wire mesh and should be securely attached to the walls or frame.
- Consider the size and age of your rabbit when designing the levels.
- Ensure the platforms are sturdy and won’t collapse.
- Provide enough space between levels for your rabbit to move comfortably.
Creating a Hideaway Box Inside
Rabbits often feel secure when they have a hideaway or hiding box. You can create one using a wooden box or a covered area within the rabbit house. This feature can help reduce stress and provide your rabbit with a sense of security.
“Rabbits are prey animals and often feel safer when they have a place to hide. Providing a hideaway box can be a simple yet effective way to improve their well-being.”
By incorporating these features, you can create a comfortable and engaging environment for your rabbit, enhancing their quality of life.
Finishing Touches and Rabbit-Safe Customisations
Now that your rabbit house is built, focus on making it safe and comfy for your pet. The final touches will not only look great but also keep your rabbit healthy.
Sanding Smooth All Edges and Surfaces
Start by sanding all edges and surfaces to avoid injuries. Use fine-grit sandpaper to smooth out any rough spots. Pay extra attention to the wire mesh and access doors.
Applying Non-Toxic Stain or Paint
After sanding, apply a non-toxic stain or paint to protect the wood and make it look good. Choose finishes that are safe for your rabbit since they’ll be in contact with the wood.
Pet-Safe Finish Options
Look for water-based or natural oil finishes without toxic chemicals. Good options include linseed oil, beeswax, and non-toxic water-based paints. Always check the labels for pet safety certifications.
Proper Drying and Curing Time
Let the finish dry and cure as instructed. Make sure the rabbit house is well-ventilated. This step is key to preventing any harm to your rabbit.
Adding Furniture-Style Legs or Wheels
Consider adding furniture-style legs or wheels to elevate your rabbit house. This makes it look better and easier to clean. Make sure the legs or wheels are strong and won’t tip over.
Installing Accessories and Feeders
Install accessories and feeders to make your rabbit’s space more interesting. Add water bottles, hay racks, ramps, and toys to keep them entertained and active.
Mounting Water Bottles and Hay Racks
Mount water bottles and hay racks at a height your rabbit can easily reach. Use strong clips or brackets to keep them from falling over.
Adding Ramps and Toys
Ramps and toys are key to a fun environment. Choose sturdy ramps and safe, durable toys. Change toys often to keep your rabbit interested.
Want a PERFECT Rabbit House Plan Without Guesswork?
Building a rabbit house in a small apartment is easy…
IF you have the right plan.
Instead of wasting time with incomplete tutorials or confusing blueprints, get access to 16,000 step-by-step woodworking plans, including detailed Rabbit House Plans inside Ted’s Woodworking.
Why Woodworkers Love It:
- ✅ 16,000 “Done-For-You” Plans (Includes Rabbit Houses)
- ✅ Step-by-Step A–Z Instructions (No Guesswork)
- ✅ Exact Cutting & Materials Lists (Save Money & Time)
- ✅ Detailed Schematics + Multiple Angle Views
- ✅ Beginner-Friendly (No Large Workshop Needed)
- ✅ Lifetime Access + Free Monthly New Plans
- ✅ One-Time Payment – No Monthly Fees
- ✅ 60-Day 100% Money-Back Guarantee
Stop Searching. Start Building.
For less than the cost of one custom plan, you get lifetime access to thousands of professional wood plans — including indoor, outdoor, furniture, storage, hutches, and more.
👉 Click Here to Get Instant Access to 16,000 Woodworking Plans Now
Build your rabbit house the right way — clean, sturdy, apartment-friendly, and professional.
Don’t miss this limited-time deal.
Conclusion
Building a DIY indoor rabbit house is a rewarding project. It provides a safe and happy home for your rabbit. By following the steps in this guide, you can create a comfortable and enriching environment for your pet.
With careful planning and attention to detail, you can design a small space rabbit house. It will fit perfectly in your apartment. Your indoor rabbit house DIY project will save you money and give you satisfaction.
A well-built DIY rabbit hutch or indoor rabbit house setup will keep your rabbit healthy and happy. So, gather your materials, follow the instructions, and start building a cosy home for your furry friend.
By investing time and effort into your DIY rabbit hutch, you’ll create a nurturing environment. This will enhance your rabbit’s quality of life. Start your small space rabbit house project today and enjoy seeing your rabbit thrive in their new home.
FAQ
What is the minimum space required for a rabbit house in a small apartment?
A rabbit house needs at least 2×4 feet of floor space. It should also be 4 feet tall. This allows your rabbit to move around comfortably.
What type of wood is safe for building a rabbit house?
Use untreated, non-toxic woods like pine, cedar, or poplar. Avoid pressure-treated wood or woods with toxic finishes.
How do I ensure good ventilation in my DIY rabbit house?
For good ventilation, install wire mesh on the sides or back. This lets air in while keeping your rabbit safe.
Can I customise the design of my rabbit house to fit my apartment’s decor?
Yes, building your own rabbit house lets you customise it. You can match it to your apartment’s decor and your rabbit’s needs.
What kind of finishing materials are safe for my rabbit?
Use non-toxic finishes like water-based stain or paint. Avoid chemical-based finishes or paints with lead or toxins.
How can I make my rabbit house easy to clean?
Make it easy to clean by adding a removable cleaning tray or a hinged roof. This lets you access the interior easily.
What accessories can I add to enrich my rabbit’s environment?
Add water bottles, hay racks, ramps, and toys. These enrich your rabbit’s environment and provide mental and physical stimulation.
How can I ensure my rabbit house is stable and secure?
Attach it to the wall or use a sturdy base. Use secure fasteners and hardware to assemble it. This ensures stability and security.
Can I build a rabbit house for multiple rabbits?
Yes, you can build a house for multiple rabbits. Just remember to consider the extra space and resources needed.
Are there any free indoor rabbit house plans available?
Yes, you can find free plans online or in DIY books. You can also modify existing plans to fit your needs.
