
Did you know that adding a clear synthetic coating to reclaimed timber can boost its value by over 500%? This simple step turns basic materials into stunning art that lasts for generations. You can start making beautiful handmade items today, even without a big workshop or expensive tools.
The world’s interest in these unique creations has doubled in five years. This shows more people want to make their homes special. It’s an exciting time to join this artistic community and share your work.
Working with liquid polymers opens up a world of possibilities in your home. Whether you’re starting a new hobby or refreshing your decor, it’s easy to get started. You’ll find that even small tasks bring a sense of accomplishment and lasting beauty to your space.
This guide introduces you to several easy epoxy resin wood projects for beginners. You’ll learn about creative ideas like elegant Timber Stool Designs in Kitchen areas that add style right away. You’ll also discover how to make a stunning ocean-wave table to wow your guests.
Key Takeaways
- Discover how to enhance reclaimed timber using durable synthetic finishes.
- Master basic techniques for diy resin crafts to personalise your decor.
- Learn the essential steps of woodworking with epoxy resin for long-lasting results.
- Explore stylish seating options that fit perfectly in modern kitchen environments.
- Create artistic surfaces featuring breathtaking ocean-inspired designs and textures.
- Understand why liquid polymers are the perfect medium for those starting a new craft.
Easy Epoxy Resin Wood Projects for Beginners: Essential Supplies and Safety Tips
Before starting epoxy resin wood projects, beginners need the right materials and safety knowledge. Working with epoxy resin is fun and rewarding. But it needs careful preparation and attention to detail.
Required Materials and Tools for Epoxy Wood Projects
To begin your epoxy resin wood project, you’ll need basic supplies. These include:
- Epoxy resin and hardener
- Mixing cups and sticks
- Gloves and a mask for safety
- A protective table cover or mat
- Moulds for shaping your project
- Colourants and decorative extras (optional)
Having the right tools and materials makes the process smoother and more fun.

Safety Equipment and Workspace Preparation
Safety is key when working with epoxy resin. Make sure your workspace is well-ventilated. Use a respirator mask to avoid inhaling fumes. Wear protective gloves and eyewear to prevent skin and eye irritation. Cover your work surface with a protective mat or table cover to prevent damage from spills.
Choosing the Right Epoxy Resin Type
There are many types of epoxy resin, each with its own features. For beginners, a clear epoxy resin with a medium viscosity is a good choice. Think about the curing time and your project’s needs when picking your epoxy resin.
Basic Techniques Every Beginner Should Know
Learning a few basic techniques can greatly improve your epoxy resin projects. Start by practising mixing small batches of resin. Try different colourants or inclusions. Learn to work with small jewellery moulds or other shapes to create unique designs.
- Mix your epoxy resin thoroughly to avoid uncured spots.
- Experiment with different pigments and inclusions to achieve unique effects.
- Work in a well-ventilated area and follow safety guidelines.
Epoxy Resin Coasters
Making epoxy resin coasters is a great beginner project. It’s both functional and decorative. If you’re looking for a fun DIY project, this is a great choice. These coasters add elegance to any room.
Materials Needed for Resin Coasters
You’ll need silicone moulds, epoxy resin, colouring agents, and mixing tools. Make sure your workspace is well-ventilated and covered because epoxy resin can be messy.
The shape of your coasters depends on the silicone moulds. You can find many shapes and sizes online or in craft stores.
Step 1: Prepare Your Silicone Moulds
Before pouring the resin, clean and dry your moulds. If they’re new, wash them with soap and water. Let them dry completely. This step helps your coasters have a smooth finish.
Tip: Lightly spraying the moulds with a release spray can help with demolding after the resin has cured.
Step 2: Mix and Colour Your Epoxy Resin
Follow the instructions on your epoxy resin kit to mix the resin and hardener. It’s crucial to mix thoroughly to avoid any uncured resin. Add colouring agents like alcohol inks or mica powders to get your desired colour.
Try different colours and techniques, like layering or swirling, to create unique designs.
Step 3: Pour Resin and Create Designs
Pour the mixed resin into your moulds. Add materials like glitter or dried flowers to create designs. Use a stir stick or toothpick to mix the materials and get the desired pattern.
Step 4: Cure, Demold, and Finish
Let the resin cure for the time recommended by the manufacturer. This is usually several hours or overnight. Once cured, remove the coasters from the moulds. Sand the edges if needed.
Your epoxy resin coasters are now ready. They can be used or given as gifts. They add a personal touch to any setting and are sure to be appreciated.
“Working with epoxy resin is a fun and rewarding experience, even when you see your creations come to life.” – A seasoned resin crafter.
Resin River Serving Board
A resin river serving board is both useful and beautiful. It can make your kitchen look amazing. This project uses colored resin in the cracks of wooden boards, making a unique serving piece.
Selecting the Right Wood Slab
Choose a wood slab with interesting cracks or voids for your resin river serving board. Hardwoods like walnut, maple, or oak are great because they’re durable and look good. Make sure the wood is dry and clean.
Step 1: Prepare and Seal the Wood Surface
Clean the wood surface well. Dirt can mess up the epoxy resin’s stickiness. Then, apply a wood sealer to the whole surface. This helps the epoxy stay in place and prevents it from getting into the wood.
Step 2: Build Your Dam and Create the River Channel
Build a dam to keep the epoxy resin in place. Use silicone or rubber for a tight seal. You can make your river channel simple or complex, depending on your design.
Step 3: Mix and Pour the Resin River
Mix the epoxy resin as the instructions say, adding colourants for your river’s look. Pour it into the channel, filling it to the right level. You can add glitter or pigments for extra flair.
Step 4: Sand, Polish, and Apply Food-Safe Finish
After the epoxy cures, remove the dam and sand the surface. Use different sandpaper grits to polish it well. Then, apply a food-safe finish to keep it safe for food use.
By following these steps, you can make a beautiful resin river serving board. It’s a great way to use woodworking with epoxy resin and create something special.
Ocean Wave Epoxy Table
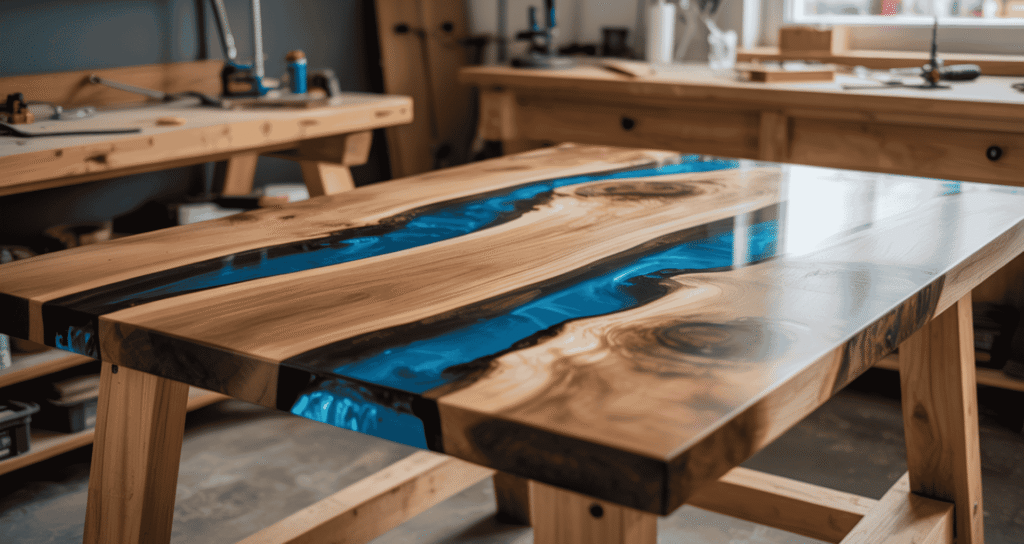
Make your living space stunning with an ocean wave epoxy table. It’s perfect for beginners in epoxy resin projects. This furniture combines wood’s natural beauty with the ocean’s mesmerising effect.
Planning Your Ocean Wave Design and Colour Palette
Start by planning your design and picking colours that show the ocean’s beauty. Think about the sea’s colours, from deep blues to whites. Use epoxy resin and pigments to capture these hues.
Be creative with your design by mixing colours and techniques. Try different colour combinations to make it your own.
Step 1: Select and Prepare Your Tabletop Wood
Choosing the right wood is key. Look for a slab that’s sturdy and has interesting grain. Clean and sand it well for a smooth finish.
Make sure the wood is dry and clean. This is important for a successful ocean-wave-epoxy-table project.
Step 2: Build a Leak-Proof Mould Frame
Build a mould frame to hold the epoxy resin. Use strong materials like melamine or PVC. Make sure it’s level and attached well to the tabletop.
Step 3: Mix Resin and Create Wave Colours
Mix the epoxy resin as the instructions say. To get the ocean wave look, mix colours and use a heat gun for swirls. Colour mixing is an art; be creative and adjust until it looks right.
Step 4: Pour Multiple Layers for Ocean Depth Effect
To get the ocean’s depth, pour layers of epoxy resin. Let each layer cure before adding the next. This takes time but is needed for a realistic look.
Step 5: Remove from Mould and Sand Smooth
After the last layer cures, take the tabletop out of the mould and sand it. This step is key to a glossy finish.
Step 6: Apply Final Finish and Attach Table Legs
Put a final finish on to protect and enhance your table. Then, attach the legs to finish your project.
Your ocean-wave-epoxy table is now ready. It’s a unique piece for your home and a great beginner epoxy woodworking idea.
Epoxy Resin Jewellery and Pendants
Exploring epoxy resin jewellery making is a creative journey. You can make earrings, pendants, or bracelets. Use small moulds, add colours, glitter, or tiny objects like shells or beads.
Types of Resin Jewellery for Beginners
Beginners can start with simple projects like pendants or earrings. Epoxy resin jewellery making lets you play with colours and add special touches. Mix resin with pigments, glitter, or include small items like dried flowers or beads.
Step 1: Gather Jewellery Moulds and Embedments
To begin, gather jewellery moulds and embedments. Find them at craft stores or online. Pick moulds that match your design. Embedments can be glitter, dried flowers, or small beads.
Step 2: Mix Small Batches of Colored Resin
Mixing small batches of colored resin is key. Use clear epoxy resin and add pigments for colour. Mix well to avoid bubbles and even colour.
Step 3: Pour into Moulds and Add Decorative Elements
Pour the resin into moulds and add decorations like glitter or beads. Be creative, but make sure everything is covered by resin.
Step 4: Demold, Drill, and Attach Jewellery Findings
Once cured, remove your jewellery from molds. Drill holes for pendants or earrings. Then, attach findings like jump rings or earring hooks.
Follow these steps to make stunning epoxy resin jewellery and pendants. Resin casting tutorials for newbies can help you learn these techniques.
Wood Stool with Epoxy Design for Kitchen

You can make your kitchen look elegant with a wood stool and epoxy design. This project mixes woodworking and epoxy resin for a unique piece. With the right materials and steps, you can get professional results.
Choosing Your Stool Base and Design Pattern
First, pick a wooden stool base that matches your kitchen. Think about the style, size, and material. You can use a pre-made base or make one from wood. Choose a design for the epoxy, like a simple fill or a complex pattern.
Step 1: Prepare the Wooden Stool Top Surface
Start by sanding the stool top smooth. Clean off dirt and dust. If needed, use a wood conditioner to prepare the wood for epoxy.
Step 2: Create Design Channels or Natural Voids
Find spots on the stool top for design channels or natural voids. Use a router or chisel to make them. Clean the area well to remove debris.
Step 3: Build a Dam and Seal Edges
Make a dam around the stool top to hold the epoxy. Make sure it’s level and attached well. Seal the dam’s edges and any gaps to keep the epoxy in.
Step 4: Mix and Pour Colored Epoxy Resin
Mix the epoxy resin as the instructions say, adding colour if you want. Pour it into the channels or voids. Use a stick or pouring medium for the look you want.
Step 5: Level the Surface During Cure
Let the epoxy cure, checking and adjusting the surface to stay level. This is key for a smooth finish.
Step 6: Sand, Polish, and Seal the Stool Top
After the epoxy cures, remove the dam and sand the top smooth. Polish it to highlight the wood and epoxy. Apply a sealant to protect it from damage.
By following these steps, you can make a stunning wood stool with epoxy. It’s a great way to be creative and learn about working with epoxy and wood.
Live Edge Epoxy Shelf
Making a live-edge epoxy shelf is a great beginner epoxy woodworking idea. It mixes natural beauty with modern skills. You get to work with unique wood and add epoxy resin to enhance it.
To begin, find the right live-edge wood slab. Look for local woodworking stores or online suppliers of live-edge lumber.
Finding and Selecting Live Edge Wood Slabs
When picking a slab, think about the wood type, size, and natural features you like. Look for slabs with interesting bark, unique grain patterns, or natural voids for epoxy.
| Wood Type | Characteristics | Ideal for Epoxy Projects |
|---|---|---|
| Walnut | Dark, rich color; distinctive grain | Yes |
| Maple | Light color; smooth grain | Yes |
| Oak | Strong grain; durable | Yes |

Step 1: Clean and Prepare the Live Edge Surface
Start by cleaning the slab to remove dirt and debris. Use a wire brush or sandpaper to smooth it out. Be careful not to harm the natural edges.
Step 2: Fill Natural Cracks and Bark Voids with Epoxy
Mix your epoxy resin as the instructions say. Pour it into the cracks and voids. Adding colour pigments can make the wood’s features stand out.
Step 3: Create a Smooth, Level Top Surface
After the epoxy cures, use a planer or sander to make the top flat. This is key for a level and a useful shelf.
Step 4: Install Brackets and Mount Your Shelf
Install brackets or corbels to hold the shelf. Mount it on the wall. Make sure the brackets can handle the shelf’s weight.
By following these steps, you can make a stunning live-edge epoxy shelf. It brings natural elegance to any room. This DIY epoxy wood project not only beautifies your space but also gives you a fulfilling woodworking experience.
Epoxy Resin Keychains and Bookmarks

You can make beautiful and useful items like keychains and bookmarks with epoxy resin. These projects are great for beginners who want to try resin crafting. Epoxy resin can be colored, shaped, and finished in many ways, making it perfect for making unique items.
Materials for Small Resin Accessories
To make epoxy resin keychains and bookmarks, you’ll need some basic things. These include:
- Epoxy resin (UltraClear Art & Craft Epoxy is recommended for its clarity and durability)
- Hardener (specifically designed for epoxy resin)
- Pigments or dyes (for colouring your resin)
- Silicone moulds (for shaping your keychains and bookmarks)
- Dried flowers, glitter, or photos (for decoration)
- Keychain hardware (rings, clips, etc.)
- Bookmark findings (tassels, charms, etc.)
- Mixing cups and stirrers
- Protective gear (gloves, goggles, etc.)
Step 1: Choose and Prepare Your Moulds
Picking the right mould is key to your project. For keychains, small shapes like hearts or stars work well. For bookmarks, long, thin moulds are best. Make sure your moulds are clean and dry before pouring resin. Lightly spray them with cooking spray if needed to make demolding easier.
Step 2: Add Dried Flowers, Glitter, or Photos
To make your keychains and bookmarks special, add dried flowers, glitter, or small photos. Put your decorations in the mould before pouring the resin. This lets you be creative and make your accessories unique.
Step 3: Pour Resin in Thin Layers
Mix your epoxy resin and hardener as the instructions say. Pouring the resin in thin layers is better for small projects. This method helps avoid bubbles and ensures a clear finish.
Step 4: Attach Hardware and Finishing Touches
After your resin is fully cured and demolded, attach the keychain hardware or bookmark findings. Use a drill or Dremel to make holes if needed. Sand any rough spots and apply a finish to protect your work.
Here’s a simple table to summarise the steps:
| Step | Description |
|---|---|
| 1 | Choose and prepare your molds |
| 2 | Add decorations like dried flowers or glitter |
| 3 | Pour resin in thin layers |
| 4 | Attach hardware and add finishing touches |
As Resin Crafting Magazine says, “Working with epoxy resin takes patience, but it’s worth it. With practice, you’ll make beautiful, professional-looking pieces soon.”
“The art of resin crafting is not just about creating something beautiful; it’s about experimenting and pushing the boundaries of what’s possible with this versatile material.”
— Resin Crafting Expert
Resin-Filled Wood Cutting Board
You can make your kitchen look elegant with a resin-filled wood cutting board. It’s a great project for beginners with epoxy resin. This piece is not only beautiful but also shows off your creativity.
Selecting Food-Safe Epoxy and Hardwood
When making a cutting board, use materials safe for food. Pick a non-toxic, durable epoxy resin. Choose hardwood like maple or walnut that can handle wear and tear.
Key Considerations for Food-Safe Epoxy:
- Non-toxic and compliant with FDA regulations
- Resistant to scratches and cracks
- Easy to clean and maintain
| Material | Characteristics | Food Safety |
|---|---|---|
| Maple Hardwood | Durable, resistant to wear | Yes, when properly finished |
| Walnut Hardwood | Hard, dense, and aesthetically pleasing | Yes, when properly finished |
| Food-Safe Epoxy Resin | Non-toxic, durable, and resistant to scratches | Yes, FDA compliant |
Step 1: Design Your Cutting Board Pattern
Begin by designing your cutting board pattern. Think about the size, shape, and wood arrangement. You can choose a simple or complex design, depending on your skill.
Step 2: Arrange Wood Pieces with Intentional Gaps
Cut your hardwood into pieces for your design. Make sure to leave gaps for the epoxy resin. The gaps should be even, and the wood should stay in place.
Step 3: Pour Food-Safe Epoxy Resin
Mix your epoxy resin as the instructions say and pour it into the gaps. Fill the gaps fully but don’t overdo it.
Step 4: Flatten, Sand, and Apply Mineral Oil Finish
After the epoxy cures, sand the board to flatten it. Use different grits of sandpaper for a smooth finish. Then, apply mineral oil to protect the wood and make it look better.
By following these steps, you can make a beautiful and useful resin-filled wood cutting board. It will add a special touch to your kitchen.
Epoxy Wood Phone Stand

With epoxy resin’s versatility, you can make a beautiful and useful phone stand. It’s great for beginners who want to try epoxy woodworking.
Designing a Functional and Attractive Phone Stand
When making your phone stand, think about looks and use. It should hold your phone right and look good. Choose wood and epoxy colours that match your space.
Woodworking expert says,
“The key to a successful epoxy wood project is in the preparation and attention to detail.”
Woodworking Expert
Step 1: Cut Wood Pieces to Phone Stand Dimensions
Begin by cutting wood to the right size for your stand. Use a sharp tool for clean edges.
- Measure and mark the wood carefully before cutting.
- Use a mitre saw or circular saw for precise cuts.
- Sand the cut edges to smooth them out.
Step 2: Create the Phone Slot and Angle
Next, make the slot for your phone. The angle is key to keeping your phone steady.
Tips for creating the perfect angle:
- Think about the height and angle for comfort.
- Use a protractor or angle guide for accuracy.
- Test the angle with your phone before finishing.
Step 3: Add Decorative Epoxy Accents or Inlays
Epoxy resin can make your phone stand look amazing. You can add decorative accents or inlays.
| Epoxy Color | Wood Type | Design Effect |
|---|---|---|
| Clear | Walnut | Modern, sleek look |
| Colored | Maple | Vibrant, eye-catching |
| Metallic | Oak | Luxurious, premium feel |
Step 4: Sand Smooth and Apply Protective Finish
Finish by sanding your stand smooth and applying a protective coat. This seals the wood and epoxy.
- Start with coarse-grit sandpaper and work up to fine.
- Use a food-safe finish if you’re worried about safety.
- Let the finish dry fully before using your stand.
By following these steps, you can make a useful and pretty epoxy wood phone stand. It shows off your creativity and DIY skills.
Epoxy Resin Wood Clock
You can make your home more personal with a beautiful epoxy resin wood clock. This project mixes wood’s natural beauty with epoxy resin’s versatility. It creates a unique piece of art that’s also functional.
Materials Needed for Your Resin Wood Clock
To begin, gather a few key items. You’ll need a wooden panel or slab, UltraClear Art & Craft Epoxy, colourants (if you want), a clock mechanism kit, and basic woodworking tools. Make sure your workspace is well-ventilated and covered with a drop cloth or old sheets.
Required Materials:
- Wooden panel or slab
- UltraClear Art & Craft Epoxy
- Colourants (optional)
- Clock mechanism kit
- Woodworking tools (saw, drill, sandpaper)
- Protective gear (gloves, safety glasses)
Step 1: Select Wood Shape and Size for Clock Face
Pick a wooden slab that matches your clock’s size and shape. You can choose a pre-cut panel or cut one from a larger piece of wood. Sand the surface to make it smooth.
Step 2: Pour Epoxy Background or Design Elements
Follow the instructions to prepare your epoxy resin. If you want, add colourants for a unique look. Pour the epoxy mixture on the wood, spreading it evenly. You can make patterns or designs with different colors or swirling techniques.
Step 3: Drill Centre Hole for Clock Mechanism
After the epoxy cures, mark the centre of your clock face. Use a drill press or a hand drill with a precise bit to make a hole for the clock mechanism. Make sure the hole fits your clock kit perfectly.
Step 4: Install Clock Movement, Hands, and Battery
Install the movement, hands, and battery as the kit instructions say. This usually means putting the movement through the hole, attaching the hands, and following the manufacturer’s guidelines to secure it.
By following these steps, you can make a stunning epoxy resin wood clock. It’s a great way to express your creativity and enjoy making something unique and useful.
🔥 Ready to Build Like a Pro (Even as a Beginner)?

Stop wasting time on confusing plans and costly mistakes.
Start building professional-quality projects — the right way, the first time.
👉 With Teds Woodworking, you get everything you need to turn your ideas into reality.
✅ Why Thousands of Woodworkers Love It:
- ✔️ 16,000+ step-by-step woodworking plans — built & tested in real workshops
- ✔️ Beginner-friendly instructions — no guesswork, no confusion
- ✔️ Exact cutting & materials lists — avoid costly mistakes
- ✔️ Works with basic tools — no expensive setup required
- ✔️ Find any project in minutes — smart search & categories
- ✔️ Lifetime access + FREE monthly new plans
- ✔️ Bonus guides + videos to speed up your learning
🚀 Don’t Just Watch… Start Building Today!
👉 Click below and unlock 16,000+ woodworking plans instantly
👉 Create stunning epoxy resin projects (and much more) with confidence
🔥 [Get Instant Access to Ted’s Woodworking Now]
Conclusion
Now that you’ve explored easy epoxy resin wood projects, it’s time to get creative. You can create functional items, such as resin river serving boards and wood stools, featuring epoxy designs. Alternatively, you can create decorative pieces, such as ocean wave epoxy tables and live-edge epoxy shelves.
With your new skills, you can try different techniques and designs in diy resin crafts. Whether it’s making personalised gifts or unique home decor, woodworking with epoxy resin opens up a world of possibilities.
As you keep working on your epoxy resin projects, you’ll find joy in combining wood and resin. So, gather your materials, follow the steps in this guide, and start making your own stunning pieces.
FAQ
What are some easy epoxy resin wood projects for beginners looking to decorate their home?
For beginners, easy projects include making custom coasters, bookmarks, or a Wood Stool with Epoxy Design. These projects help you learn the basics of mixing and curing. They are less expensive and less stressful than bigger projects.
What is the best type of resin to use for woodworking with epoxy resin?
The right resin depends on your project. For thick layers, like a Resin River Serving Board, use EcoPoxy FlowCast. For coating surfaces, TotalBoat Table Top Epoxy is great. It gives a durable, glossy finish.
Are there specific safety precautions I should follow for diy epoxy wood projects?
Yes, safety is crucial. Always wear a respirator with organic vapour cartridges, like 3M’s, to avoid fumes. Use nitrile gloves and keep your area well-ventilated. Proper preparation is key.
How can I ensure success with epoxy resin jewellery making?
For jewellery making, be precise and patient. Use a digital scale for exact resin-to-hardener ratios. ArtResin is recommended for jewellery because it doesn’t yellow and has a low odour.
What wood species are recommended for beginner epoxy resin project ideas?
Beginners should use hardwoods like Black Walnut, Cherry, or Maple. These woods are dense and less likely to “bleed” air. Brands like Black Forest Wood Co. offer high-quality wood slabs.
Is it difficult to create an ocean-wave-epoxy table as a first-time project?
An ocean-wave-epoxy table may look complex, but it’s beginner-friendly. Use a heat gun to create a realistic “lacing” effect. A structured tutorial will help manage the layers needed for depth.
How do I make a resin-filled wood cutting board safe for food contact?
To make a cutting board safe, use FDA-compliant resin like Max Clear Grade. After curing, finish with food-grade mineral oil or Rubio Monocoat Oil Plus 2C to protect the wood and resin.
What are the most common mistakes to avoid in beginner epoxy woodworking ideas?
A common mistake is not sealing the wood before pouring. This can cause bubbles. Always use kiln-dried wood with a moisture content below 12% to prevent warping or delamination.
Do I need specialised tools for simple epoxy resin creations like keychains?
No, you don’t need special tools for simple projects. You’ll need silicone moulds, mixing cups, and stir sticks. For a professional finish, consider investing in a random orbital sander.
Where can I find more resin casting tutorials for newbies?
Many resources are available online. Websites like Instructables or woodworking channels offer beginner-friendly tutorials. They guide you from wood selection to polishing.


