Are you tired of living in a cluttered space? Small rooms and apartments can be tough to keep tidy. But, there’s a simple fix: DIY wooden shelves. Building your own floating shelves lets you create a storage system that’s just right for you.
Floating shelves not only add storage, but they also make your space look bigger and better. With just a few tools and some basic carpentry skills, you can make a beautiful storage solution for your small area.
Key Takeaways
- Create customised storage with DIY wooden shelves
- Maximise a small space with floating shelves
- Improve the aesthetic of your room with simple carpentry
- Increase storage capacity without cluttering the space
- Customise your shelves to fit your specific needs
The Space-Saving Magic of Floating Shelves
Floating shelves are a smart choice for small spaces. They help you store things without taking up floor space. This is great for tiny rooms and apartments where every inch matters.
Why Floating Shelves Work in Small Spaces
Floating shelves save floor space, making rooms look bigger. They keep your floors open, giving a sense of more space. Plus, making your own with a wooden shelf DIY tutorial lets you tailor them to your space.

Visual Benefits of Wall-Mounted Storage
Wall-mounted storage, like floating shelves, adds style to your rooms. They’re perfect for showing off decorative items, books, or kitchenware. Following a floating shelf installation guide ensures your shelves look good and work well, boosting your space’s look.
Planning Your DIY Floating Shelf Project

Before starting your DIY floating shelves, planning is key. You need to think about how they will look and work in your small space. This ensures your shelves are both useful and stylish.
Determining the Perfect Location
Choosing where to put your shelves is important. Think about the room’s layout and what you’ll use the shelves for. Pick a spot that’s easy to reach and looks good.
Also, consider the height. It can greatly affect the room’s look.
Deciding on Size and Configuration
The size and layout of your shelves depend on the space and what you’ll store. Measure the wall well and decide how many shelves you need. Choose a design that’s flexible and easy to change.
Weight Considerations for Wall Types
Each wall type can hold different weights. Knowing your wall type—drywall, plaster, or brick—is crucial. Pick the right hardware to support your shelves and what’s on them.
| Wall Type | Weight Limit | Recommended Hardware |
|---|---|---|
| Drywall | Moderate | Molly bolts or toggle bolts |
| Plaster | Low to Moderate | Plaster anchors |
| Brick | High | Masonry anchors |
With careful planning, your DIY floating shelves can be a beautiful and useful addition to your small space.
Essential Tools and Materials for Floating Wooden Shelves

Creating a DIY wooden shelf project needs the right tools and materials. Building floating wooden shelves for small rooms requires precision. You need the right equipment for a sturdy and visually appealing result.
Required Tools Checklist
You’ll start with basic tools. A circular saw cuts wood, a drill makes holes for screws, and a sander smooths wood surfaces. A level ensures shelves are perfectly horizontal. Clamps hold pieces together while the adhesive dries.
Wood Selection Guide for Small Space Shelving
Choosing the right wood for your DIY wood shelf is key. Lighter woods like pine or spruce make small spaces look bigger. For a luxurious look, consider hardwoods like oak or maple. The wood’s thickness affects the shelf’s look and strength.
Hardware and Mounting Supplies
For floating wooden shelves, the right hardware and mounting supplies are crucial. You’ll need wall anchors or French cleats for support. Make sure the hardware fits your wall type for a sturdy mount.
By choosing your tools and materials wisely, you’ll make beautiful and functional floating wooden shelves. They will maximise small space storage effectively.
Preparing Your Materials for the Project
Before starting your DIY floating shelves, prepare your materials well. This step is key to a smooth project and beautiful shelves. You need to measure and cut your wood correctly, sand it, and get it ready for finishing.
Measuring and Cutting the Wood to Size
Getting your measurements right is crucial for DIY projects. Use a good tape measure and check your sizes before cutting. A sharp saw will give you clean cuts and save materials.
“Measure twice, cut once” is a helpful tip. It saves time and materials. For floating shelves, being precise is important for a professional look.
Sanding and Prepping Surfaces for Finishing
After cutting your wood, sand and prep the surfaces. Sanding smooths out rough edges and makes the surface ready for finishing. Start with coarse-grit sandpaper and move to finer grits for the best finish.
After sanding, clean the surfaces to remove dust or debris. This step helps your finish stick well, making your shelves look great. By doing these steps, you’ll make beautiful and useful shelves for small spaces.
Bob Vila said, “The right preparation can make all the difference in the success of your DIY project.” Preparing your materials well is essential for professional-looking DIY floating shelves.
How to Build Floating DIY Wooden Shelves for Small Spaces

Now that you’ve got your materials ready, it’s time to build your floating DIY wooden shelves. Making shelves for small spaces needs careful planning. This ensures they are both useful and look good.
Creating the Shelf Structure
To begin, you’ll need to make the shelf’s base. Cut your wood to the right size and put the pieces together. Use a table saw or circular saw for clean cuts. Make sure your measurements are right to avoid problems later.
- Cut the wood to your planned size.
- Put the shelf together with wood glue and finishing nails for strength.
- Sand the edges to make them smooth.
Building the Hidden Mounting System
A hidden mounting system is key to the floating look. You’ll attach a bracket or cleat to the wall and then the shelf to it. The bracket must hold the shelf and its stuff.
To make the hidden mounting system:
- Measure and mark the wall for the bracket.
- Use a level to make sure the bracket is straight.
- Fix the bracket to the wall studs with screws.
Assembling the Components Securely
With your shelf and mounting system done, it’s time to put them together. Attach the shelf to the bracket tightly. Use the right hardware for your wall type (drywall, concrete, etc.).
To keep it stable:
- Make sure all screws and bolts are tight.
- Check if the shelf moves or wobbles.
- Adjust as needed for a stable, level shelf.
By following these steps, you can make beautiful, useful floating DIY wooden shelves for your small space. They will improve both storage and style.
Wall Preparation and Finding Studs

Before you start mounting your DIY floating shelves, it’s crucial to prepare your wall properly. This step ensures that your shelves are not only visually appealing but also securely attached to the wall, preventing any potential accidents.
Locating Wall Studs Properly
Locating wall studs is a critical step in mounting your floating shelves. You can use a stud finder to identify the studs behind your wall. It’s recommended to use a high-quality stud finder for accurate results. Once you’ve located the studs, mark their positions with a pencil. This will guide you in placing the mounting brackets for your shelves.
- Use a stud finder to locate the wall studs.
- Mark the stud positions with a pencil.
- Ensure the marks are clear and visible.
For added stability, it’s best to mount your shelves to the studs. If you’re dealing with a heavy shelf or a wall with metal studs, consider using specialised fasteners designed for your wall type.
Alternative Mounting Options for Different Wall Types
Not all walls are made of traditional drywall or wood studs. For concrete or brick walls, you’ll need to use masonry anchors or screws designed for these materials. If you’re dealing with plaster walls, use plaster anchors to avoid damaging the wall surface. It’s essential to choose the right mounting hardware for your wall type to ensure the stability of your shelves.
Preparing the Wall Surface
Before mounting, make sure the wall surface is clean and dry. Remove any dirt, grime, or old adhesive that could interfere with the mounting process. If you’re mounting shelves on a painted wall, consider the type of paint used and whether it might affect the adhesion of your mounting hardware. Cleaning the wall surface will help ensure a secure and durable mount for your floating shelves.
By following these steps, you’ll be able to mount your DIY floating shelves securely, ensuring they remain a beautiful and functional part of your home decor.
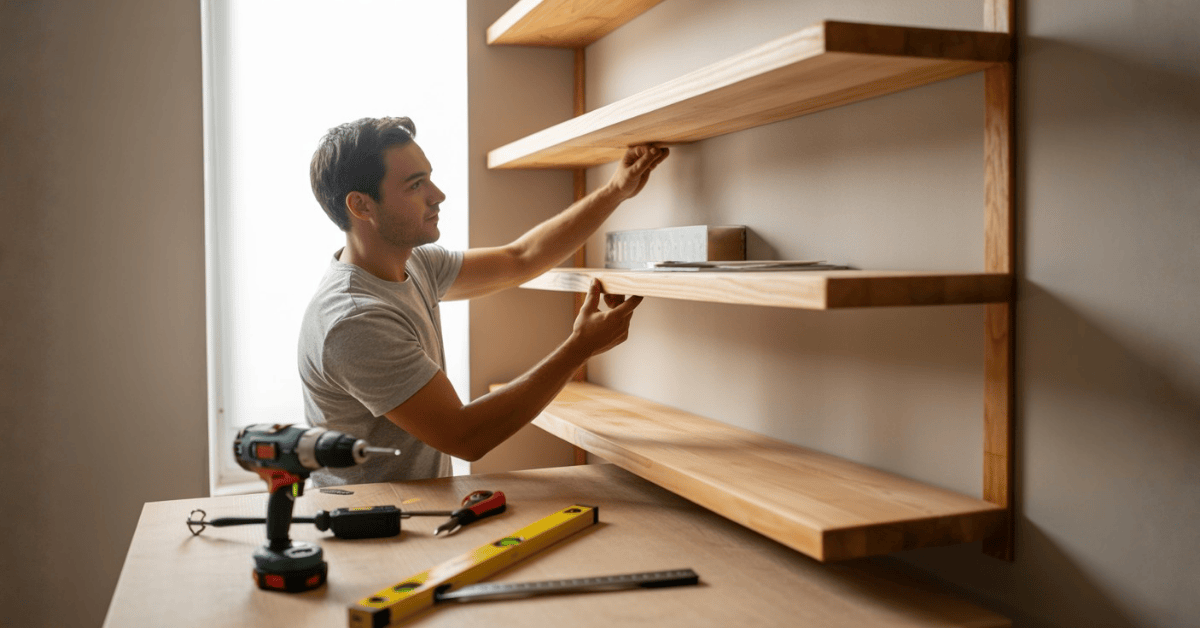
Step-by-Step Installation Process
Now that you’ve got your materials ready, it’s time to start installing your DIY floating wooden shelves. This step is key to making sure your shelves look great and are safe.
Mounting the Bracket System Securely
Start by attaching the bracket system to the wall. Find the wall studs and mark where the brackets will go. Use a level to make sure the brackets are straight, then drill pilot holes before screwing them in. If you have drywall, use anchors for extra support.
Tip: Choose brackets that can hold the weight of your shelves and what you’ll store on them. This is important for keeping your DIY wood shelf stable and lasting longer in a small room.
Attaching the Shelf to the Wall
Now, attach the shelf to the wall. Lift the shelf and line it up with the brackets. You might need to slide it on or use hidden mounting hardware. Make sure the shelf is level and well attached.
Testing for Stability and Making Adjustments
After attaching the shelf, test its stability by gently pushing on it. It should not wobble or move. If it does, adjust the brackets or the shelf’s position. This is important for keeping your small space shelving ideas both stylish and safe.
After these steps, you’ll have installed your DIY floating wooden shelves. They will add both storage and style to your small room.
Finishing Touches for Your Wooden Shelves
Now that your DIY wooden shelves are built, it’s time to add the final touches. The finish you choose will greatly affect their look and durability.
Staining Options for Different Wood Types
Staining your shelves can really bring out their natural beauty. Different woods take stain differently, so test it first. For example, oak and pine woods soak up stain more than maple or cherry.
Choose a stain that matches your decor and follow the instructions carefully.
| Wood Type | Stain Absorption | Recommended Stain |
|---|---|---|
| Oak | Uneven | Water-based |
| Pine | Uneven | Oil-based |
| Maple | Even | Water-based |
| Cherry | Even | Oil-based |
Painting Techniques for Custom Colors
If you want to paint your shelves, start with a good primer. This makes the surface smooth for painting. Pick a color and finish that fits your small space well.
For a lasting finish, apply thin coats. Let each coat dry before adding the next.
Sealing and Protecting Your Shelves
Sealing your shelves is key, whether stained or painted. Use a clear coat of polyurethane or varnish. This protects them and makes cleaning easier.
By adding these finishing touches, your DIY wooden shelves will look great and last longer. They’ll be a valuable part of your small space for years.
Styling and Maximising Your New Floating Shelves
Now that your DIY floating wooden shelves are up, it’s time to decorate them. They’re a great chance to add some flair to your small room while keeping it tidy.
Weight Distribution Guidelines for Safety
When decorating your shelves, remember to balance the weight. Distribute the weight evenly to keep them stable. Don’t overload them with too much weight, as it can make them unsafe.
Decorative Arrangements for Visual Appeal
To make your shelves look good, think about your personal style. Mix different textures, colors, and shapes for an interesting display. Group similar items together for a cohesive look, or mix them up for variety.
Functional Organisation in Limited Space
In small spaces, keeping things organised is crucial. Use your shelves for items you use often, like books or kitchen tools. Use baskets or bins for smaller items to keep them hidden.
By following these tips, you can make your shelves both beautiful and useful. With a bit of creativity, your DIY shelves will be a stylish and practical part of your home.
🪚 Key Benefits of Ted’s Woodworking

- 🧰 16,000+ Ready-to-Build Plans — clear blueprints, cut lists, and step-by-step guides.
- 🪵 Perfect for Beginners & Pros — easy instructions, no guesswork.
- 💡 Save Time & Money — accurate measurements, no wasted wood.
- 🖥️ Instant Digital Access — lifetime use, no monthly fees.
- 🎁 Free Bonuses: CAD viewer, 150 videos, & business startup guide.
- 💰 One-Time Fee: $67 — plus a 60-day money-back guarantee.
Turn your small-space ideas into stunning wood projects!
Get 16,000+ step-by-step woodworking plans from Ted’s Woodworking and start building like a pro — no experience needed.
👉 Download Ted’s Woodworking Plans Now — lifetime access for just $67 (one-time only)!
Conclusion: Transform Your Small Space with Custom Floating Shelves
Building custom floating DIY wooden shelves is a simple yet effective way to transform your small space into a functional and stylish area. By following the steps outlined in this article, you can create a beautiful storage solution. This solution not only maximises your space but also adds a touch of personality to your room.
When you build your own DIY wooden shelves, you have the freedom to choose the perfect size, material, and design to fit your needs. This level of customisation allows you to create a storage solution that is tailored to your specific requirements. It makes the most of your available space.
To get started on your project, revisit the steps outlined in this article on how to build floating DIY wooden shelves for small spaces. With a little creativity and some basic DIY skills, you can create a stunning and functional storage solution. This solution enhances the beauty of your small space.
FAQ
What type of wood is best for building floating shelves in small spaces?
The best wood for floating shelves depends on your style and budget. Solid oak, pine, and maple are popular. They are durable and look good.
How do I determine the weight capacity of my floating shelves?
To find out how much weight your shelves can hold, think about the wall type, shelf size, and hardware. It’s wise to check with a pro or follow the manufacturer’s advice.
Can I install floating shelves on plaster walls or drywall?
Yes, you can put shelves on plaster or drywall walls. But use the right hardware and follow the right steps for safety and stability. Wall anchors or a pro’s help might be needed.
What are some common mistakes to avoid when building and installing floating shelves?
Avoid mistakes like bad wall prep, wrong measurements, and not enough hardware. Plan well, measure right, and follow the installation guide for success.
How can I style my new floating shelves to maximise storage and visual appeal?
Mix decorative items with useful storage. Use baskets or bins. Arrange items by type or theme. Leave space for a clean look.
Can I use floating shelves in a bathroom or kitchen, and what considerations should I keep in mind?
Yes, you can use shelves in bathrooms or kitchens. But think about the moisture and humidity. Choose water-resistant materials and ensure good air flow to avoid damage.
How do I maintain and clean my floating shelves to ensure their longevity?
Keep shelves clean by dusting often. Avoid harsh cleaners and dry them well after cleaning. A protective finish or wax can help it last longer and make cleaning easier.
What are some DIY floating shelf ideas for small spaces?
For small spaces, try using reclaimed wood, making a ladder shelf, or adding hidden storage. Experiment with shapes, sizes, and designs for a unique storage solution.

