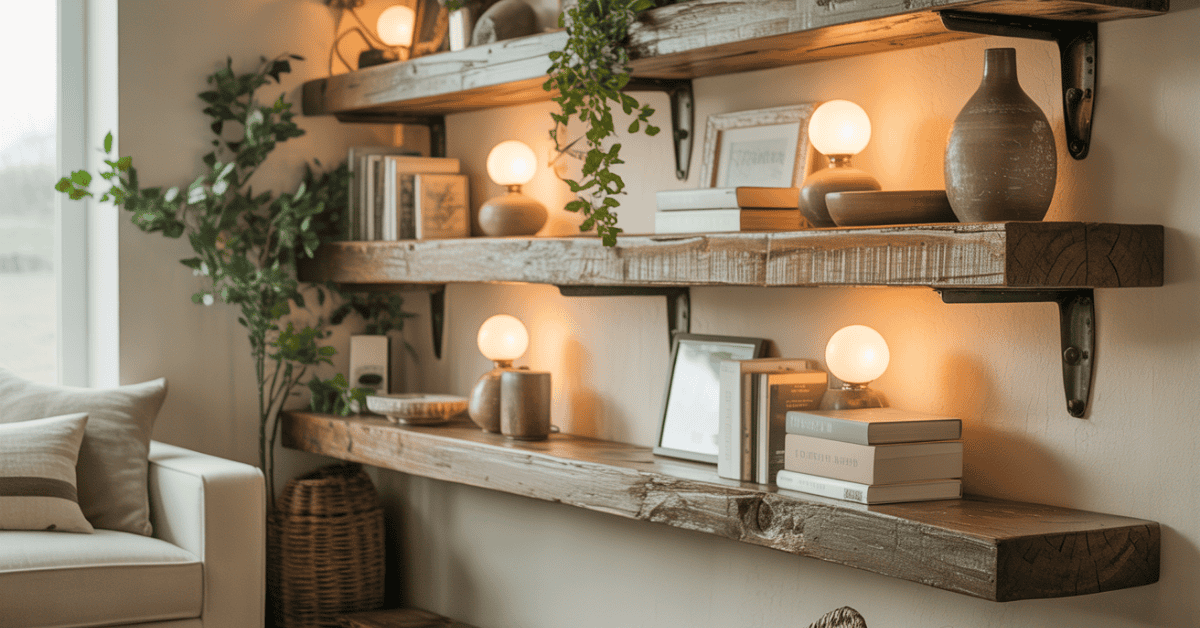
Want to add a modern touch to your home? Making DIY wooden shelves with hidden brackets is a smart choice. This guide will show you how to build elegant, solid wood shelves that seem to hang in mid-air.
With solid wood and hidden brackets, you can make a beautiful display area. It will bring warmth and elegance to any room. We’ll cover every step, from getting your materials ready to putting up the shelves.
Key Takeaways
- Learn how to create a contemporary wooden shelf design using solid wood and hidden brackets.
- Understand the benefits of using hidden brackets for a clean and modern look.
- Discover how to choose the right materials for your DIY project.
- Get step-by-step instructions for building and installing your shelves.
- Explore tips for customising your shelves to fit your home decor.
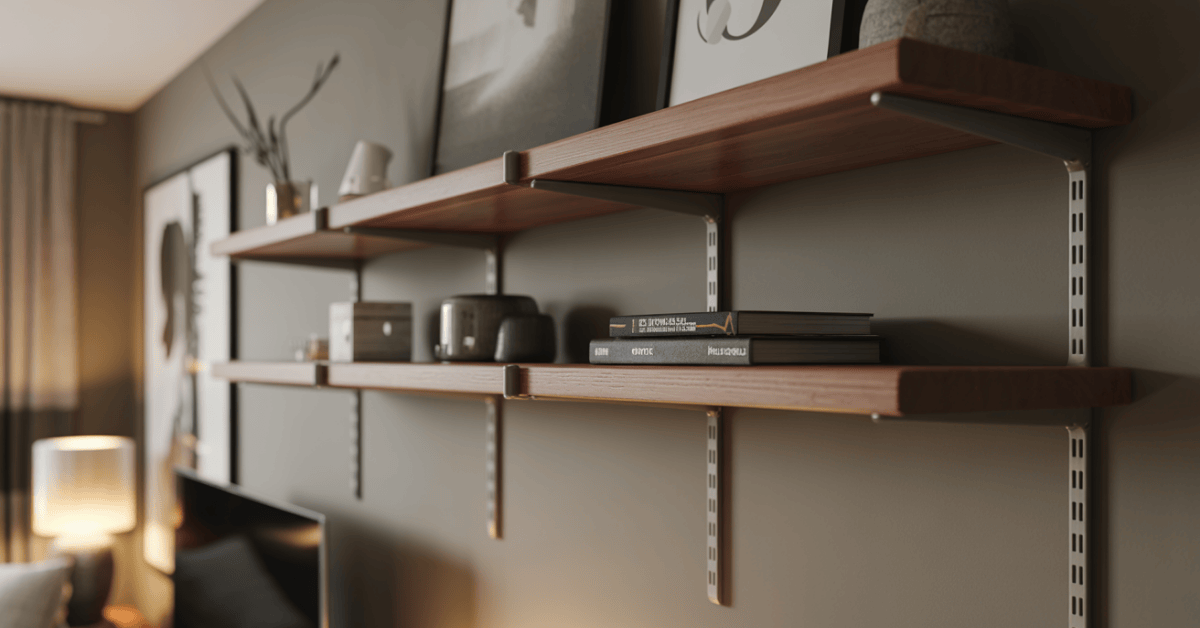
The Appeal of Modern Wooden Shelves with Hidden Brackets
Adding modern DIY wooden shelves to your home can really boost its look. These shelves, with hidden brackets, have a clean, minimalist style. This style is very popular in today’s home decor.
Aesthetic Benefits of Clean-Looking Shelves
Clean wooden shelves look sleek and tidy. They’re perfect for small spaces. The hidden brackets make the shelves seem to float, enhancing your home’s modern feel.
Using solid wood for these shelves adds warmth and cosiness. You can pick from many wood types to fit your decor. This ensures they blend in perfectly.
Why Hidden Brackets Make a Difference
Hidden brackets on wooden shelves are more than a design choice. They offer practical benefits, too. They keep the focus on the shelf, not the brackets.
Installing hidden brackets can be tricky. But the result is a shelf that looks sleek, modern, and simple.
| Benefits | Description |
|---|---|
| Aesthetic Appeal | Enhances the modern look of your home with clean lines and minimal visual clutter. |
| Versatility | Can be used in various rooms and decor styles, from modern to traditional. |
| Functionality | Provides additional storage without compromising the aesthetic appeal. |
Planning Your DIY Wooden Shelves Project
For a successful DIY shelving project, planning and precise measurements are key. To make contemporary wooden shelf designs that fit well, think about a few things first.
Determining Shelf Size and Location
First, decide where you want your shelves and how much space you have. Make sure the minimalist wooden shelf brackets will fit in your chosen spot.

Measuring Your Space Correctly
Getting your measurements right is important. Measure the width, height, and depth of where you’ll put your DIY shelves with hidden brackets. Use a tape measure and write down your measurements carefully to avoid mistakes.
Sketching Your Shelf Design
After getting your measurements, draw a basic design for your shelves. Think about the style, material, and size. Your sketch doesn’t need to be perfect, but it should show what you’re aiming for. Here are some important things to include in your sketch:
- The dimensions of your shelves
- The type of wood you’ll use
- The design of the hidden brackets
Essential Materials for DIY Wooden Shelves with Hidden Brackets
Choosing the right materials is key to making modern hidden bracket shelves. The success of your DIY project depends on picking the right parts. These parts should match your style and make sure your shelves are strong.
Selecting the Right Wood Type
The type of wood you pick is very important for sleek wooden shelves. You have to choose between hardwoods and softwoods, each with its own traits.
Hardwoods vs. Softwoods
Hardwoods like oak and maple are denser and pricier but last longer and look luxurious. Softwoods, like pine, are cheaper and still look great. Your choice depends on your budget and the look you want for your shelves.
Pre-Cut vs. Custom Cut Options
You can choose pre-cut wood or have it custom-cut. Pre-cut saves time, but custom cuts fit perfectly in your space.
Types of Hidden Bracket Systems
The hidden bracket system makes your shelves look modern and floating. You can choose from different types, like floating shelf hardware and concealed mounting plates.
Floating Shelf Hardware
Floating shelf hardware supports your shelves without visible brackets. It’s great for a minimalist look.
Concealed Mounting Plates
Concealed mounting plates hide brackets. They’re attached to the wall and shelf, offering strong support.
Additional Hardware and Supplies
You’ll also need other parts to finish your project. This includes screws, wall anchors, sandpaper, and stain or paint.
By picking each part carefully, you can make shelves that are both useful and look good. They’ll show off the beauty of modern hidden bracket shelves perfectly.
Tools You’ll Need for This Project

Having the right tools is key to a successful wooden shelves project. You’ll want to get the tools needed for a modern clean look. These include power tools, hand tools, and safety gear.
Essential Power Tools
Power tools are important for precise cuts and holes. You’ll need:
- A circular saw for straight cuts.
- A drill for pilot holes and screws.
- A pocket hole jig for strong joints.
These tools will make your shelves look professional.
Hand Tools for Precision Work
Hand tools are also crucial for fine details. You’ll need:
- A level for horizontal shelves.
- A measuring tape for exact measurements.
- A stud finder for wall stud locations.
These tools ensure your shelves are precise and accurate.
Safety Equipment
Safety is always first when using power tools. You’ll need:
- Safety glasses to protect your eyes.
- Gloves for hand protection.
Preparing Your Wood for Modern Shelving
Before you start building your wooden shelves, it’s key to prepare the wood properly. This step makes sure your shelves look good, last long, and work well.
Cutting the Wood to Size
Getting the wood cut right is important for shelves that look clean. You can use a circular saw or a table saw for this.
Using a Circular Saw vs. Table Saw
A circular saw is easy to move around and good for big cuts. A table saw is better for precise cuts and repeated tasks.
Creating Perfect 90-Degree Cuts
For a pro finish, you need to cut at 90 degrees. Use a mitre saw or make sure your circular saw cuts square.
Sanding Techniques for a Smooth Finish
Sanding is key to getting your wood ready for shelves. Start with rough sandpaper and move to finer ones for a smooth finish. Pay extra attention to the edges for a clean look.
Edge Treatment Options
You can treat the edges of your shelves in different ways to make them look better. Choose between rounded or sharp edges based on what you like.
Rounded Edges vs. Sharp Edges
Rounded edges are softer and safer. Sharp edges make your shelves look modern and sleek.
Using a Router for Custom Edges
A router can make your shelves stand out with custom edges. Pick from many router bits to get the look you want.
| Edge Treatment | Description | Best For |
|---|---|---|
| Rounded Edges | Gives a softer look, safer | Family homes, kid-friendly spaces |
| Sharp Edges | Modern, sleek appearance | Modern decor, minimalist designs |
| Custom Edges | Unique profiles using a router | Custom designs, high-end interiors |
Understanding Hidden Bracket Installation

To make a modern shelving unit, you need to know how to install hidden brackets. Hidden brackets for wooden shelves give a clean, minimalist look. They are great for modern homes. You must understand the different mounting systems, their weight limits, and the best places to put them for stability.
Types of Hidden Mounting Systems
There are many hidden mounting systems, each with its own features and setup needs. You can pick from systems with concealed brackets or those with recessed mounting plates. Knowing these options helps you choose the right one for your modern hidden bracket shelves.
Weight Considerations and Limitations
When installing hidden brackets, think about the weight they can handle. Make sure the brackets can support the shelf and its contents. Too much weight can make the shelf unstable and even fall.
Placement Strategy for Maximum Stability
To get sleek wooden shelf styling, plan where to put your hidden brackets carefully. Use a stud finder to find the wall studs. Securing the brackets to these studs makes your shelves stable. The right placement keeps your shelves steady and level.
Wall Preparation and Bracket Mounting
Before you start mounting your DIY wooden shelves, it’s crucial to prepare the wall properly. This step ensures that your shelves are securely attached and maintain their modern clean look.
Finding and Marking Wall Studs
Locating the wall studs is a critical step in securing your brackets. You can use a stud finder or alternative methods to identify where the studs are.
Using a Stud Finder Effectively
A stud finder is a handy tool that detects the density of the wall material, helping you locate the studs. Move the stud finder slowly across the wall until it indicates the presence of a stud.
Alternative Methods for Locating Studs
If you don’t have a stud finder, you can knock gently on the wall to find the studs. The sound will be more solid when you knock on a stud. You can also check your wall’s electrical outlets or switches, as they are usually attached to studs.
Drilling Pilot Holes Correctly
Once you’ve marked the stud locations, it’s time to drill pilot holes for your brackets. Use a drill bit that’s slightly smaller than the screw to avoid splitting the wall material.
Securing Brackets to Different Wall Types
The method for securing brackets varies depending on your wall type. Whether you’re dealing with drywall, masonry, or concrete, there are specific techniques to ensure a secure installation.
Drywall Installation Techniques
For drywall, use drywall anchors to provide additional support for your brackets. This is important if you’re not hitting a stud.
Masonry and Concrete Installation
For masonry or concrete walls, use masonry anchors or concrete screws. These are designed to grip the dense material and hold the weight of your shelves.
DIY Wooden Shelves Hidden Brackets Modern Clean Look: Installation Process
Now that you’ve prepared your wall and brackets, it’s time to focus on the installation process for your DIY wooden shelves with hidden brackets. This step is crucial in achieving a modern clean look that is both aesthetically pleasing and functional.
Preparing the Shelf for Bracket Attachment
Before attaching the hidden brackets to the wall, you need to prepare your shelf for the attachment. This involves making precise adjustments to ensure a seamless fit.
Drilling Precise Holes for Hardware
To attach the hidden hardware, you’ll need to drill precise holes in your shelf. Use a drill press or a hand drill with a steady hand to create holes that are exactly the right size for your hardware.
Creating Recesses for Flush Mounting
For a truly flush mount, you may need to create recesses in your shelf for the hidden brackets. This step requires careful measurement and chiselling to ensure the brackets sit perfectly flush with the shelf surface.
Attaching Hidden Hardware to Your Shelves
With your shelf prepared, the next step is to attach the hidden hardware. This process involves securely fastening the brackets to the shelf, ensuring they are evenly spaced and aligned properly.
Mounting Techniques for a Seamless Look
The final step in the installation process is mounting your shelf to the wall using the hidden brackets. Ensure that the brackets are securely attached to the wall studs for maximum stability. By following these mounting techniques, you’ll achieve a seamless look that makes your shelf appear as if it’s floating.
Finishing Your Wooden Shelves
After building your modern DIY wooden shelves, it’s time to add a finish. This step makes them look better and last longer. The right finish can make your shelves a stunning part of your home.
Staining Options for Different Wood Types
The type of wood you use affects how it takes stain. Choose a stain that matches your wood’s look. Hardwoods like oak or maple look great with stains that highlight their grain. Softwoods like pine might need a stain with more color.
Applying Sealants and Protectants
After staining, apply a sealant or protectant to keep your shelves in top shape. Options like polyurethane or varnish protect against spills and scratches. They also make the wood color and grain pop. Always follow the instructions for the best results.
Creating Custom Finishes for a Modern Look
For a unique look, try custom finishes. You can mix stains or distress the wood for a vintage vibe. Modern finishes like matte or glossy can also give your shelves a contemporary feel.
Matte vs. Glossy Finishes
Choosing between matte and glossy finishes depends on your style and the room’s look. Matte finishes are subtle, while glossy ones add elegance.
Two-Tone and Color Block Techniques
For a bold look, try two-tone or color block techniques. This means using different colors or stains on different parts of the shelves. It creates a striking contrast that adds depth to your room.
Maintenance and Care for Your Modern Wooden Shelves

To keep your DIY wooden shelves looking great, regular care is key. This means cleaning them often, checking them now and then, and sometimes refinishing them. This helps keep their modern look.
Regular Cleaning Practices
Cleaning your wooden shelves regularly is important. Use a soft, dry cloth to wipe them down. Stay away from harsh chemicals that can harm the finish.
If you have tough stains, a damp cloth with mild soap might work. Just make sure to dry the shelves well after.
Periodic Inspection of Brackets and Mounts
Check the hidden brackets and mounts often to make sure they’re secure. Look for any wear or damage. Tighten any loose screws to keep your shelves stable and safe.
Refinishing Tips for Long-Term Beauty
As time goes by, your wooden shelves might need a new look. Begin by sanding the surface to fix any flaws. Then, apply a fresh coat of stain or sealant.
This will bring back their original beauty and make them last longer.
Troubleshooting Common Issues
Building DIY wooden shelves with hidden brackets can sometimes lead to common problems. These issues can be fixed with the right steps. It’s important to make sure your shelves are level and well-attached to the wall.
Fixing Uneven Shelves
If your shelf isn’t level, first check if the wall is straight. Use shims to adjust the bracket’s position. Always check the shelf’s level after attaching it to the wall.
Addressing Loose Brackets
Loose brackets can make your shelf unstable. Make sure the brackets are tightly attached to both the shelf and the wall. Tightening any loose screws or bolts should fix the problem.
Repairing Surface Imperfections
Scratches or dents on the surface can be fixed with wood filler or sanding. For bigger damage, you might need to replace the damaged board.
| Issue | Solution |
|---|---|
| Uneven Shelves | Check wall plumbness, use shims to adjust bracket position |
| Loose Brackets | Tighten loose screws or bolts |
| Surface Imperfections | Use wood filler or sanding, replace damaged boards if necessary |
⭐ Ready to Build Stunning Wooden Shelves—Fast, Easy & Mistake-Free?
Unlock 16,000+ step-by-step woodworking plans and build ANY project with confidence—even if you’re a beginner.
Why DIYers Love Ted’s Woodworking:
- ✅ 16,000 “Done-For-You” Plans (A to Z instructions)
- ✅ Exact Cutting & Materials Lists — no guesswork, no waste
- ✅ Detailed Schematics + 3D Views
- ✅ Perfect for Beginners and Pros
- ✅ Free Monthly New Plans for Life
- ✅ +150 Premium Video Tutorials Included
- ✅ One-time price → Lifetime Access
✨ If you enjoyed building hidden-bracket shelves, wait until you see what you can build next…
👉 Get Instant Access to Ted’s 16,000 Woodworking Plans (Limited Offer – $67 Only!)
Start Your Next DIY Project Now →
Conclusion
Building DIY floating shelves from solid wood is a mix of beauty, usefulness, and skill. You’ve learned how to make and put up wooden shelves that look sleek and modern. These shelves have hidden brackets, making them perfect for any room.
Using hidden brackets in your DIY shelves gives them a modern, clean look. This design not only makes them look good but also makes them strong and reliable. Think about the size, material, and where you’ll put your shelves to match your space.
With the right tools and materials, you can make a beautiful and useful piece of furniture that shows off your style. As you start your DIY project, be sure to measure well, cut accurately, and build patiently. Your hard work will pay off with a beautiful wooden shelf that adds elegance to your home.
Learning to make DIY wooden shelves with hidden brackets lets you create shelves that are both modern and classy.
FAQ
What type of wood is best for DIY wooden shelves with hidden brackets?
The best wood for your shelves depends on what you like and how durable you need it. Solid oak, maple, and cherry are good choices. They look clean and modern.
How do I determine the right size for my wooden shelves?
First, measure the space for your shelves. Think about the width, depth, and height. Also, consider what you’ll store to make sure the shelves fit right.
What are the benefits of using hidden brackets for my shelves?
Hidden brackets make your shelves look sleek and modern. They hide the support system, giving a clean look. They also offer design flexibility and can be more durable than old bracket systems.
How do I install hidden brackets securely?
Follow the manufacturer’s instructions for installing hidden brackets. Make sure the wall is ready by finding studs. Use the right drilling techniques for pilot holes.
Can I use hidden brackets on different types of walls?
Yes, but you might need different methods for securing. For drywall, find studs. Concrete or brick walls might need special anchors. Always check the weight limit and the wall type.
How do I maintain my modern wooden shelves?
Clean them regularly with a soft cloth. Check the brackets now and then. Refinish them when needed. Avoid harsh chemicals that can harm the finish or wood.
What if my shelves are uneven after installation?
If shelves are uneven, check the brackets. They might need adjusting or the shelf itself. Make sure the wall and brackets are level during installation.
Can I customise the finish of my wooden shelves?
Yes, you can change the finish. Stain, apply sealants, or use custom finishes. Choose based on the wood and look you want. Always test on a small area first.
What are some common issues with DIY wooden shelves with hidden brackets?
Issues include uneven shelves, loose brackets, and surface problems. Check the installation, tighten hardware, and refinish as needed to fix these.
Are hidden bracket shelves suitable for heavy loads?
Yes, for heavy loads, choose the right hidden bracket system. Follow the manufacturer’s weight limit. Proper installation is key.

