You’ve probably seen them around – personalized wooden signs that make any place feel warmer and more welcoming.
Making your own homemade wood signs is a fun DIY project. It lets you add a personal touch to your home.
With tutorials and guides, you can learn to make DIY wooden signs and displays that show off your style.
Key Takeaways
- Create personalized home decor with DIY wooden signs
- Learn various techniques for making wooden signs
- Add a personal touch to your home with homemade wood signs
- Use Cricut machines and various materials for crafting
- Follow tutorials and guides for a fun and rewarding DIY project
The Rising Popularity of DIY Wooden Signs and Displays
In recent years, DIY wooden signs and displays have become very popular. This is because they are versatile and look great. Homeowners love the charm and character that wooden signs add to their homes.
Why Wooden Signs Have Become a Home Decor Staple
Wooden signs are now a key part of home decor. They offer a rustic charm and can be customized to fit your style. They make any room feel warm and cosy, perfect for creating a welcoming space.
Benefits of Creating Your Own Personalized Wood Decor
Making your own DIY wooden signs lets you add a unique touch to your home. It’s a fun and rewarding project. You can personalize your decor to make your space truly special.
Popular Wooden Sign Styles and Trends
Popular styles include rustic, farmhouse, and modern minimalist designs. The table below shows current trends in wooden sign decor:
| Style | Description | Popular Use |
|---|---|---|
| Rustic | Distressed wood, vintage feel | Living rooms, cabins |
| Farmhouse | Simple, country-inspired | Kitchens, entryways |
| Modern Minimalist | Clean lines, simple designs | Bedrooms, modern homes |
Essential Tools and Materials for Wooden Sign Making
To start making wooden signs, you need the right tools and materials. This includes the essential tools, types of wood, and extra materials. These will help you create beautiful, personalized DIY wooden signs and displays.
Must-Have Tools for Beginners
Beginners should start with basic tools that are easy to use and affordable. Some must-have tools include:
- A Cricut machine or a craft cutter for precise cuts
- Sandpaper for smoothing out the wood surface
- Paint and brushes for adding color and design
- A hammer and nails for assembling the sign

Types of Wood Best Suited for Signs
The type of wood you choose affects the look of your handmade wooden signs. Popular options include:
- Reclaimed wood for a rustic, vintage look
- Pine or cedar for a natural, rustic appearance
- Birch or plywood for a smooth, even surface
Additional Supplies You’ll Need
You’ll also need extra supplies to finish your project. These may include:
- Stencils or transfer paper for creating designs
- Sealant or varnish to protect the wood
- Decorative items like ribbons or embellishments
Budget-Friendly Alternatives for Getting Started
Starting a new hobby can be pricey, but there are ways to begin without spending a lot. Consider:
- Using reclaimed or recycled wood
- Shopping for second-hand tools or materials
- Opting for more affordable alternatives to expensive tools
Preparing Your Wood Canvas: Cutting, Sanding, and Conditioning

Getting your wood ready is key to making custom wood decor that looks great. You’ll need to measure and cut your wood, sand it smooth, and condition it for your design.
Measuring and Cutting Techniques
First, accurate measurements are essential. Use a sharp pencil and a straightedge to mark your cut lines. Choose the right saw for your wood type. A circular saw is best for straight cuts, and a jigsaw for curved ones.
Always cut on a stable surface and keep your hands away from the blade.
Proper Sanding Methods for a Smooth Finish
Sanding is crucial for a smooth finish. Start with coarse-grit sandpaper (about 80-100 grit) to remove rough spots or splinters. Then, move to finer grits (120-220 grit) for a silky surface. Always sand with the wood grain to avoid scratches.
Wood Conditioning and Prepping for Design
Before applying your design, make sure the wood is conditioned right. You might need to apply a wood conditioner to prevent uneven stain absorption. Follow the manufacturer’s drying instructions. Then, wipe the surface with a tack cloth to remove dust or debris.
Safety Tips When Working with Wood
When working with wood, safety is your top priority. Wear protective gear like safety glasses and a dust mask. Keep your workspace well-ventilated and clutter-free. Use proper lifting techniques to avoid injury, and keep children and pets away from your work area.
Design Planning and Transfer Methods

Creating a wooden sign starts with careful design planning and precise transfer methods. It’s the first step to making a personalized gift or a decorative piece for your home. The design sets the foundation for your project.
Creating and Sizing Your Design
First, choose the design or message for your wooden sign. Think about its purpose, the recipient, and the style that matches your home. Use design software like Adobe Illustrator or Canva to play with fonts, sizes, and layouts.
When sizing your design, remember the size of your wooden canvas. This ensures your design fits perfectly.
Transfer Techniques: Stencils, Carbon Paper, and Projectors
After finalizing your design, you need to transfer it onto the wood. There are a few ways to do this:
- Stencils: Great for precise designs and text. You can make your own stencils or buy them.
- Carbon Paper: A simple way to transfer detailed designs. Place carbon paper between your design and the wood, tracing it to transfer.
- Projectors: Good for intricate designs. Project your image onto the wood and trace it. This method needs a steady hand and a dark room.
Typography Tips for Beautiful Text Layout
Typography is key to your wooden sign’s look. Pick fonts that are easy to read and match your message. Mixing fonts or using decorative ones for headings adds a personal touch.
Focus on spacing and alignment to make your text balanced and attractive.
“Typography is the craft of endowing human language with a durable visual form.” – Robert Bringhurst
Free Resources for Design Inspiration
Stuck for a design? There are many free resources online. Pinterest and design blogs are full of ideas. You can also find free design templates on crafting websites or in software like Canva.
Don’t hesitate to mix different elements to create a unique design. It should reflect your style or match your home decor.
Painting and Staining Techniques for Wooden Signs

To make your wood decor pop, you need to learn how to paint and stain. Whether you’re making rustic DIY signs or handmade wooden signs, the right methods can make a big difference.
Choosing the Right Paints and Stains
Choosing the right paints and stains is key to getting the look you want. For a rustic vibe, try chalk paint or matte finish acrylics. For a natural look, oil-based stains are great because they bring out the wood grain and last long.
- Chalk paint for a rustic, matte finish
- Acrylic paints for vibrant colors
- Oil-based stains for a natural look

Brush Techniques for Different Effects
How you apply paint or stain can change the look of your sign. Try different brush techniques to get unique effects:
- Flat brushes for broad, even coverage
- Round brushes for detail work and fine lines
- Fanned brushes for creating textured, distressed looks
Creating Distressed and Vintage Looks
To get a distressed or vintage look, try these methods:
- Sand edges and corners to wear them down
- Use a dry brush to apply paint in a stippled effect
- Apply a wash or glaze over a base coat for added depth
Color Combinations That Work Well Together
Choosing the right colors is important for your wooden sign. Here are some popular color combinations:
| Color Combination | Description |
|---|---|
| White and Wood Tone | Classic and clean, perfect for farmhouse-style signs |
| Black and Gold | Elegant and sophisticated, ideal for quotes or monograms |
| Distressed Pastels | Soft and charming, great for vintage or shabby chic designs |
By mastering these painting and staining techniques, you can create amazing handmade wooden signs. Try out different methods and color combinations to find what works best for your DIY wooden sign projects.
Advanced Decoration Methods for Unique DIY Wooden Signs and Displays

To make your DIY wooden signs and displays stand out, try advanced decoration methods. These techniques will boost their beauty and make them special and personal.
Wood Burning (Pyrography) Basics
Wood burning, or pyrography, lets you add detailed designs to your wooden signs. You’ll need a pyrography pen and some practice wood. Start with simple designs and then try more complex ones as you get better.
Adding Dimensional Elements and Embellishments
Adding depth to your signs can make them look more interesting. Use materials like metal, fabric, or extra wood for embellishments. You can stick them on with glue, nails, or screws, based on what they are and how heavy they are.
Incorporating Mixed Media into Your Signs
Mixed media means using different materials and methods to make something unique. For wooden signs, you could use paint, stain, decoupage, or fabric. The goal is to mix these elements well so they work together and enhance your sign’s message or theme.
Creating Layered and 3D Effects
Layered and 3D effects can make your signs look deeper and more interesting. You can use multiple wood layers, cut-out designs, or mix materials. Try layering paint or stain to add depth.
Using these advanced decoration methods will help you create unique and striking DIY wooden signs and displays. They will show off your creativity and skill.
Step-by-Step Beginner-Friendly Projects
Starting with simple DIY wooden sign projects is a great way for beginners to build skills and confidence. Creating homemade wood signs is a fun hobby. It lets you personalize your home decor with unique pieces.
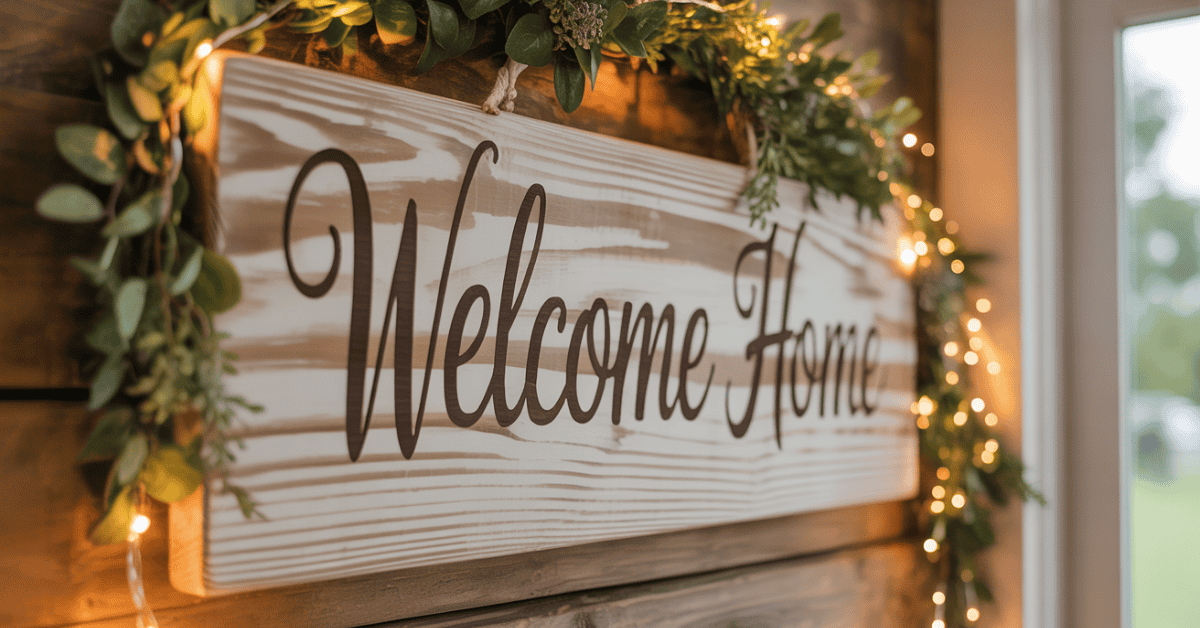
Simple Welcome Sign Tutorial
Begin with a basic welcome sign using a wooden plank, paint, and a stencil. Sand the wood to a smooth finish, then apply a coat of primer. Use a stencil to paint your desired text, such as “Welcome to our home.” Finish with a protective coat to ensure durability.
Rustic Family Name Display
Create a rustic family name display by using reclaimed wood and a bold font. Measure and cut the wood to your desired size, then sand the edges. Use a wood-burning tool or paint to apply your family name. Add a distressed finish for a more rustic look.
Seasonal Wooden Door Hanger
Make a seasonal wooden door hanger by cutting out a shape relevant to the season (e.g., a heart for Valentine’s Day). Paint or stain the wood, then add a ribbon or twine for hanging. You can also add embellishments like glitter or small decorations.
Farmhouse-Style Kitchen Sign
Design a farmhouse-style kitchen sign by using a wooden board and a rustic font. Paint a motivational or humorous quote related to cooking or family. Distress the sign for a vintage look, and apply a clear coat to protect the finish.
| Project | Materials Needed | Reclaimed wood, wood-burning tool or paint |
|---|---|---|
| Simple Welcome Sign | Wooden plank, paint, stencil, primer | Beginner |
| Rustic Family Name Display | Reclaimed wood, wood burning tool or paint | Intermediate |
| Seasonal Wooden Door Hanger | Wood, paint or stain, ribbon or twine | Beginner |
| Farmhouse-Style Kitchen Sign | Wooden board, paint, rustic font | Beginner |
These DIY wooden sign projects are perfect for beginners. They help you create personalized wooden signs for your home. With these guides, you can confidently start crafting your own unique decor pieces.
Troubleshooting Common Issues in Wooden Sign Making
DIY wooden sign making is fun and rewarding, but it comes with challenges. You might face problems like paint bleed, uneven staining, or warping wood. Knowing how to fix these issues is key to getting professional-looking results.
Fixing Paint Bleed Under Stencils
Paint bleed under stencils can mess up your design’s crisp lines. Make sure your stencil sticks well to the wood with the right adhesive or tape. Also, use a little paint and an almost-dry brush to avoid seepage.
Correcting Uneven Staining
Uneven staining happens due to wood porosity or wrong application. To fix it, sand the sign to remove the uneven stain. Then, reapply the stain following the wood grain and using a clean cloth.
Repairing Splits and Cracks in Wood
Splits and cracks can be fixed with wood filler. Apply a lot of filler, let it dry, and sand it smooth. For a rustic look, keep some texture.
Solutions for Warping and Other Wood Problems
Warping can be stopped by sealing both wood sides and keeping it in a stable place. If warping happens, try to straighten the wood by adding moisture and clamping it flat.
By tackling these common problems, you can boost your wooden sign-making skills. This way, you can make stunning, rustic diy signs that beautify your home.
🪚 Build Stunning DIY Wooden Signs with 16,000+ Easy Plans!

Turn your creativity into craftsmanship with Ted’s Woodworking — the world’s largest collection of step-by-step woodworking plans.
👉 Get instant access to 16,000+ “done-for-you” projects — from wooden signs and displays to furniture and home décor. Simple, clear, and beginner-friendly!
🌟 Why Choose Ted’s Woodworking
- ✅ 16,000+ detailed blueprints for every skill level
- ✅ Step-by-step guides & materials lists — no guesswork
- ✅ Lifetime access + free monthly plans
- ✅ Custom projects on request
- ✅ Bonus videos & business guide included
- ✅ One-time payment — no monthly fees!
🎯 Start Building Like a Pro Today!
👉 Get Ted’s Woodworking Now for Just $67
(Limited-Time Offer — Instant Lifetime Access!)
Conclusion: Showcasing Your Personalized Wooden Decor
Now that you’ve made your own diy wooden signs and displays, it’s time to show them off. These personalized wooden signs can bring warmth and character to any room. Place them in high-traffic areas, such as the living room or kitchen, to make a significant impact.
Don’t forget to use your diy wooden signs and displays outdoors, too. Hang a wooden welcome sign above your front door or set up a rustic wooden display on your porch. Your personalised wooden signs are sure to spark interesting conversations.
As you enjoy your finished projects, think about making more. With what you’ve learned, you can keep creating unique and personalized wooden sign decor. You can also make them as gifts for friends and family. The possibilities are endless, and your creativity is the only limit.
FAQ
What type of wood is best for making DIY wooden signs?
The best wood for DIY signs depends on what you want it to look like and how long it lasts. Pine, cedar, and reclaimed wood are popular choices. For a cheaper option, try plywood or MDF.
What tools do I need to get started with wooden sign-making?
You’ll need basic tools like a saw, sandpaper, paintbrushes, and a drill to start. You might also want a stencil cutter, heat gun, or wood-burning tool for more designs.
How do I prevent paint from bleeding under stencils?
Use a good stencil material and apply thin paint to avoid bleeding. Use a foam brush or stiff-bristled brush to control seepage. A sealant or fixative can also help the paint stick to the wood.
Can I use any type of stain on my wooden sign?
No, not all stains work for wooden signs. Pick a stain made for wood that matches your wood type. Think about color, finish, and durability when choosing.
How do I create a distressed or vintage look on my wooden sign?
For a distressed look, try sanding, scraping, or using a distressing tool. Apply stain or paint, then sand it off for a worn effect.
What are some popular design trends for DIY wooden signs?
Trends include rustic, farmhouse, geometric, and inspirational quotes. Personal touches like names or messages make your sign unique.
How do I protect my wooden sign from the elements?
Apply a clear sealant or varnish to protect from moisture and UV light. Consider waterproofing or UV-resistant finishes for extra protection.
Can I make a wooden sign without any prior experience?
Yes, you can make a wooden sign even without experience. Start simple, follow tutorials, and practice. Don’t be afraid to try new things.
How do I display my finished wooden sign?
You can hang, place on a shelf, or use as a decorative accent. Use a decorative hanger or stand for a professional look.
What are some ideas for advanced decoration methods for DIY wooden signs?
Try wood burning, adding depth with dimensional elements, or mixing media. Experiment with textures, colors, and patterns for visual interest.