
Did you know DIY tiny homes can save up to 50% in labor? Yet, professional builds often cost over $150,000. With careful planning, your wooden small house can cost between $30,000 and $70,000. This guide will help you achieve this without any guesswork.
This guide will teach you how to plan, budget, design, and build a wooden small house. You’ll get advice from experts like Kathryn Linea Rund and Kevin Fritz. They share their knowledge to help you avoid costly mistakes and stay on track.
We begin with getting approvals from your local planning department. Then, we set a budget and design a compact floor plan. You’ll choose durable materials and match your foundation to your soil and zoning. For a trailer path, you’ll refurbish the chassis and move on to framing, sheathing, and weather protection.
Throughout, we’ll give you straight talk on costs, timelines, and when to call licensed pros. By the end, you’ll have a clear roadmap for your DIY wooden small house project.
Key Takeaways
- Plan first: secure local approvals, confirm zoning, and set a realistic budget before you buy materials.
- Smaller is not easier: Kevin Fritz notes that tight spaces demand precise planning to avoid expensive fixes.
- Control and savings: Kathryn Linea Rund highlights DIY benefits in creative choices and labour cost cuts.
- Proven sequence: foundation or trailer prep, framing, sheathing, weather barrier, then finishes.
- Smart materials: Use spray foam, durable siding, and metal roofing for long-term performance.
- Know your limits: hire licensed trades for electrical and plumbing to meet code and ensure safety.
- Cost clarity: target $30,000–$70,000 for a DIY build; pros can exceed $150,000 depending on specs.
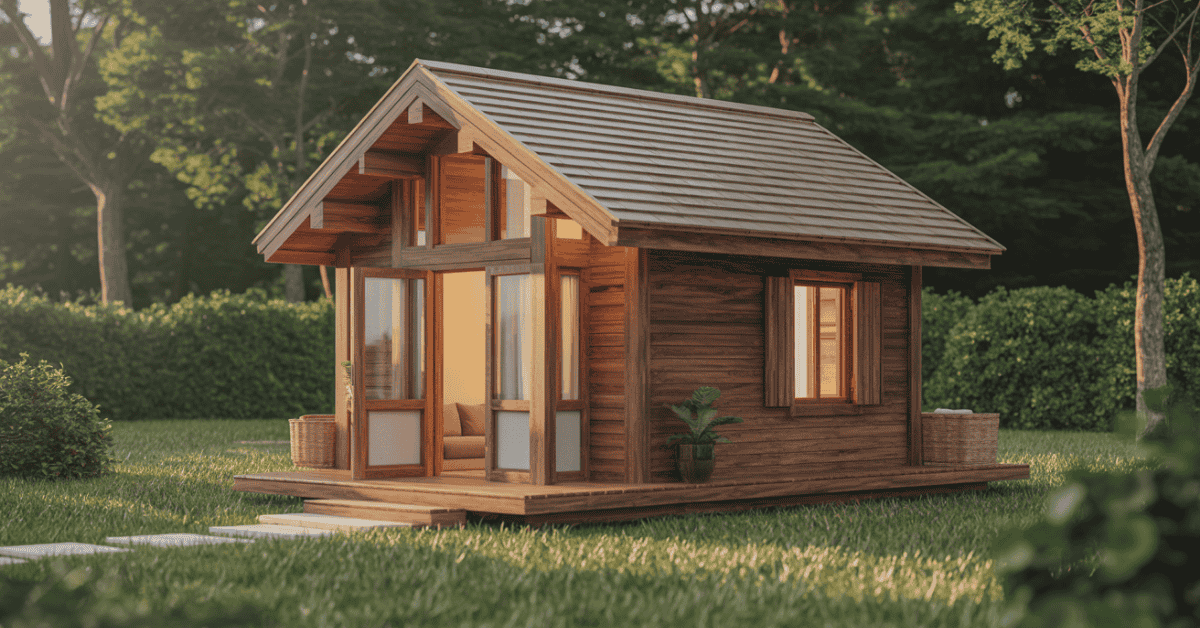
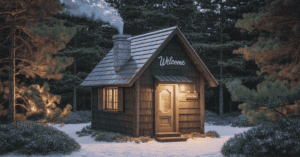
Why Build a Wooden Small House in 2025
In 2025, you can build your future home yourself. A do-it-yourself tiny home lets you work on your own schedule. You can pick materials that fit your budget and make every inch your own.
Benefits of doing it yourself for cost and creative control
Building it yourself saves you money and time. A small wooden house tutorial helps you plan every detail. You can choose where to spend more or less, from the frame to the outside finish.
With good planning, you can avoid mistakes and keep quality high. You can order materials as needed and modify your design along the way. This way, you can stay within your budget without giving up your style.

Tiny living trends and space-efficient lifestyles in the United States
In the United States, tiny living is becoming more popular. People want to reduce waste, keep things simple, and save money. Building a small wooden cabin fits well with these goals, whether it’s for a guest house or a mobile home.
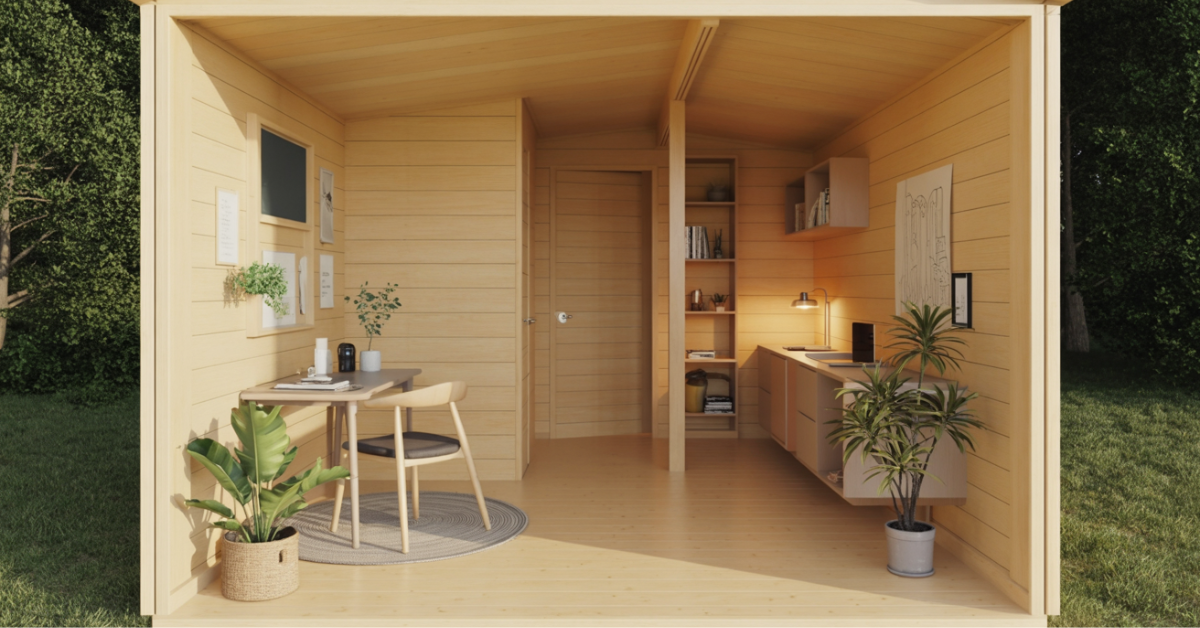
Smart designs use natural light, built-in storage, and furniture that can change. You can have a big life in a small space, with room for work, rest, and cooking. Making smart choices means every inch works hard.
How a small footprint helps you afford higher-end finishes
A smaller home means you can afford better materials. You might choose a metal roof, solid-wood doors, or better insulation. This is the advantage of focusing on what’s important.
By spending wisely, your tiny home can have durable finishes. A step-by-step guide helps you stay on track and improve the quality of your home.
Legal Basics, Zoning, and Permits for Tiny Wooden Homes
Before you start building, you need a solid plan. Call your local planning office to check if your project is allowed. They will tell you about zoning, where to build, and what permits you need.
Proper classification affects inspections, utilities, and your right to live in the unit full-time. It also guides your wooden house construction steps and helps you tailor any diy wooden cottage tutorial to your local rules.
How local planning departments classify tiny homes and RV chassis builds
Find out if your home is an accessory dwelling unit, a park model RV, or a permanent dwelling. Some places treat tiny homes on trailers like RVs, limiting where you can park. If you plan to live there all year, make sure it’s allowed.
Ask for a checklist from the planner. It should list needed inspections, trailer VIN or certification, and if you need hookups or off-grid systems. Keep these records; they help from the start of your project.
Codes that govern wooden house construction and materials by state
Different states have different building and energy codes. These codes cover structural loads, wood species, and framing grades. Your inspector will check if your build meets these standards.
Check the R-values for insulation, smoke and CO alarms, egress sizes, and stair or ladder rules. Use this list to make sure your diy wooden cottage tutorial meets local standards. This ensures your drawings, materials, and methods are correct.
Site placement rules, certifications, and where you can locate your build
Confirm the distance from property lines, height limits, and utility easements. Ask if a trailer-based unit must be anchored, skirted, or moved on a schedule. Soil type and zoning impact foundation choices, so verify before starting.
Learn if you can place the home on a rural lot, in a backyard as an ADU, or only in approved parks. If it’s an RV, you might need RV park placement and specific certifications. Make sure your plan aligns with these rules to avoid costly changes.
| Topic | What to Ask Your Planner | Why It Matters | Impact on Your Build | Classification |
|---|---|---|---|---|
| Is it an ADU, RV, park model, or permanent dwelling? | Determines where you can live and park, and which inspections apply. | Guides wooden house construction steps and utility approvals. | ||
| Code Edition | ||||
| Which building and energy codes are adopted this year? | Sets structural, egress, and insulation rules. | Shapes material choices and framing details in wooden house construction. | ||
| Materials | ||||
| Approved wood species, grades, and fasteners for framing? | Ensures strength and compliance during inspections. | Refines your diy wooden cottage tutorial material list. | ||
| Site Rules | ||||
| Setbacks, height limits, anchoring, and skirting requirements? | Controls placement and safety during storms. | Which building and energy codes were adopted this year? | ||
| Utilities | ||||
| Standards for water, sewer, power, and off-grid systems? | Affects health, safety, and ongoing use. | Schedules rough-ins and final hookup inspections. | ||
| Occupancy | ||||
| Is full-time residential use permitted at this site? | Clarifies legal living status year-round. | Determines final permits and long-term placement options. |
Budgeting, Financing, and Cost Expectations

Before you start building, you need to know the costs. A step-by-step guide for building a small wooden house is best with a clear budget plan. Smaller homes mean spending less on materials and more on quality, fitting the DIY cabin-building goals.
Typical DIY tiny home cost ranges and what drives price
DIY tiny homes usually cost between $30,000 and $70,000. Custom homes can go up to $150,000. Doing the work yourself can save up to half the cost, as builders like Kevin Fritz and Ben Rawson of Zen Tiny Homes say.
Building a small home costs more per square foot than a big house. You need custom details and compact appliances. A good guide will highlight these costs.
Setting a realistic budget for materials, tools, permits, and contingencies
Start with a simple budget worksheet. List costs for land, permits, plans, and engineering. Add costs for materials and tools. Don’t forget a 10–20% contingency for unexpected costs.
Choose materials that fit your skills and timeline. Metal roofing is durable and affordable. Cedar or fir siding is a good value. Insulation options like spray foam or recycled denim should be considered.
Financing options for beginners, including construction loans
If you can’t save enough, consider a construction loan. You estimate costs and draw funds as you complete each stage. Some lenders offer special tiny home loans.
Look into personal loans, RV loans, or home equity lines. Compare interest rates and fees. Use a guide to plan your finances and delivery dates.
| Cost Driver | Budget Impact | Typical Choices | Savings Tip | Structure & Framing |
|---|---|---|---|---|
| High | SPF or Douglas fir lumber; OSB or plywood sheathing | Buy in bulk during sales; design to standard lengths to cut waste | ||
| Envelope | ||||
| High | House wrap, metal roofing, cedar/fir lap siding | Fewer penetrations reduce flashing costs and leaks | ||
| Windows & Doors | ||||
| Medium–High | Andersen, Marvin, or Milgard units; insulated exterior doors | Standard sizes beat custom by a wide margin | ||
| Insulation | ||||
| Medium | Closed‑cell spray foam or recycled denim batts | Air-seal first; smaller cavities then perform better for less | ||
| Interior Finishes | ||||
| Medium | Luxury vinyl plank, butcher‑block counters, paint-grade trim | Tiny footprint allows selective splurges without overspend | ||
| Mechanical/Electrical/Plumbing | ||||
| Medium | Mini‑split, tankless water heater, breaker panel, PEX | Pre‑plan runs to shorten pipe and wire lengths | ||
| Permits & Professional Fees | ||||
| Low–Medium | Confirm the scope early to avoid rework and repeat fees | Rent speciality tools you will use once | ||
| Tools & Equipment | ||||
| Low–Medium | Circular saw, impact driver, nailer, PPE | Match the draw schedule to delivery lead times | ||
| Contingency | ||||
| 10–20% | Corrections, code updates, price spikes | Fund it from day one and protect it | ||
| Financing | ||||
| Varies | Construction loan, HELOC, personal or RV loan | Match the draw schedule to the delivery lead times |
Keep your plan simple, track costs weekly, and let your diy wooden small house step-by-step guide and easy wooden house building guide shape each purchase so diy cabin building stays on budget.
Designing a Smart Floor Plan for a Small Wooden House

Start with your life, not the lumber list. Decide on bathroom count, indoor–outdoor access, and storage zones. A small wooden house tutorial works best when you map daily routines first, then shape rooms to fit. Keep the wooden small house step-by-step mindset: list needs, set priorities, and sketch traffic paths.
In compact footprints, every inch must earn its keep. Use pocket doors, a combined mud zone and laundry, and lofts for sleep or gear. Your beginner woodworking house project should stack functions near plumbing walls to save runs and reduce noise.
Room flow, natural light, ventilation, and views in compact layouts
Plan clearly, short circulation. Align the front door with a sightline to a window or deck to make the space feel larger. Put cooking and dining near that path to cut steps.
Daylight is comfort. Place windows on at least two sides of the main rooms for cross-breeze and balanced light. Clerestories or a skylight over the galley can brighten the core without sacrificing wall storage.
- Cross-vent rooms with operable windows on opposite walls.
- Use an energy recovery ventilator (ERV) to control humidity in a tight shell.
- Frame views to trees or a courtyard to extend the perceived size.
When to use proven plans versus hiring an engineer
Choose proven plans when you want speed and predictable costs. Many prefabricated kits include engineered floor plans that simplify approvals. This path suits a wooden small house step by step approach and reduces guesswork.
Hire a licensed engineer when you change spans, add a loft with higher loads, or site the home in high wind, seismic, or heavy snow zones. As builder Kevin Fritz advises, an engineering check confirms that your idea will perform safely before you cut the first board.
- Use stock plans for standard roof pitches and simple rectangular footprints.
- Consult an engineer for cantilevers, window walls, or unusual trailer chassis tie-downs.
Prepping your beginner woodworking house project for structural integrity
Match framing sizes to climate and loads. In low snow areas, lighter members can be acceptable; one Bay Area builder used 1×3 rafters and 1×2 truss framing because loads were modest. Verify your region’s requirements before you scale down.
Sheathing adds strength. Nail exterior sheathing per schedule to boost racking resistance, then wrap with a quality house wrap to guard against moisture. This small wooden house tutorial step prevents hidden rot and helps the frame stay plumb.
- Specify species and grade for studs and rafters; kiln-dried lumber stays straighter.
- Include hold-downs, hurricane ties, and proper anchor bolts for uplift and shear.
- Plan mechanical ventilation early; an ERV slot needs power and duct routes.
| Design Focus | Practical Move | Benefit | DIY Fit |
|---|---|---|---|
| Room Flow | Align entry with window/deck | Long sightlines, bigger feel | Great for a beginner woodworking house project |
| Natural Light | Dual-aspect windows, clerestory | Balanced daylight, fewer shadows | Works with wooden small house step by step sketches |
| Ventilation | Cross-breeze + ERV | Humidity control, fresh air | DIY-friendly with careful planning |
| Structure | Right-sized framing + sheathing nailing pattern | Strength, racking resistance | Use proven schedules or have an engineer verify |
| Moisture | House wrap and flashing at openings | Stops water ingress, protects wood | Clear steps in a small wooden house tutorial |
Site Prep and Foundations for Small Wooden Homes

Start building a solid foundation before you even begin framing. First, walk the land, mark where utilities are, and follow local rules. Next, plan how to keep stormwater away from your site. A flat, clean area makes building safer and quicker.
Before you dig, check if your project is classified as an RV or a real property. This matters for inspections, anchoring, and taxes. It helps keep your project on schedule and within budget.
Clearing, grading, and soil considerations for your lot
Remove brush, stumps, and debris, and set aside topsoil for the foundation. Create a slight slope to direct water away. If the soil is soft or expands, test it and add fill if needed.
In wet or hilly spots, add swales or a French drain to protect the pad. A Bay Area project used a 12-inch roof overhang to protect walls from rain, reducing wear over time.
Choosing between a slab, a crawl space, pier blocks, or a trailer chassis
Choose a foundation that fits your climate, soil, and local codes. A concrete slab is solid and good for heat. A crawl space keeps mechanicals easy to reach and raises framing above water.
Pier blocks or poured piers are quick and cheap for stable soil. For a mobile home, a trailer chassis is often used. Refurbish it by removing rust, applying primer, and painting to fight corrosion. For a permanent home, check with your local building department about frost depth and anchoring.
Plumbing rough-ins and utilities during foundation work
Put in underground lines before pouring or setting piers. Run water, sewer, and electrical conduits to the panel location. Place plumbing rough-ins now to avoid future concrete work.
Check trench depths and insulation needs for your area. Label each stub-up and verify drain slopes. Cap lines to keep them clean. Good planning here makes building easier and keeps inspections smooth.
diy wooden small house step-by-step guide
You start with approvals, a budget, and clear plans. Map your wooden house construction steps before a single cut. This diy wooden cottage tutorial keeps each phase simple and in order so you can build with confidence.
Permits first, purchases second, sawdust third. Lock in your scope, then price materials by line item. Keep a build log to track changes, deliveries, and safety checks.
Material selection for framing, siding, insulation, and roofing
For framing, most beginners choose kiln-dried SPF or Douglas fir. Some switch to light-gauge steel for straight lines, but wood is easier to cut and fasten. Add plywood sheathing for rigidity and smoother nailing.
Use a quality house wrap to manage moisture and wind. For siding, rough-milled cedar resists decay, while fir lap boards give a clean line; install to hide fasteners and shed water. This aligns with proven wooden house construction steps for durability.
Spray foam delivers a high R-value and stiffens the shell with thinner walls. Recycled denim is easy on the hands and fills voids well. Fibreglass costs less, but it can shed fibres and may not suit vented, breathable wall goals in a diy wooden cottage tutorial.

Metal roofing panels last for decades and go on fast. A small roof can cost around $240 in materials, depending on brand and profile. Use matched fasteners and butyl tape at seams for a tight, dry cap.
Energy efficiency essentials like spray foam and ERVs
Tiny homes are tight, so balanced ventilation is key. An ERV from brands like Panasonic or Broan refreshes air while saving heat and controlling humidity. Kevin Fritz calls an ERV non-negotiable for healthy indoor air.
Seal every joint with tape rated for sheathing, then foam or gaskets at penetrations. Pair spray foam in walls with a smart vapour retarder and plan for continuous airflow paths.
Scheduling the build sequence from frame to finish
Follow a steady, repeatable path. It shortens delays and makes inspections smoother within a diy wooden small house step-by-step guide.
- Refurbish trailer chassis or pour foundation.
- Install subfloor and lay out walls.
- Frame walls and roof; plumb, level, and square.
- Sheathe walls; deck the roof.
- Set windows and doors.
- Add house wrap, roofing, then siding.
- Rough-in mechanical, electrical, and plumbing.
- Insulate; air-seal; install ERV ducts and unit.
- Hang interior finishes; prime and paint.
- Fit trim, cabinets, and built-ins.
Use this order to protect materials from weather, keep trades in sync, and reduce rework. It reflects proven wooden house construction steps found in any solid diy wooden cottage tutorial.
| Component | Best-Practice Choice | Pros | Watchouts |
|---|---|---|---|
| Framing | Douglas fir or SPF, kiln-dried | Decades-long life, lightweight | Store flat and covered to avoid warp |
| Sheathing | Plywood | Rigid, holds fasteners, smooth plane | Edge-gap and tape seams for movement |
| House Wrap | Breathable WRB | Moisture control, wind barrier | Proper laps and flashing at openings |
| Siding | Cedar or fir lap | Durable, classic look, hides fasteners | Back-prime and maintain finish |
| Insulation | Closed-cell spray foam | High R/inch, adds stiffness, air seal | Plan for ventilation and service cavities |
| Alternate Insulation | Recycled denim batts | Comfortable to handle, even fill | Needs meticulous air sealing |
| Roofing | Metal panels | Decades-long life, light weight | Use matching screws and sealants |
| Ventilation | ERV (Panasonic, Broan) | Fresh air, humidity control, energy savings | Balance supply/return and maintain filters |
Framing, Sheathing, and Weather Protection
You start framing your wooden small house with straight, dry lumber. Use 3-inch star-drive screws for strong joints. They pull plates and studs tight, keeping corners square and plumb.
In a compact 6×10 interior, rough-cut 2x2s can work if you accept slight variances. These quirks add unique dimensions and character. But you must check every stud with a level. Tie walls together with top plates before lifting the roof, following an easy wooden house-building guide approach.
Match roof framing to local loads. In mild, low-snow regions like the San Francisco Bay Area, light 1×3 rafters with 1×2 truss webs reduce weight while staying stiff. Deck the roof with 1/2-inch plywood to lock the frame, then nail edges on schedule so panels sit flush and do not telegraph seams.
Sheathing adds shear strength and stops twisting. Fasten plywood to walls and roof with narrow-gauge staples or nails, spaced tightly at edges. Overhang panels slightly; trim them flush after fastening for crisp corners. This step is a core part of wooden house construction because it stabilizes the box before the weather hits.
Wrap the structure early. House wrap sheds wind-driven rain and protects framing from decay. Plan-wide roof overhangs to shield doors, windows, and siding. Lay roofing underlayment as soon as the deck is nailed, so your wooden small house stays dry while you work through the easy wooden house building guide checklists.
| Task | Recommended Material | Fastener/Spacing | Purpose | Pro Tip |
|---|---|---|---|---|
| Wall Framing | 2×4 or rough-cut 2×2 (verified straight) | 3-inch star-drive screws, two per joint | Creates square, plumb walls | Check the crown on every stud before installation |
| Roof Framing | 1×3 rafters with 1×2 truss webs (low snow) | Exterior wood screws at gussets | Lightweight stiffness | Confirm local load requirements with your jurisdiction |
| Roof Deck | 1/2-inch plywood | Nails at 6 inches on edges, 12 inches field | Structural diaphragm | Stagger seams for better rigidity |
| Wall Sheathing | APA-rated plywood | Narrow-gauge staples or nails; tight edge spacing | Shear resistance | Overhang slightly and trim for clean corners |
| House Wrap | Weather-resistive barrier | Taped seams; cap staples | Water and air control | Wrap before windows for proper flashing layers |
| Underlayment | Synthetic or felt underlayment | Cap nails per manufacturer | Temporary weather protection | Install the same day you deck the roof |
Windows, Doors, Roofing, and Exterior Siding
Building a cabin means focusing on durability and style. Details like tight windows, crisp doors, and clean roofs are key. These elements help your cabin withstand the weather and stay warm.
Choosing durable windows and fitting doors in tight tolerances
High-performance windows from Andersen, Pella, or Milgard are a good choice. They seal well and save on labour. Repurposed aluminium trailer windows are cheaper but need careful framing.
For doors, aim for a 1/8-inch reveal on all sides. Plane the slab and dry-fit the hinges before you mortise. A rounded-top door carved from thick redwood feels classic; sheath it with thin cedar or fir for a layered grain. Weatherstrip the stop, add a sill pan, and set a quality sweep to block wind and splash.
Lightweight, long-lasting roofing options for tiny homes
Metal panel roofing is light, fast to install, and tough in storms. On a small footprint, materials can be surprisingly affordable, and you get decades of service. Deck with 1/2-inch plywood over rafters, roll synthetic underlayment, then lay panels with butyl tape at laps.
Run panels from ridge to eave to reduce seams. Use corrosion-resistant screws with washers, driving through the flats for a solid bite. Keep overhangs around 12 inches to push rain away from walls. In diy cabin building, that single detail protects your siding and trim for years.
Lap siding, house wrap, and moisture management
Wrap the shell with a tested weather-resistive barrier, then tape seams so the layer acts as a drain plane. Lap siding made from rough-milled cedar and fir, 1/4 inch thick in 5–10 inch widths, gives an organic look. Staple high and hide fasteners with each overlap for a clean face.
Back-prime cut ends, flash windows with sill pans and flexible flashing, and leave a small gap above trim for drainage. With steady details like these, your small wooden house tutorial stays dry, and building a small wooden cabin becomes a lesson in water control as much as in carpentry.
| Component | Recommended Approach | Why It Works | Field Tip |
|---|---|---|---|
| Windows | High-performance units or repurposed aluminum with custom redwood frames | Tight seals boost comfort; custom frames adapt curved trailer windows | Shim at jamb midpoints; confirm square and plumb before fastening |
| Doors | Thick redwood slab, sheathed with thin cedar or fir; precise 1/8-inch reveals | Stable core resists warp; thin skins add grain and style | Mortise hinges flush and test swing with weatherstrip installed |
| Roofing | Metal panels over 1/2-inch plywood with synthetic underlayment | Lightweight, long-lasting, and quick to fasten | Use butyl tape at laps; screw through flats with gasketed fasteners |
| Siding | Rough-milled cedar/fir lap, 1/4 inch thick, varied widths | Organic look; overlapping hides fasteners and sheds water | Maintain ~12-inch roof overhangs and back-prime cut ends |
| Moisture Control | House wrap, taped seams, pan flashing, drainage gaps | Creates a continuous drain plane behind cladding | Leave small clearances at trim and sills for drying |
Mechanical, Electrical, Plumbing, and Interior Finishes
Once the shell is sealed and dry, you can start setting up the systems needed for a diy wooden small house. Plan the routes and label everything. Think about service access first. This stage requires careful planning and clean bends in tight spaces.
Safe DIY versus when to hire licensed trades
You can do the layout, drilling, and mounting of boxes yourself. But it’s best to hire a licensed electrician for the final connections and testing. Tight spaces can lead to shorts and heat, so it’s safer to leave certain tasks to the pros.
For plumbing, you can set up fixture locations and install supports. Dry-fit PEX or copper before hiring a licensed plumber to pressure-test and connect it. Schedule inspections before closing the walls to stay on track.
When it comes to HVAC in small builds, choose short, smooth duct paths or a balanced ERV for fresh air. A certified tech should commission the system to protect your warranty and air quality.
Insulation choices from recycled denim to spray foam
Spray foam is great for high R-value in thin walls and adds rigidity. It’s perfect for diy cabin building where every inch matters. It also seals air leaks, improving comfort and reducing noise.
Recycled denim is easy on the skin and lungs and fits well in studs. It’s a good choice for a diy wooden small house, working well with vapour-open wall systems and smart membranes.
Choose insulation based on your climate zone and wall depth. Seal all penetrations first, then insulate. Keep mechanical chases clear for future service.
Flooring, trim, and small-space storage solutions
Mill solid floorboards and fasten them from below for a clean look. Use thin sacrificial plywood to protect them during the build. This keeps your finish ready for move-in while you finish other tasks.
Use fir or redwood for trim that’s warm and durable. Custom quarter-rounds soften corners, and a subtle wavy fascia adds character without clutter.
Maximize storage with built-ins like toe-kick drawers and wall beds with shelves. Use multi-use furniture to keep paths clear. Always measure twice before cutting, following a diy wooden small house step-by-step guide.
| System | DIY Tasks | Hire a Pro For | Key Materials | Why It Matters |
|---|---|---|---|---|
| Electrical | Layout circuits, mount boxes, pull cable, label runs | Panel terminations, load calcs, testing, inspection | NM-B or MC cable, GFCI/AFCI breakers, LED fixtures | Prevents shorts and fire in tight cavities |
| Plumbing | Fixture layout, supports, dry-fit PEX/copper, trap placement | Pressure tests, venting, main connections, backflow | Recycled denim batts, spray foam, smart vapour retarder | Stops leaks and protects water quality |
| HVAC/ERV | Duct routing, mounting brackets, exterior hoods | Sizing, airflow balance, commissioning | ERV unit, rigid duct, mastic, insulated flex | Controls humidity and ensures fresh air |
| Insulation | Seal penetrations, install batts or prep cavities | Closed-cell spray foam application | Recycled denim batts, spray foam, smart vapor retarder | Boosts R-value and reduces drafts |
| Interior Finishes | Flooring install, cabinet assembly, paint, trim | Structural millwork and stair engineering | Solid wood flooring, fir/redwood trim, low-VOC paint | Durable, healthy surfaces in small spaces |
🔨 Take Your DIY Wooden House Skills to the Next Level!
Building your own wooden small house is just the beginning. If you want step-by-step, done-for-you blueprints that remove the guesswork and help you create stunning projects with ease, then Ted’s Woodworking is exactly what you need.
With over 16,000 woodworking plans, you’ll get:
✔️ A-to-Z Instructions – Easy-to-follow guides so you never feel stuck
✔️ Cutting & Material Lists – Save money and avoid costly mistakes
✔️ Detailed Schematics & 3D Views – Every angle covered, no guesswork
✔️ Beginner-Friendly Plans – Start small and grow your skills
✔️ Lifetime Access + Free Monthly Plans – Always have fresh ideas
🎁 Plus, you’ll unlock exclusive bonuses like 150 premium woodworking videos, complete guides, and even a business starter kit – all included for a one-time price.
👉 Click here to get instant access to 16,000 woodworking plans with Ted’s Woodworking and start building your dream projects today!
Conclusion
Building a safe, durable tiny home is possible with a clear plan. First, check zoning and site rules with your local planning department. Then, set a budget with extra money for tools, permits, and surprises.
Design your home for light, ventilation, and strength. If your design is complex, get a licensed engineer’s help. This guide will help you plan confidently and meet U.S. codes by 2025.
Choose materials that last in tight spaces. Use kiln-dried lumber, ZIP System sheathing, and high-quality house wrap. Fasteners should be corrosion-resistant.
Prepare your foundation or trailer, then install plumbing and power. Frame, sheath, and weatherproof early. Choose durable windows, doors, and roofing for long life.
Use spray foam and an ERV for comfort and clean air. Costs vary by region and finish level. DIY builds usually cost $30,000–$70,000, while pros can charge up to $150,000.
Your smaller home lets you afford quality without overspending. This guide helps you maintain quality and reduce waste.
When installing MEP systems, know when to hire licensed trades. This ensures safety and inspection approval. Move from rough to finish with a simple checklist.
If you need a quick refresher, this guide simplifies the building process. It helps you build smarter, live lighter, and enjoy a home that fits your life.
FAQ
How do you start a DIY wooden small house step by step in 2025?
First, check with your city or county planning department. They’ll tell you if your project is an ADU, RV, or permanent dwelling. Set a budget with a 10–20% contingency for unexpected costs. Next, finalise a compact floor plan and choose materials. Confirm the foundation type you’ll use. Then, sequence the build: start with the foundation or chassis, then the subfloor, framing, sheathing, and house wrap. Continue with roofing, windows/doors, siding, and rough-in MEP. Finish with insulation, interior finishes, and trim.
What are the main benefits of building a wooden small house yourself?
Building a small house yourself gives you creative control. You avoid contractor delays and labor markups, as Kathryn Linea Rund notes. You can also tailor the space to your lifestyle. While you can save up to 50% on labor, remember that compact construction is not easier, as Kevin Fritz emphasizes.
Is tiny living actually practical in the United States?
Yes, tiny living has become mainstream. ADUs and movable units offer flexible, lower-cost housing. Smaller footprints reduce utility use and maintenance. Smart layouts deliver comfort through daylight, cross-ventilation, and built-in storage.
How does a small footprint help you afford higher-end finishes?
A small footprint means buying fewer materials. You can allocate more budget to durable upgrades like metal roofing and cedar siding. This way, you can afford higher-end finishes without overspending.
How will planning staff classify your tiny home or RV chassis build?
Planning staff will classify your build based on local codes. Many states treat trailer-based units as RVs with specific rules. If you want real property status, you must meet state-adopted building codes. They will confirm siting rules, setbacks, required inspections, and whether anchoring is needed.
Which codes govern wooden house construction and materials?
States adopt building codes that dictate acceptable wood species and grades. They also specify structural spans, insulation, and energy measures. Requirements vary by state, so verify these before buying materials.
Where can you legally locate your small wooden house?
Legal location depends on classification and zoning. ADUs follow local setback and lot coverage limits. RV-class tiny homes may be restricted to RV parks or certain lots. Building departments will tell you what certifications and inspections you need. They will also inform you about utility hookups.
What do DIY tiny homes typically cost?
DIY tiny homes typically cost between $30,000 to $70,000. This range depends on size, finishes, and location. Professional builds can reach $150,000.Costs per square foot can be higher than conventional homes due to complexity and custom details.
How do you set a realistic budget for a wooden small house?
Start by listing line items for permits, engineering, framing lumber, and sheathing. Include costs for windows and doors, house wrap, insulation, roofing, siding, interior finishes, and tools. Remember to include land or parking fees and a 10–20% contingency for corrections and code-driven changes.
What financing options can beginners use?
Beginners can explore construction loans after finalizing plans and a budget. You can also combine savings with personal loans or HELOCs for ADUs on owned property. Ask lenders about draw schedules and inspection requirements.
How should you design a smart small wooden house floor plan?
Start by considering your needs: bathroom count, cooking style, storage, and indoor-outdoor flow. Place windows on multiple walls for daylight and cross-ventilation. Keep circulation direct, with clear paths and multiuse zones that reduce wasted space.
Should you use proven plans or hire an engineer?
Use proven plans for speed and simplicity. Hire a licensed engineer if you have unique spans, loft loads, or unusual openings. Kevin Fritz recommends confirming structural assumptions early to avoid costly rework.
How do you prep a beginner woodworking house project for structural integrity?
Verify framing sizes for local loads. Plan shear walls with plywood sheathing, specify fasteners and hold-downs, and detail roof overhangs for weather protection. An engineer’s review is valuable for nonstandard designs.
What does site prep involve for a small wooden house?
Clear vegetation and debris, then grade for positive drainage away from the structure. Consider soil bearing capacity and compaction. Coordinate trenching for water, sewer or septic, and electrical conduits before you pour or set a foundation.
How do you choose between a slab, a crawl space, pier blocks, or a trailer chassis?
Match the foundation to your zoning, soil, budget, and mobility needs. Slabs suit warm climates and simple builds. Piers or crawl spaces work on sloped sites and offer access to utilities. Trailer chassis builds enable mobility but may be classified as RVs.
When do plumbing rough-ins and utilities happen?
During foundation or chassis prep. Set sewer lines, water supply, and electrical conduits before you close the floor system. Proper rough-ins prevent demolition later and speed inspections.
What materials should you select for a diy wooden small house?
Use dimensioned lumber for framing, plywood for sheathing, and house wrap for moisture control. Choose durable lap siding in cedar or fir, and spray foam or recycled denim insulation. Long-lasting metal roofing is also recommended.
How do you boost energy efficiency in a tiny wooden house?
Prioritize air sealing, spray foam or tight-fitting batt insulation, and an ERV for balanced ventilation and humidity control. Efficient windows and shaded overhangs help regulate temperature and protect cladding.
What is the best build sequence from framing to finishes?
After approvals and budget: start with the foundation or chassis, then the subfloor, frame, walls and roof, install sheathing and roof decking, apply house wrap and underlayment, set windows and doors, add roofing and siding, rough-in MEP, insulate, then complete drywall or panelling, cabinetry, flooring, and trim.
How do you frame, sheath, and protect the structure from weather?
Use straight, dry lumber with structural screws or nails. Install plywood sheathing for racking resistance, then apply house wrap. Add roofing underlayment as soon as the roof decking is on. Aim for generous overhangs to shield doors, windows, and siding.
What should you know about windows, doors, roofing, and siding?
Choose durable, well-sealed windows; fit doors with tight tolerances to prevent drafts. Metal roofing offers decades of life at a reasonable cost. Use lap siding over house wrap to manage moisture; overlap to hide fasteners and extend cladding life.
When should you hire licensed trades for MEP work?
Bring in licensed electricians and plumbers for panel work, wiring, gas lines, pressure testing, and code-required inspections. Tight spaces increase risk, and professional sign-off helps prevent hazards like shorts or leaks.
Which insulation is best for a small wooden house?
Spray foam delivers high R-value and rigidity in thin assemblies. Recycled denim is pleasant to handle and fills cavities well. Fibreglass is economical but may be less ideal for breathable wall strategies. Choose based on climate, budget, and ventilation plans.
How can you finish interiors for function and storage?
Protect floors during construction, then install durable flooring. Use simple trim profiles in fir or redwood, build custom nooks, toe-kick drawers, and multi-use furniture. Prioritize vertical storage to keep circulation clear.
What’s the difference between a diy cabin building project and a permanent small wooden house?
A DIY cabin on a trailer may be classified as an RV with different siting limits and codes. A permanent small wooden house must meet state building codes, foundation requirements, and inspections, but can be recognized as real property.
Are prefab kits helpful for a beginner’s woodworking house project?
Yes. Prefab or engineered kits provide vetted plans, material lists, and often structural approvals, reducing guesswork and speeding your build while keeping you within code parameters.
How do you manage moisture and extend exterior lifespan?
Combine house wrap, properly lapped flashing, and rainscreen details where allowed. Add roof overhangs of about 12 inches, maintain sealants, and specify durable claddings. Good ventilation via an ERV reduces indoor humidity that can migrate into walls.
Can a do-it-yourself tiny home be insured and financed?
Often, yes—but terms depend on classification. RV-designated units may use RV insurance and speciality lenders. Real property units can qualify for traditional products if they meet building code, appraisal, and title requirements.
What tools and fasteners are best for wooden house construction?
Use a circular saw, drill/driver, impact driver, nailer or staple gun, and levels. Structural screws like 3-inch star-drive varieties resist stripping and speed assembly. Pair with code-approved connectors and anchors for hold-downs and shear.
What are realistic timelines for building a wooden small house?
A focused DIY build can take 3–6 months part-time, longer if you’re learning tools and waiting on inspections. Lead times for windows, doors, and electrical panels can affect schedules—order critical items early.
How do you keep your diy wooden cottage tutorial project within budget?
Lock your design early, price materials with alternates, repurpose quality components where allowed, and track every purchase. Sequence tasks to avoid rework, and get inspections on time to prevent delays and change orders.
