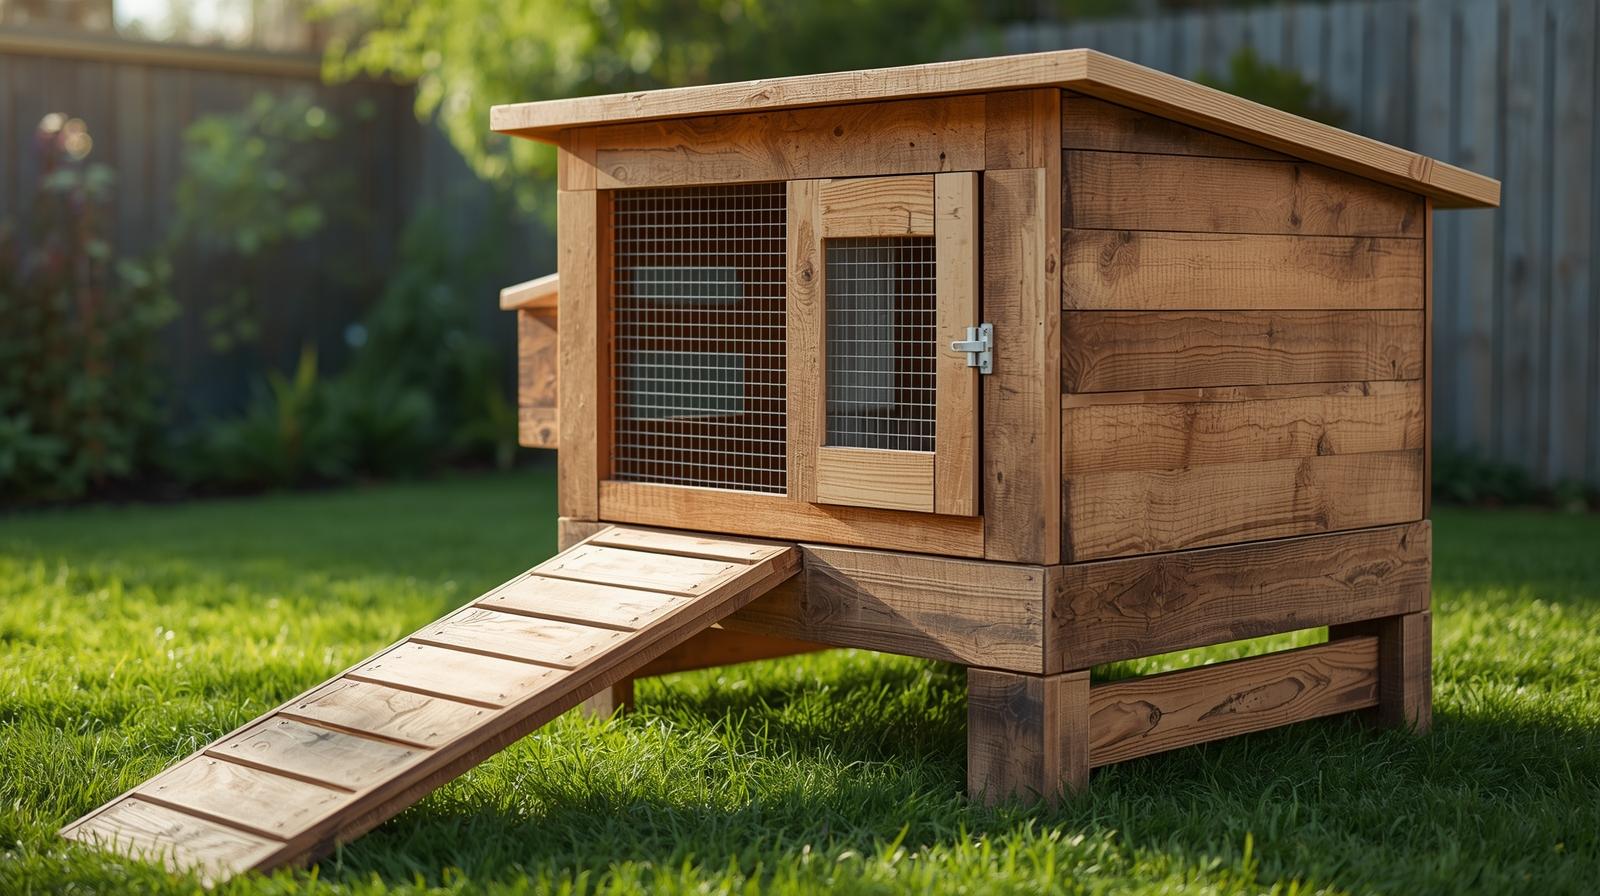
Looking for a budget-friendly and green way to house your rabbit? A sustainable rabbit housing made from recycled pallets is a smart choice. It’s good for your pet and helps the planet.
Building a pallet rabbit house is a fun way to reuse materials. This DIY guide will show you how. You’ll learn to make a snug and safe spot for your rabbit without spending a lot.
Key Takeaways
- Learn how to build a cost-effective and eco-friendly home for your rabbit.
- Discover the benefits of using reclaimed pallets for sustainable rabbit housing.
- Follow a step-by-step guide to create a safe and comfortable pallet rabbit house.
- Understand the importance of providing a secure environment for your rabbit.
- Explore creative ways to reuse materials for your pet’s home.
Why Build a Pallet Rabbit House for Your Bunny
Building a rabbit hutch from pallets is good for the planet and your wallet. It’s a smart way to give your rabbit a cosy home. You’ll also be reducing waste and making a space that’s healthy for your bunny.
Key Benefits of a Pallet Rabbit House
- Cost-effectiveness: Making your own hutch saves money compared to buying one.
- Customisation: You can design it just right for your rabbit and your taste.
- Environmental Benefits: Using pallets cuts down on waste and saves trees.
Studies show DIY huts are better than store-bought ones. They offer better air, safety from predators, and last longer. You can add special features like better air flow and safe areas for your rabbit.
Plus, a pallet house lets you make a special place for your rabbit. You can add fun spots like hiding places and climbing walls. This keeps your bunny happy and healthy.
In short, making a pallet rabbit house is a great project. It’s good for you and your pet. It’s a smart way to create a safe, comfy home while helping the environment.
Benefits of Using Reclaimed Wood for Sustainable Rabbit Housing
Using reclaimed wood for your rabbit house is good for the planet and your wallet. It helps cut down on waste and supports green practices.
Old pallets and other reclaimed wood can make a cosy home for your rabbits. It’s a way to help the environment and get a unique, character-filled home.
Cost-Effective Alternative to Store-Bought Hutches
Reclaimed wood is cheaper than buying new rabbit hutches. You can make a quality home with materials that are often free or cheap.
By using reclaimed wood, you save money. This lets you spend more on your rabbit’s care.
Environmental Advantages of Recycled Materials
Choosing reclaimed wood means less demand for new lumber. This reduces the harm from logging and wood processing. It’s a green choice that helps the planet.
It also means less waste in landfills. By picking reclaimed wood, you’re doing good for the Earth.
Customisation for Your Rabbit’s Specific Needs
Building with reclaimed wood lets you design for your rabbit’s needs. You can adjust size, layout, and features for comfort and safety.
Need better ventilation or more space? Reclaimed wood lets you add special features like hiding spots or elevated areas. It’s all about making your rabbit happy and healthy.
| Benefits | Description | Advantages |
|---|---|---|
| Cost-Effective | Reduces the need for new materials | Saves money, allocates resources efficiently |
| Environmental | Tailors to the rabbit’s specific needs | Supports sustainability, reduces environmental impact |
| Customization | Tailors to rabbit’s specific needs | Ensures comfort, safety, and happiness |
Essential Materials and Tools for Building Your Rabbit Hutch
Before starting your DIY pallet rabbit cage, gather all needed materials and tools. This step ensures your project is smooth and your rabbit hutch is safe and comfy for your pet.
How to Select Safe, Untreated Pallets
Choosing untreated wood is key when picking pallets for your rabbit hutch. Look for “HT” (Heat Treated) pallets instead of “MB” (Methyl Bromide) for safety. Check the pallets for damage or rot and make sure they’re strong enough for your hutch.
Complete Tool List for Easy Rabbit Hutch Construction
To build your DIY outdoor rabbit hutch, you’ll need various tools. Here’s a detailed list:
- Hammer
- Tape measure
- Saw (circular or handheld)
- Drill with bits
- Screwdriver set
- Pliers
- Wire cutters
- Safety gloves
- Safety glasses
Hardware, Fasteners, and Additional Supplies
You’ll also need hardware and fasteners to put your hutch together. These include:
| Material | Quantity | Purpose |
|---|---|---|
| Screws | 1 box | Assembling the frame |
| Nails | 1 bag | Attaching planks |
| Wire mesh | 1 roll | Ventilation and protection |
| Roofing nails | 1 bag | Securing roofing material |
Wire Mesh, Roofing Materials, and Weatherproofing Options
For a durable and safe rabbit hutch, choose the right wire mesh, roofing, and weatherproofing. Wire mesh must be strong to protect your rabbits and let in air. Use corrugated metal or asphalt shingles for the roof. Seal edges and joints with weatherproof sealant to keep water out.
Safety Considerations and Planning Your Design
When you’re building a pallet rabbit house, safety is key. You need to plan carefully to make sure your rabbit is safe and happy.
Identifying Heat-Treated vs. Chemically Treated Pallets
First, check if your pallets are safe. Pallets can be treated in two ways. Heat-treated pallets are safe for rabbits because they kill pests and bacteria with heat. But chemically treated pallets can harm your rabbit because of the toxic chemicals used.
To know if a pallet is heat-treated, look for the “HT” mark. Pallets with “MB” are not safe because they contain methyl bromide, a harmful chemical.

Determining the Right Size for Your Rabbit Breed
The size of your rabbit hutch matters a lot. Different rabbits need different amounts of space. For example, big rabbits like Flemish Giants need more room than small ones like Netherland Dwarfs.
| Rabbit Breed | Minimum Hutch Size (inches) |
|---|---|
| Netherland Dwarf | 24 x 24 x 12 |
| Holland Lop | 30 x 24 x 12 |
| Flemish Giant | 48 x 36 x 18 |
Planning for Proper Ventilation and Protection
Good ventilation is important for your rabbit’s health. Make sure your design lets in enough air to keep ammonia from building up. Also, add protection from predators and bad weather with wire mesh and a waterproof roof.
By planning carefully, you can make a safe and cosy home for your rabbit. Follow these tips to create a secure and healthy space for your pet.
Preparing and Processing Your Pallets
To make a safe and strong bunny hutch, you need to prepare your pallets well. This means doing several steps to turn raw pallets into parts you can use for your DIY rabbit hutch tutorial.
Step 1: Carefully Disassemble Pallet Sections
The first thing to do is take apart the pallets into smaller pieces. You have to handle them carefully to avoid damaging the wood. Use a pry bar or a hammer to gently pull out the nails that hold the pallet together. As you take it apart, sort the wood by length and width. This makes it easier to work with later.
Step 2: Cleaning and Inspecting All Wood Pieces
After taking it apart, check each piece of wood for dirt, grime, or damage. Cleaning the wood is key to removing any harmful substances from your rabbits. Use a stiff brush or a power washer on a low setting to clean it. Then, check the wood again for rot, cracks, or wear. Throw away any pieces that are too damaged.
Step 3: Sanding Smooth to Prevent Injuries
Sanding is important to make the wood safe for your rabbits. Use a medium-grit sandpaper to smooth out any rough edges or splinters. Focus on areas your rabbits can reach. Sanding not only prevents injuries but also makes the environment more comfortable for your pets.
Step 4: Cutting Boards to Your Planned Dimensions
After sanding, cut the wood to the sizes you need for your build your own bunny hutch project. Use a saw to cut the wood according to your plans. Make sure your cuts are precise for easy assembly later. Label each piece so you know where it goes.
| Step | Description | Tools Needed |
|---|---|---|
| 1 | Disassemble pallets | Pry bar, Hammer |
| 2 | Clean and inspect wood | Stiff brush, Power washer |
| 3 | Sand wood smooth | Medium-grit sandpaper |
| 4 | Cut wood to size | Saw |
By following these steps, you’ll have processed pallet wood ready for your pallet rabbit house diy guide project. This preparation is key to making your DIY project a success. It ensures your rabbit hutch is safe and works well.
Constructing the Base Frame and Elevated Floor
A strong base frame is key to your homemade rabbit hutch. It gives the needed support and keeps the structure stable. Raising the pallet rabbit house helps protect it from predators and moisture, making a safe space for your rabbits.

Step 5: Building a Sturdy Foundation Frame
First, build a solid foundation frame. This frame will hold the weight of the hutch and its rabbits. Use pallet wood to make a rectangular frame that’s square and sturdy. Make sure it’s a bit bigger than your hutch to support it well.
Key Considerations:
- Use untreated pallet wood to avoid chemical contamination.
- Ensure the frame is level to prevent uneven stress on the structure.
- Use appropriate fasteners to secure the frame together.
Step 6: Installing Elevated Legs for Ground Clearance
It’s important to elevate the rabbit hutch to protect it from predators and moisture. Use strong pallet wood or other durable materials for the legs. Choose a height that keeps the hutch safe from predators and dry.
| Leg Height | Predator Protection | Moisture Protection |
|---|---|---|
| 12 inches | Moderate | Good |
| 18 inches | High | Excellent |
Step 7: Attaching Solid Flooring with Drainage Gaps
The flooring should be solid to prevent injuries but also allow for drainage. Use pallet wood slats with gaps for drainage. Make sure the slats are smooth and free from splinters.
“A clean and dry environment is crucial for the health and well-being of rabbits. Proper drainage is key to maintaining such an environment.”
By following these steps, you can build a safe and sturdy base for your DIY pallet rabbit cage. This will provide a healthy home for your rabbits.
Building the Wall Structure and Support System
Now that the base and floor are ready, it’s time to build the walls. A strong wall is key to keeping your rabbits safe from predators and bad weather.
Step 8: Assembling the Back and Side Walls
Start by putting together the back and side walls with pallet wood. Make sure the corners are right, and the walls are even. Use 2-inch nails to hold the wood together tightly.
Step 9: Creating Corner Posts and Vertical Supports
Corner posts and vertical supports are vital for your hutch’s strength. Cut four corner posts and more vertical supports if you need them. Attach them to the walls with 2.5-inch screws for extra stability.
Step 10: Framing the Front Wall with Door Opening
The front wall needs a door opening. Measure and mark where the door will go, then build the frame. Use weather-resistant wood for the door frame to last longer.
Step 11: Reinforcing All Wall Connections
After building the walls, make sure all connections are strong. Check every joint and corner, and add screws or nails if needed.
Here’s a summary of the materials needed for building the wall structure:
| Material | Quantity | Purpose |
|---|---|---|
| Pallet wood | As needed | For constructing walls |
| 2-inch nails | 1 pack | Securing wooden planks |
| 2.5-inch screws | 1 pack | Attaching corner posts and vertical supports |
| Weather-resistant wood | 1 piece | Door frame |
By following these steps, you’ll have a strong wall structure. It will be the core of your rabbit hutch, giving your pets a safe place to live.
Installing the Roof Frame and Weather Protection
Now that the walls are up, it’s time to add a roof. This roof will keep your rabbit dry and comfortable. It also adds to the eco-friendly feel of your project.
Step 12: Constructing a Sloped Roof for Water Runoff
A sloped roof is key for water runoff. It keeps your rabbit hutch dry and strong.
Tips for a Sloped Roof:
- Use a level to ensure the slope is even.
- Consider the climate in your area; steeper slopes are better for areas with heavy rainfall or snowfall.
Step 13: Attaching Corrugated Roofing or Shingles
You can choose between corrugated roofing or shingles. Corrugated roofing is great for water runoff.
| Material | Water Resistance | Cost | Ease of Installation |
|---|---|---|---|
| Corrugated Roofing | High | Moderate | Easy |
| Shingles | High | Moderate to High | Moderate |
Step 14: Sealing Edges and Adding Overhang
Sealing the edges and adding an overhang are important. They keep water out and protect the walls from rain.
By following these steps, your eco-friendly pallet rabbit house will stay dry and cosy, no matter the weather.
Adding Doors, Ventilation, and Access Features
As you finish your pallet rabbit house, adding doors and ventilation is key. It keeps your rabbit healthy and safe. Good ventilation and secure doors are vital for a comfy home and safety from threats.
Step 15: Building and Hanging the Main Door
The main door is crucial for your rabbit hutch. It lets you in and keeps your rabbit safe. You’ll need sturdy wood for the frame and wire mesh or a solid panel for the door. Make sure it’s well-hinged and attached securely.
Tip: Choose durable hinges and a strong latch to keep the door closed.
Step 16: Installing Wire Mesh Windows for Airflow
Wire mesh windows are vital for airflow in the hutch. Measure the spots, cut the mesh, and attach it to the frame. This improves air flow and keeps the hutch cool.
“Good ventilation is key to maintaining a healthy environment for your rabbits.”
Step 17: Creating a Cleaning Access Door
A cleaning door makes hutch upkeep easy without using the main door. Make it big enough for cleaning but secure against escape or predators. Attach it with hinges and a latch, so it fits flush with the hutch.
Remember: Cleaning regularly is crucial for your rabbit’s health. So, this door should be easy to use and effective.
By adding these features, you’ll make your DIY pallet rabbit house safe and cosy for your rabbit.
Your Complete Pallet Rabbit House DIY Guide: Interior Setup
Now that you’ve built the basic structure of your pallet rabbit house, it’s time to focus on creating a comfortable and stimulating interior environment. A well-designed interior is crucial for your rabbits’ well-being. It provides them with spaces to rest, play, and feel secure.
Step 18: Adding Interior Partitions and Levels
Adding interior partitions and levels can help maximise the space within your rabbit hutch. This creates separate areas for different activities. You can use wooden planks or pallets to create these partitions. Ensure they are securely attached to prevent any accidents.
Consider the size of your rabbits and the space needed for them to move comfortably. You can also add hiding places or visual barriers to reduce stress.
Step 19: Installing Ramps and Exercise Areas
Rabbits require regular exercise to maintain their health. Installing ramps and creating exercise areas within the hutch can encourage movement and play. Use sturdy materials for the ramps and ensure they are not too steep for your rabbits to climb.
Exercise areas can be as simple as a flat surface with some toys or as complex as a multi-level playground. The key is to provide variety and stimulation.
Step 20: Creating Nesting Boxes and Hide Spaces
Nesting boxes and hide spaces are essential for rabbits, providing them with a sense of security and comfort. You can create these using wooden boxes or by converting parts of the hutch into cosy nooks.
Line the nesting boxes with soft bedding material like hay or straw. Ensure the hide spaces are dark and quiet, allowing your rabbits to retreat when they feel the need.

To help you visualise the interior setup, here’s a simple table outlining the key components and their benefits:
| Component | Benefits |
|---|---|
| Interior Partitions | Maximizes space, reduces stress |
| Ramps and Exercise Areas | Encourages exercise, improves health |
| Nesting Boxes and Hide Spaces | Provides security, comfort |
By following these steps, you can create a rabbit hutch interior that is both functional and enjoyable for your pets. Remember, the key is to provide a stimulating environment that caters to your rabbits’ natural behaviours and needs.
Finishing, Sealing, and Weatherproofing Your DIY Outdoor Rabbit Hutch
After building your DIY outdoor rabbit hutch from reclaimed wood, it’s time to finish and weatherproof it. Finishing and sealing are key to keeping your hutch safe from the weather. This makes sure your rabbit has a healthy and safe place to live.
Applying Pet-Safe Wood Sealant
To keep your reclaimed wood rabbit house dry and long-lasting, use a pet-safe wood sealant. Pick a sealant that’s safe for your rabbits to chew on. Follow the instructions to apply the sealant, usually needing two coats for good protection.
- Choose a water-based or natural oil-based sealant to avoid harmful chemicals.
- Make sure the sealant is dry before letting your rabbits in the hutch.
- Reapply the sealant as needed, as the manufacturer suggests, to keep it protected.
Adding Insulation for Temperature Control
Insulation in your recycled wood rabbit hutch helps control the temperature. It keeps the hutch warm in winter and cool in summer. This is important for your rabbit’s comfort and health.
- Use safe, non-toxic insulation like foam board or recycled denim.
- Insulate the walls and floor of the hutch. Make sure it’s covered so rabbits can’t chew on it.
- Think about adding a removable roof or section for easy cleaning.
Installing Protective Screens Against Predators
To protect your rabbits from predators, put up protective screens around the hutch. Use strong wire mesh that’s buried at least 12 inches underground to stop digging predators.
- Choose a mesh size that’s small enough to keep predators out.
- Cover all vents and windows with the wire mesh for full protection.
- Check the mesh often for any damage or weaknesses.
By following these steps, you can make sure your DIY outdoor rabbit hutch is a cosy and safe home. It will also be strong and able to stand up to the weather and potential threats.
Maintenance Tips for Your Homemade Rabbit Hutch
Keeping your DIY pallet rabbit house clean is key to your rabbit’s health. Regular care keeps the hutch clean, safe, and secure. A well-kept, eco-friendly pallet rabbit house is good for your pet and supports sustainable rabbit housing.

Daily and Weekly Cleaning Routines
Every day, clean up soiled bedding, uneaten food, and waste. You should:
- Remove soiled bedding and replace it with fresh material.
- Clean food and water containers daily.
- Check for any signs of illness or stress in your rabbit.
Once a week, do a deeper clean. This includes:
- Disinfect all surfaces with a pet-safe cleaning solution.
- Inspect the hutch for any damage or wear.
- Replace any worn-out bedding or materials.
Monthly Inspections and Repairs
Monthly checks are key to spotting issues early. Look for:
- The structural integrity of the hutch, looking for signs of damage or rot.
- The condition of the roofing, ensuring it’s watertight and secure.
- The security of doors and windows, making sure they are predator-proof.
Fix any repairs quickly to avoid bigger problems.
“Regular maintenance not only prolongs the life of your rabbit hutch but also ensures the health and well-being of your pet.”
— Rabbit Care Expert
Seasonal Weatherproofing and Updates
Seasonal changes mean you need to adjust your hutch care. In:
- In winter, ensure the hutch is well-insulated and protected from cold drafts.
- In summer, provide adequate ventilation and shade to keep your rabbit cool.
- Spring and Autumn, inspect the hutch for any damage caused by winter or summer weather and make necessary repairs.
By following these tips, your pallet rabbit house diy guide project will stay a safe, healthy, and happy home for your rabbit.
🐰 Turn Your Simple Pallet Rabbit House Into a Pro-Level Masterpiece! 🔥
You’ve started building your DIY Pallet Rabbit House…
But what if you never had to guess measurements, struggle with unclear diagrams, or waste money on wrong materials again?
Instead of hunting random plans online…
💡 Get instant access to 16,000 step-by-step woodworking plans — all in one place.
🚀 Why Woodworkers Are Grabbing This Deal
✔ 16,000 “Done-For-You” Detailed Plans
✔ Step-by-Step Instructions (A to Z)
✔ Exact Cutting & Materials Lists
✔ Clear Schematics + Multiple Angle Views
✔ Beginner to Advanced Projects
✔ Includes Rabbit Houses, Outdoor Builds, Furniture & More
✔ Lifetime Free Monthly New Plans
✔ One-Time Payment – No Monthly Fees
✔ 60-Day 100% Risk-Free Guarantee
🔨 Build With Confidence. Build Without Guesswork.
Imagine finishing your rabbit house faster…
With cleaner joints, perfect measurements, and professional results.
👉 Click Here to Unlock All 16,000 Woodworking Plans Now
⚡ Don’t miss this limited-time offer — once the price goes up, it’s gone.
Your next masterpiece is waiting.
Conclusion
You’ve now reached the end of our guide on building a diy pallet rabbit cage. You’ve learned how to make a safe and comfy home for your rabbit using old wood.
Building your own bunny hutch is a great way to give your rabbit a space that fits its needs. It’s also cheaper and better for the environment than buying one. You can make a strong and safe place for your pet, keeping it safe from predators and bad weather.
This guide showed you how to plan, prepare, and build your rabbit’s home. From picking the right pallets to adding the final touches, every step is important. By building your own cage, you’re giving your pet a happy home and helping the planet.
Now that your project is done, watch your rabbit enjoy its new home. With the right care, your homemade hutch will be a safe and happy place for your pet for many years.
FAQ
What type of pallets are safe to use for building a rabbit house?
Use heat-treated pallets marked with “HT” for your rabbit’s safety. Avoid pallets with “MB” as they can be toxic.
How do I determine the right size for my rabbit breed?
Find out how much space your rabbit needs. The hutch should be at least twice as big as your rabbit when stretched out. Remember to think about your rabbit’s adult size, not their current size.
What are the essential tools needed for building a pallet rabbit house?
You’ll need basic tools like a circular saw, drill, and hammer. Also, a tape measure, a square, and safety glasses are important. You might also need a jigsaw or sandpaper for certain tasks.
How do I ensure proper ventilation in my DIY rabbit hutch?
Add wire mesh windows on several sides for good airflow. Make sure there’s enough air without drafts. You can also put vents at the top for hot air to escape.
What kind of roofing material should I use for my pallet rabbit house?
Choose waterproof materials like corrugated metal or asphalt shingles. Make sure the roofing is well-attached and covers the walls enough to protect them.
How often should I clean my rabbit’s hutch?
Clean the hutch every day by removing soiled bedding and waste. Do a deep clean once a week, disinfecting everything. Check the hutch structure monthly and fix any damage.
Can I use regular wood sealant on my rabbit hutch?
No, use pet-safe wood sealant to keep your rabbit safe. Regular sealants can be toxic if your rabbit eats them.
How can I protect my rabbit hutch from predators?
Use strong materials and bury the wire mesh 12 inches underground to stop digging. Cover vents and windows with mesh that predators can’t get through. Make sure the door is secure.
What are some eco-friendly options for insulating my rabbit hutch?
Think about using natural insulation like recycled denim or wool. Make sure the insulation is dry and not accessible to your rabbit to prevent them from eating it.
How can I make my pallet rabbit house more comfortable for my rabbit?
Add soft bedding like hay or straw, and create hiding spots. Include toys and chewables. Make sure the hutch is well-ventilated and safe from extreme temperatures.