Did you know a simple liquid polymer can make a handmade table seem 200% more valuable? You can create diy epoxy resin crafts to make your living area look luxurious and sleek. And you won’t have to spend a lot of money.
Modern homes love these artistic concepts for their smooth surface and long life. Making custom coasters can add elegance to any room in your house.
These creative tasks are easy to do and can look professional without costing much. With 64 design styles to choose from, you can find something that fits your style perfectly.
Key Takeaways
- Achieve a high-end designer look using affordable liquid polymers.
- Modern finishes offer superior durability and a glass-like shine.
- Personalise your space with custom accents and small functional pieces.
- Explore over 64 unique design concepts to fit any interior style.
- Simple DIY steps lead to professional-grade results for beginners.
- Liquid coatings provide a smooth, easy-to-clean surface that lasts for years.
1. Epoxy Resin Coasters with Metallic Accents
Make elegant epoxy resin coasters with metallic accents to protect your surfaces in style. These coasters are a favourite DIY project because they’re durable and can be customised. You can make them fit any decor style, making them a great addition to your home.
You’ll need some basic materials and tools to start. You’ll need epoxy resin, hardener, metallic pigments, alcohol inks, silicone moulds, mixing cups, stir sticks, and a heat gun or torch.
Gathering Your Materials and Tools
To start, collect all the materials and tools you need. For this project, you will need:
- Epoxy resin and hardener
- Metallic pigments or powders
- Alcohol inks
- Silicone coaster moulds
- Mixing cups and stir sticks
- A heat gun or torch for bubble removal
- Protective gear (gloves, goggles)
Mixing and Pouring Your First Layer
First, mix the epoxy resin and hardener as the instructions say. Then, pour the mix into your silicone molds, filling them to the right level.
Adding Metallic Pigments and Alcohol Inks
To add metallic touches, mix metallic pigments into your epoxy or use alcohol inks for patterns. Try different methods like layering or swirling to get the look you want.
Demolding and Applying a Protective Finish
Once the epoxy is set, carefully take out your coasters. Sand them to smooth out any rough spots. Then, apply a protective finish to make them last longer and look better.
By following these steps, you can make stunning epoxy resin coasters with metallic accents. They’ll add elegance to your home decor.
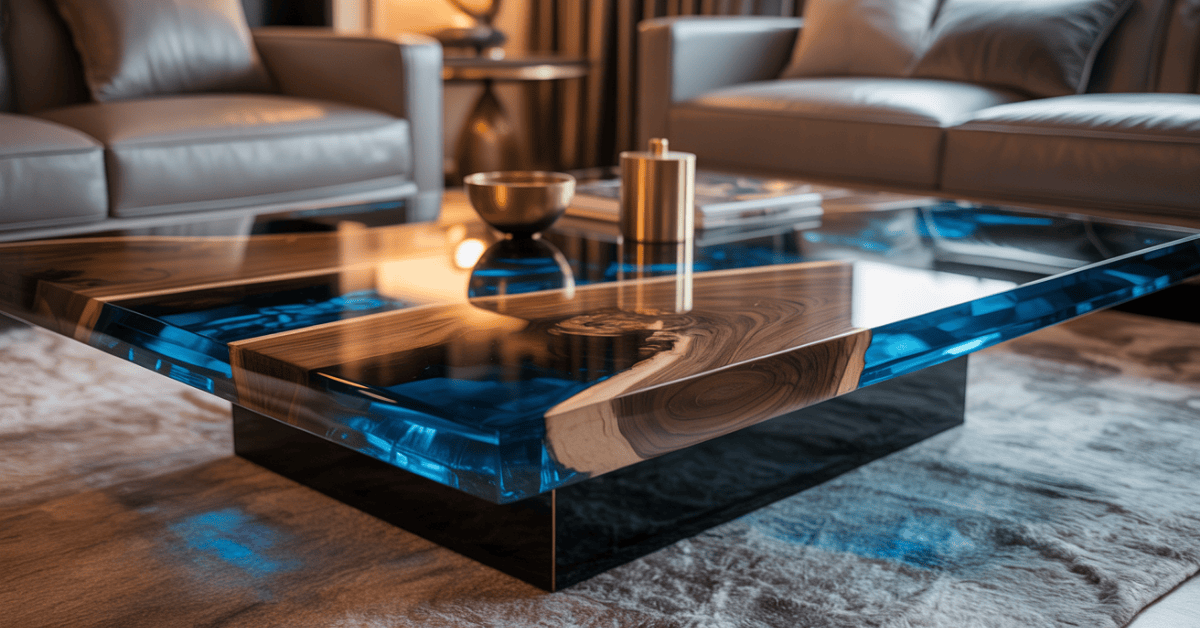
2. Stunning River Table Coffee Table
Epoxy resin and live-edge wood make a stunning river table coffee table. This project combines natural wood beauty with epoxy resin’s versatility. It lets you create a unique piece that shows off your style.
Selecting and Preparing Live Edge Wood Slabs
Start by picking the perfect live-edge wood slabs for your table. Look for slabs with interesting shapes and character. These will add to your table’s unique beauty.
Once you have your slabs, clean and dry them well. It’s crucial to choose wood slabs that are dry and free from debris or imperfections. You might need to use a wood planer or sander to smooth out the surfaces.
Building Your Dam and Setting Up the Pour
To create the river effect, build a dam around your wood slabs. You can use silicone, rubber, or wooden strips for this. Make sure your dam is secure and watertight to prevent leaks.
Before pouring the epoxy resin, make sure your workspace is well-ventilated. Also, mix your epoxy resin according to the manufacturer’s instructions. Prepare any pigments or additives you’re using to achieve the desired colour and effect.

Creating the Flowing River Effect with Blue Pigments
To create the flowing river effect, mix blue pigments with your epoxy resin. Layer the resin and pigment mixture to simulate water movement. Use pouring, manipulating, and tilting techniques to achieve the desired effect.
Sanding, Polishing, and Final Assembly
After the epoxy resin cures, sand and polish the surface for a high-gloss finish. Start with coarse-grit sandpaper and move to finer grits for a smooth surface.
Once sanded and polished, assemble your river table coffee table. Attach the legs and any hardware securely. Make sure everything is stable and level for safety.
| Material | Quantity | Purpose |
|---|---|---|
| Live Edge Wood Slabs | 2-3 | Table Top |
| Epoxy Resin | Varies | Creating River Effect |
| Blue Pigments | Varies | Coloring Epoxy Resin |
| Dam Material | Varies | Containing Epoxy Resin |
3. Geode-Inspired Resin Wall Art
Epoxy resin wall art inspired by geodes adds colour and texture to any room. Geodes have amazed people for centuries. Making their beauty with epoxy resin is a fun project.
Choosing Your Canvas and Colour Palette
Start by picking your canvas for geode-inspired resin wall art. You can use wood, canvas, or metal. The canvas affects the artwork’s look and feel. Then, pick colours like blue, purple, and gold to match geodes.
Tip: Mix colours for a unique piece. Add metallic pigments or alcohol inks for a fancy finish.
Layering Technique for Depth and Dimension
To get a geode’s depth, layer resin. Start with clear resin, then add colored resin layers. Use different colours and techniques for a special effect.
“The layering technique allows you to build up colors and create a sense of depth, much like the natural formation of a geode.” – Resin Artist
Adding Crushed Glass and Glitter for Crystalline Effects
Add crushed glass or glitter for a sparkly effect. It catches light and adds shine to your art.
Here’s a comparison of materials for a crystalline effect:
| Material | Effect | Ease of Use |
|---|---|---|
| Crushed Glass | Sparkly, crystalline effect | Easy |
| Glitter | Shimmery, textured effect | Easy |
| Mica Powder | Metallic, shimmery effect | Moderate |
Creating Multiple Pieces for a Gallery Wall
Make several geode-inspired resin art pieces for a gallery wall. Use different sizes and colours for interest and cohesion.
Follow these steps and try new techniques and materials. You’ll create beautiful epoxy resin wall art that enhances your home decor.
4. Elegant Jewellery and Trinket Tray

With epoxy resin, you can make a stunning jewellery and trinket tray. It’s perfect for adding elegance to your home. It’s a great project for beginners in epoxy resin art.
Selecting the Perfect Silicone Mould
The first step is to pick the right silicone mould. You can choose from simple shapes to more intricate ones. Make sure it’s high-quality silicone that works well with epoxy resin.
Think about the size and depth of the mould. A deeper mould gives you more defined edges. A shallower mould makes the design more subtle. You can also pick a mould with a pattern for extra flair.
Incorporating Gold Leaf and Dried Flowers
To make your tray even more elegant, add gold leaf and dried flowers. Gold leaf gives it a luxurious feel. Dried flowers add a delicate beauty.
Achieving a Glass-Like Finish
For a high-quality tray, aim for a glass-like finish. Mix your epoxy resin well and pour it slowly into the mould. Use a heat gun to get rid of bubbles.
After it’s cured, sand it to a high gloss. Start with coarse-grit sandpaper and move to finer grits for a smooth finish.
Adding Felt or Cork to the Bottom
To protect surfaces, add felt or cork to the bottom. Cut a piece to fit and attach it with strong adhesive.
| Material | Purpose |
|---|---|
| Epoxy Resin | Main material for the tray |
| Gold Leaf | Adds a luxurious touch |
| Dried Flowers | Embedded for a delicate appearance |
| Felt or Cork | Prevents scratching of surfaces |
By following these steps, you can make a beautiful and useful epoxy resin tray. It’s a great way to show off your DIY skills and add a personal touch to your home.
5. Live Edge Charcuterie Board with Resin Inlay
A live-edge charcuterie board with resin inlay is a perfect blend of art and functionality for any home. This project combines the natural beauty of live-edge wood with the elegance of epoxy resin. It creates a unique piece that’s sure to impress your guests.
Choosing Food-Safe Resin and Wood Types
When creating a charcuterie board, it’s crucial to select materials that are safe for contact with food. For the resin, look for products that are labelled as “food-safe” or “FDA compliant.” Some popular options include Entropy Resins and ProMarine Supplies. For the wood, choose durable, hardwood types like maple, walnut, or cherry, ensuring they are properly sealed.
The type of wood you choose can significantly impact the final appearance of your charcuterie board. Consider the colour and grain pattern of the wood and how it will complement the epoxy resin. For example, a dark wood like walnut can create a striking contrast with brightly colored resin.
Filling Cracks and Voids with Colored Resin
One of the unique aspects of working with live-edge wood is the natural cracks and voids that can be filled with colored resin. This not only adds visual interest but also helps to stabilise the wood. To achieve a beautiful, even fill, mix your epoxy resin with pigments or dyes that match your desired colour scheme.
Sanding to a Smooth Surface
To ensure your charcuterie board is both beautiful and functional, it’s essential to sand it to a smooth finish. Start with coarse-grit sandpaper (around 120-150 grit) and work your way up to finer grits (220-240 grit), ending with a high-gloss polish for a glass-like finish.
Applying Food-Safe Mineral Oil Finish
To protect your charcuterie board and maintain its appearance, apply a food-safe mineral oil finish. This will help to prevent cracking and ensure the wood remains moisturised. Regularly oiling your board will also make it easier to clean and maintain.
| Material | Food Safety | Durability |
|---|---|---|
| Entropy Resins | Yes | High |
| ProMarine Supplies | Yes | High |
| Maple Wood | Yes (when sealed) | Medium |
| Walnut Wood | Yes (when sealed) | High |
By following these steps and choosing the right materials, you can create a stunning live-edge charcuterie board with resin inlay. It’s both functional and beautiful, perfect for enhancing your resin wood home decor and impressing your guests with your epoxy resin woodworking ideas.
6. Contemporary Resin Wall Clock

A contemporary resin wall clock can be a stunning addition to any room. It offers both functionality and a unique piece of art. You can use epoxy resin decor ideas to create a clock that not only tells time but also adds elegance to your walls.
Creating Your Clock Base with Moulds or Freeform Pouring
To start, you’ll need to decide on the shape and size of your clock. You can either use a mould for a uniform shape or go for freeform pouring for a more organic look. If using a mould, make sure it’s big enough for the clock mechanism. For freeform pouring, create a dam to contain the resin.
Designing with Swirls, Cells, and Colour Blocking
The design possibilities are endless for your resin wall clock. You can mix different colours of resin for a marbled effect or add a special additive for cells. Colour blocking is another way to add visual interest. Try different techniques to find what works best for you.
Drilling and Installing the Clock Mechanism
Once your resin is fully cured, drill a hole in the centre for the mechanism. Use a drill bit that fits your mechanism’s shaft. After drilling, install the clock hands and attach the mechanism to the back.
Adding Numbers or Keeping It Minimalist
The final step is to decide how to display the time. You can add numbers or markers around the edge or keep it minimalist with just the clock hands. If adding numbers, use a paint pen or stickers. For a subtle look, leave the clock face blank.
With these steps, you can create a beautiful and functional contemporary resin wall clock. It adds elegance to your home decor. Whether you’re looking for a unique piece of art or a functional time-telling device, a resin wall clock is a great creative resin project to try.

7. Decorative Bookends with Preserved Botanicals
Add a touch of nature to your bookshelf with decorative bookends featuring preserved botanicals. This project combines the beauty of real flowers with the durability of epoxy resin. It creates a unique piece of home decor that showcases your creativity.
To start, you’ll need to preserve the flowers you want to use. This involves pressing and drying them to remove excess moisture.
Pressing and Drying Flowers for Best Results
To press flowers, place them between sheets of paper towels and weigh them down with a heavy book. Leave them undisturbed for several weeks to allow the flowers to dry completely. This step is crucial for preventing mould and ensuring that your flowers remain intact when cast in resin.
Some flowers dry better than others. Delicate flowers like violas and pansies work well, while thicker flowers may not dry as effectively.
Arranging Botanicals in Your Mould
Once your flowers are dry, it’s time to arrange them in your mould. Choose a mould that is the right size for your bookends and prepare it according to the manufacturer’s instructions.
Experiment with different arrangements until you find one that you like. You can use a single type of flower or mix different varieties for a more interesting look.
- Start with a base layer of resin to prevent the flowers from floating.
- Arrange your flowers on top of the base layer.
- Pour more resin to cover the flowers completely.
Pouring in Stages to Prevent Floating
To prevent your flowers from floating away, pour the resin in stages. Start with a thin layer, allow it to cure, and then add more resin.
This technique ensures that your flowers remain in place and that the resin cures evenly.
Weighing and Attaching Felt Pads
Once your bookends are cured, remove them from the mould and sand any rough edges. To prevent scratching your bookshelf, attach felt pads to the bottom of the bookends.
Weigh your bookends to ensure they are heavy enough to hold your books in place. If necessary, you can add more resin or embed weights into the bookends.
With these decorative bookends, you can add a personal touch to your home decor. They showcase your creativity with diy epoxy resin crafts and resin art ideas.
8. Ocean Wave Resin Table Lamp

Create a mesmerising ocean wave resin table lamp for your living space. It combines epoxy resin beauty with a table lamp’s function. It’s a unique epoxy resin decor idea for your home.
Building a Wooden Frame or Using a Mould
First, choose between a wooden frame or a mould for your lamp base. A frame lets you customise, while a mould is simpler. If you’re new to resin, a mould is a safer start for your creative resin project.
Mixing Translucent Blues and Whites for Wave Patterns
To get the ocean wave look, mix translucent blues and whites. Start with a blue resin base and add white layers for foam. This method is key to a realistic resin furniture project look.
Creating Foam Effects with White Resin
To make foam, mix white resin with blue. Use a stir stick or heat gun to create wave patterns. This makes your resin furniture project look like ocean foam.
Layering for Depth and Movement
Layering gives your design depth and movement. Pour resin in layers, letting each cure before adding more. This slow process is crucial for a realistic wave effect.
Installing LED Lights and Electrical Components Safely
When working with electrical parts, safety is key. Always follow safety rules when adding LED lights and other parts. If you’re not sure, get a pro to avoid risks.
By following these steps, you can make a beautiful ocean wave resin table lamp. It adds elegance to your home and shows off your epoxy resin decor ideas and creative resin projects.
9. Transform Your Space with Epoxy Resin Home Decor Projects for Countertops
With epoxy resin, you can make beautiful, unique countertops that show off your style. These countertops are great for updating your kitchen or bathroom. They are durable, easy to clean, and can match any decor.
Preparing and Priming Existing Countertop Surfaces
Before you start, clean your countertop well to remove dirt, grease, or old adhesive. Make sure the surface is dry and free of dust for the epoxy to stick well. If there are cracks or damage, fill them with a suitable filler and let it dry as instructed.
Priming the surface is also key to a strong bond. Use a primer recommended by the epoxy resin maker and follow the instructions.
Calculating Resin Amounts for Large Pours
To avoid running out of epoxy resin or having too much, calculate the right amount. Measure the length, width, and thickness of your countertop. Use an online epoxy resin calculator or ask a professional if you’re unsure.
Pouring and Spreading Techniques for Even Coverage
Even coverage is important for a professional look. Pour the epoxy resin mixture in the centre of the countertop. Use a spreader or trowel to spread it evenly. Work in sections if needed, to keep coverage even and prevent the resin from setting too soon.
Using a Torch to Remove Bubbles
Bubbles can be a problem with epoxy resin. A torch can help remove them. Pass the flame slowly and evenly over the surface to pop bubbles. Be careful not to apply too much heat, which can damage the resin or make it cure too fast.
Edge Finishing Methods
Finishing the edges of your countertop is key to a polished look. You can use a bead of resin around the edges or a router for a decorative edge. Make sure the edges are smooth and even for a professional finish.
Curing Time and When You Can Use Your New Surface
The curing time for epoxy resin countertops varies. It can take a few hours to several days for the resin to fully cure. Follow the manufacturer’s instructions for curing times and avoid using your countertop until it’s fully cured to prevent damage.
10. Custom Drawer Pulls and Cabinet Hardware

Epoxy resin is great for making custom drawer pulls and cabinet hardware. You can create unique pieces that match your style. This way, your kitchen or bathroom will look even better.
Making Your Own Silicone Moulds from Existing Hardware
To begin, you need to make a silicone mould from your hardware. First, apply a release agent to the hardware. Then, cover it with silicone. After the silicone hardens, remove the hardware to get a precise mould for your epoxy resin.
Tip: Make sure the silicone is fully cured. This step is crucial to avoid mould imperfections.
Embedding Metal Threaded Inserts
For functional hardware, you’ll need to add metal threaded inserts to your epoxy resin. This lets you screw the hardware in place securely. Place the inserts in the mould before pouring in the epoxy resin.
Colour Matching to Your Kitchen or Bathroom Decor
Using epoxy resin lets you match the colour to your decor. You can add pigments to the resin to get the right shade. This way, your custom hardware will blend perfectly with your space.
Installing Your Custom Hardware
After your epoxy resin hardware is dry, you can install it. Measure carefully and mark the screw holes before drilling. This step needs patience and precision for a professional look.
By following these steps, you can make unique diy epoxy resin crafts. These crafts not only improve your cabinets and drawers but also add to your epoxy resin decor ideas. Doing creative resin projects like this can make your living space truly yours.
11. Statement Picture Frames with Resin Decorative Borders
Elevate your home decor with statement picture frames featuring epoxy resin decorative borders. This creative project allows you to explore epoxy resin art for beginners and add a personal touch to your home.
Protecting the Glass and Photo Opening
To start, you need to protect the glass and photo opening of your picture frame. Apply tape around these areas to prevent the resin from sticking to them. You can use painter’s tape or masking tape for this purpose. Make sure the tape is pressed firmly onto the frame to create a seal.
Pouring Resin Around the Frame Edges
Mix your epoxy resin according to the manufacturer’s instructions. Pour the mixed resin around the edges of the picture frame, creating the decorative border. Use a credit card or a similar tool to spread the resin evenly and remove any air bubbles.
Adding Embellishments Like Shells, Beads, or Glitter
To make your picture frame more unique, you can add embellishments such as shells, beads, or glitter to the resin before it cures. This step allows you to get creative with your resin art ideas and personalise your decor.
Creating a Cohesive Set for Your Gallery Wall
If you’re creating multiple picture frames, consider making a cohesive set for your gallery wall. Use the same colour scheme or type of embellishments across the frames. This will create a visually appealing display that showcases your epoxy resin decor ideas.
Here’s a comparison table to help you decide on the best embellishments for your project:
| Embellishment | Description | Effect |
|---|---|---|
| Shells | Crushed or whole shells add a beachy vibe | Coastal or beach-themed decor |
| Beads | Colorful beads can match or contrast with the frame | Bohemian or eclectic decor |
| Glitter | Adds sparkle and shine to the resin border | Modern or glamorous decor |
🔥 Take Your Resin Projects to the NEXT LEVEL!

You’ve seen beautiful epoxy designs… now build stunning wood + resin masterpieces like a pro!
👉 Stop wasting time on incomplete ideas — get ready-to-build plans that actually work.
💡 Why Smart DIY Creators Choose This:
- 🪵 16,000+ step-by-step woodworking plans (tested & proven)
- 📐 Exact measurements, cut lists & diagrams — no guesswork, no costly mistakes
- 🎯 Perfect for epoxy tables, shelves, decor & custom furniture
- ⏱️ Save time — start building instantly instead of searching for plans
- 🛠️ Works even with basic tools & small workspace
- 🔄 New plans added monthly + lifetime access
⚠️ Stop Ruining Expensive Resin Projects…
Bad plans = wasted wood + wasted resin + wasted time
👉 Use tested blueprints that guide you from start to finish
🚀 Build Like a Pro Starting Today:
👉 [Get Instant Access to 16,000+ Woodworking Plans]
💬 Your dream epoxy creation isn’t difficult… You just need the right plan.
Conclusion
You now have a complete guide to 12 amazing epoxy resin home decor projects. These projects can make your living space look better. You can make everything from useful items like coasters and charcuterie boards to beautiful pieces like geode-inspired wall art and ocean wave table lamps.
Trying out epoxy resin home decor projects and diy epoxy resin crafts lets you show off your creativity. It adds a special touch to your home. Whether you’re experienced or just starting, these resin art ideas give you lots of chances to try new things.
With epoxy resin, you can make pieces that are both luxurious and long-lasting. They show off your style and make your home unique. So, get creative and start making your space better with these cool and beautiful projects.
FAQ
What is the best way to get started with epoxy resin art for beginners?
Start with small diy epoxy resin crafts like coasters or jewellery trays. Choose a brand like ArtResin for its easy use and safety. It’s perfect for home decorating with epoxy resin.
How do you achieve a crystal-clear, bubble-free finish on epoxy resin wall art?
Use a propane torch or a Wagner heat gun to pop bubbles right after pouring. This method gives your resin art ideas a clear, glass-like finish.
What type of wood is recommended for resin wood home decor and river tables?
Use kiln-dried live-edge slabs for top-notch resin furniture projects. Black Walnut, Cherry, or Olive Wood from Black Forest Wood Co are great choice for beauty and stability.
Are epoxy resin home decor projects, like charcuterie boards, safe for food contact?
For food-safe diy resin decor projects, use FDA-compliant resin. Brands like Max Clear Grade or ProMarine Supplies are good options. Just follow the mixing instructions carefully.
How can you prevent flowers from wilting or losing colour in creative resin projects?
Dry flowers completely before using them in your epoxy resin home decor projects. Use ACTIVA Silica Gel to dry them. This keeps the flowers looking fresh and vibrant.
Is it possible to use these epoxy resin woodworking ideas for kitchen countertop renovations?
Yes, you can use how to use epoxy resin for home decor for kitchen updates. Stone Coat Countertops are great for durable, heat-resistant resin furniture projects.
How do you maintain and clean your finished diy epoxy resin crafts?
Clean your epoxy resin wall art and furniture with a soft cloth and mild soap. For scratches, use Novus Plastic Polish to restore shine.
Can I create my own hardware as part of my home decorating with epoxy resin?
Yes, making custom drawer pulls and knobs is a great idea. Use silicone moulds and Hillman inserts for durable, unique hardware.


