Make your holiday season warm and charming with these 10 DIY wood Christmas ornaments. Did you know 50% of DIY wood ornament tutorials use hot glue? These ornaments bring a personal touch to your tree and create lasting memories.
Explore wood slice ornaments and rustic wooden stars in this article. It’s your guide to making the perfect DIY wood Christmas ornaments. You’ll learn to use natural materials like twine, burlap, and cinnamon sticks in these unique projects.
Key Takeaways
- Discover 10 creative DIY wood Christmas ornament ideas for a rustic holiday theme
- Learn how to incorporate natural materials like twine, burlap, and cinnamon sticks into your DIY ornaments
- Explore wood slice ornaments, rustic wooden star designs, and wood bead wreaths
- Uncover the benefits of handmade wooden decorations for your Christmas tree
- Gain inspiration to create personalised, cherished holiday memories
Introduction to Rustic Holiday Crafting
Bring the cosy charm of rustic holiday decor into your home with wooden Christmas ornaments. These handmade decorations add a special touch to your holiday decor. Explore rustic ornament ideas, wooden tree ornaments, and holiday wood crafts to make your space feel like a winter wonderland.
Benefits of Handmade Wooden Decorations
Handcrafted wooden ornaments add warmth and authenticity to your holiday display. They give your Christmas tree a unique look that shows off your style. Wooden decorations fit perfectly with farmhouse, woodland, or minimalist themes.
Essential Tools and Materials
To make your own wooden Christmas ornaments, you’ll need some basic tools and materials. Get X-acto knives, hot glue guns, paint brushes, and wood crafting tools. You’ll also need wood slices, beads, twine, felt, and acrylic paints for your project.

Safety Considerations
When working with wood and tools, safety is key. Be careful with sharp tools like X-acto knives and hot glue guns to avoid accidents. Always work in a well-ventilated area and wear protective gear when needed.
Adding rustic wood crafts to your holiday decor makes your home warm and inviting. Embrace the natural beauty of wood and let your creativity shine. Craft unique, handmade ornaments that will be treasured for years.
Getting Started with DIY Wood Christmas Ornaments
Making your wooden ornaments is a fun way to bring rustic charm to your holiday decor. It’s perfect for both seasoned DIYers and beginners. Creating your ornaments lets you make your home special for the holiday season.
First, gather all the materials and tools you need. Use different types of wood, like pine, cedar, or reclaimed wood, for unique textures. Make sure your workspace is ready with a scroll saw, drill, sandpaper, and embellishments like paint or wood-burning tools.
Start with easy projects like wood slices or star ornaments. This will help you get better and more confident. Try painting, wood burning, or adding natural elements to make your ornaments stand out.
As you get better, don’t be scared to try new things. The fun of making DIY ornaments is in the process of learning and making them your own. Each ornament shows off your creativity and holiday spirit.
Let your creativity shine by making DIY wood Christmas ornaments. With a bit of imagination and the right tools, you can turn simple wood into beautiful decorations. These will add a warm, rustic feel to your holiday home.
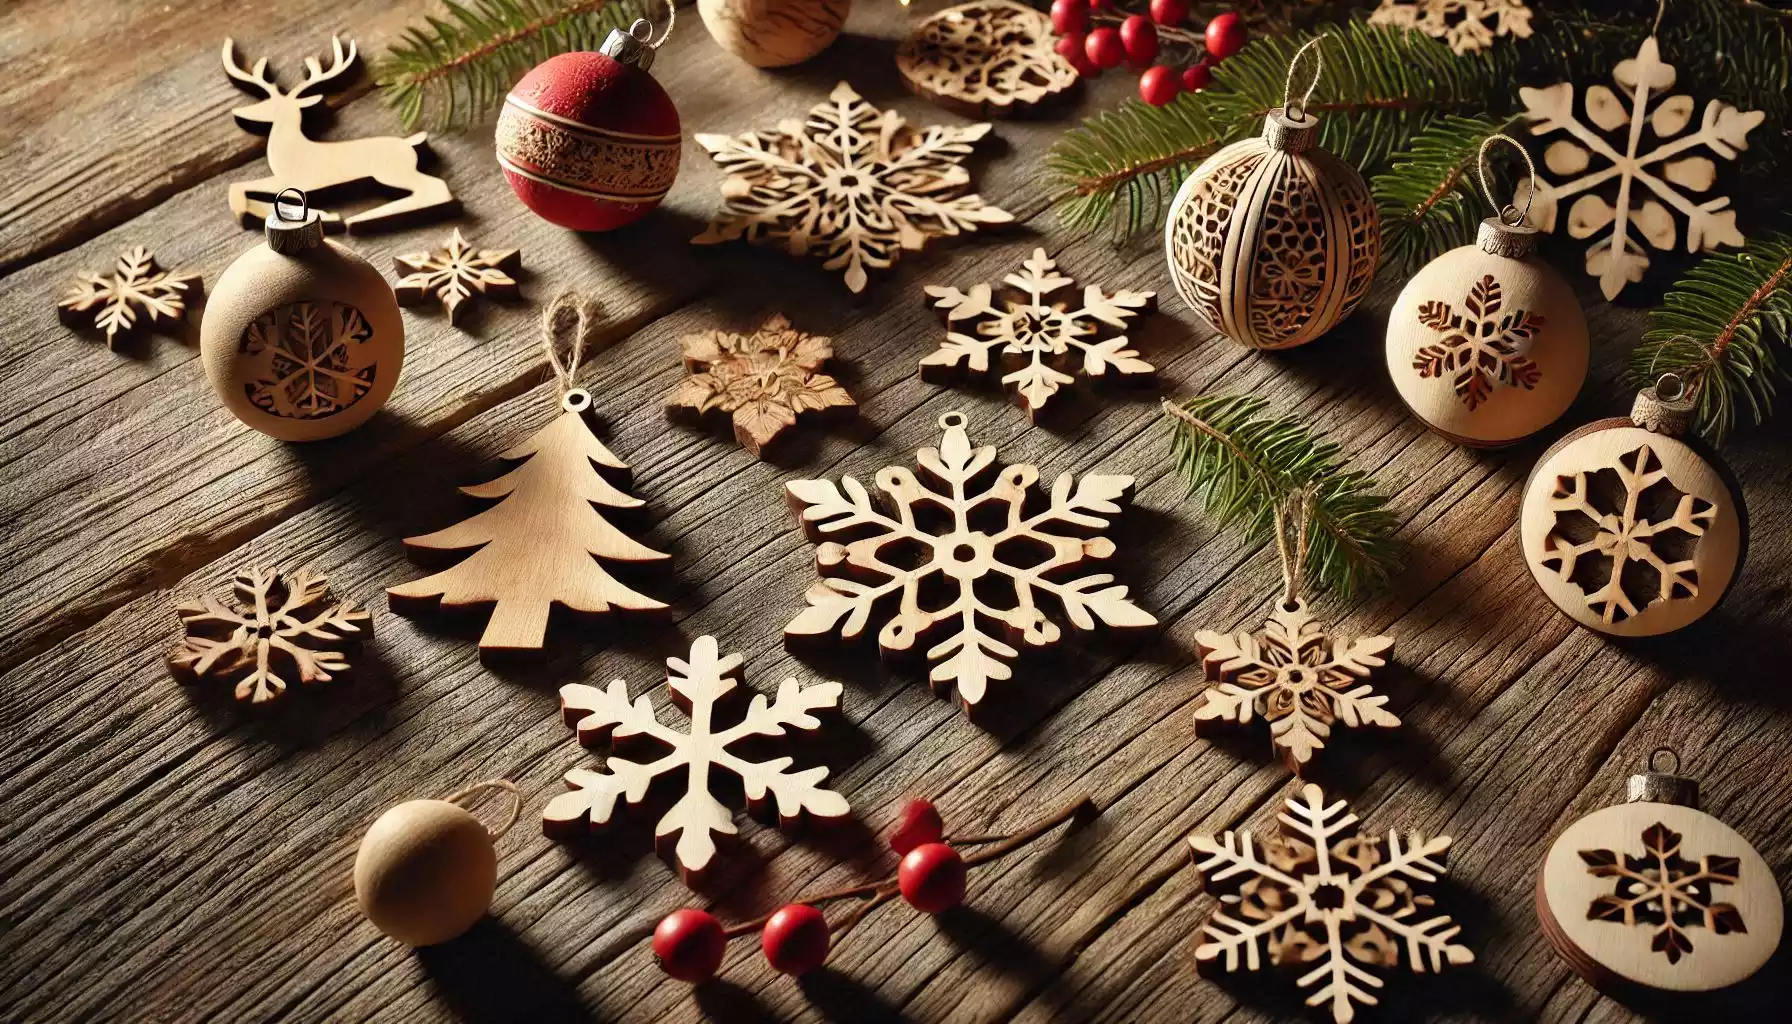
Wood Slice Ornaments with Painted Designs
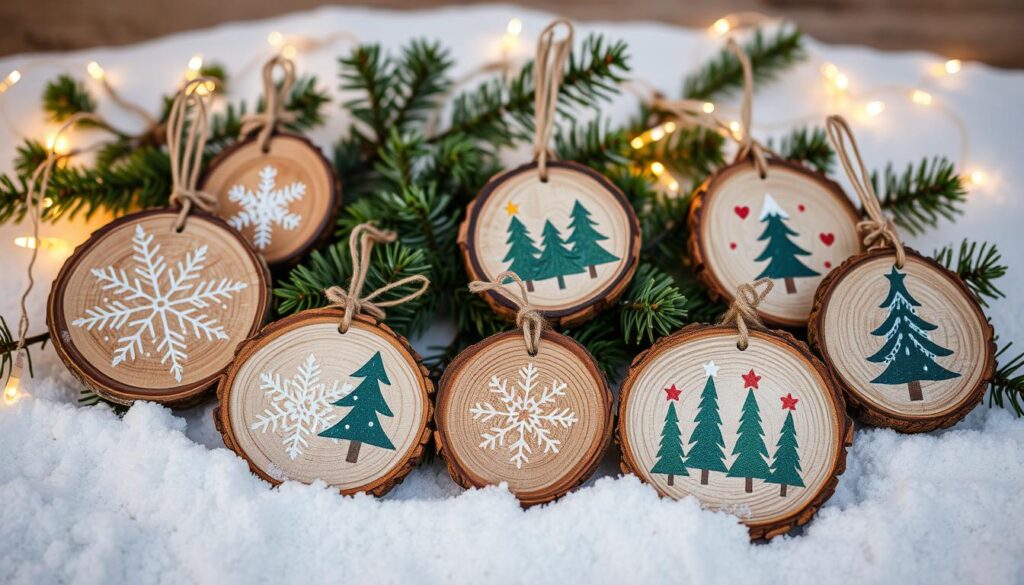
Bring rustic charm to your holiday decor with wood slice ornaments. These natural pieces are perfect for showing off your creativity. They add a handmade touch to your Christmas decorations.
Natural Wood Selection Tips
Choose wood slices with unique grain patterns or bark edges for extra charm. Pine and birch poles are great for ornaments. You can also find pre-cut wood rounds in various sizes and colors at craft stores.
Paint and Design Techniques
Get creative by painting festive designs on the wood slices. You can paint snowflakes, Christmas trees, or even messages. Try stencils or freehand painting with acrylics. Add embellishments like stamp letters, twine, and holiday craft supplies.
Sealing and Finishing Methods
Seal the ornaments with clear varnish or polyurethane after painting. This protects the design and highlights the wood’s beauty. It’s important to keep them looking good for years to come.
Explore wood slicing art and make your own unique Christmas ornaments. With creativity and the right materials, you can turn simple wood slices into beautiful, eye-catching ornaments.
Rustic Wooden Star Ornaments
Make your holiday decor shine with rustic wooden star ornaments. These DIY ornaments are simple to make and bring a cosy, rustic feel to Christmas. Begin by collecting five twigs, each 8″ long, along with mini pinecones, faux evergreen, and jute twine. Use a glue gun to shape the twigs into a star and hold them together.
Wrap the star with jute twine to add texture and interest. You can also stain or paint the stars for colour. For a distressed look, use chalk mineral paint and a putty knife.
These ornaments are great as gifts or for decorating your tree. Try different sizes and decorations to make your ornaments unique.
Wood Bead Wreath Ornaments
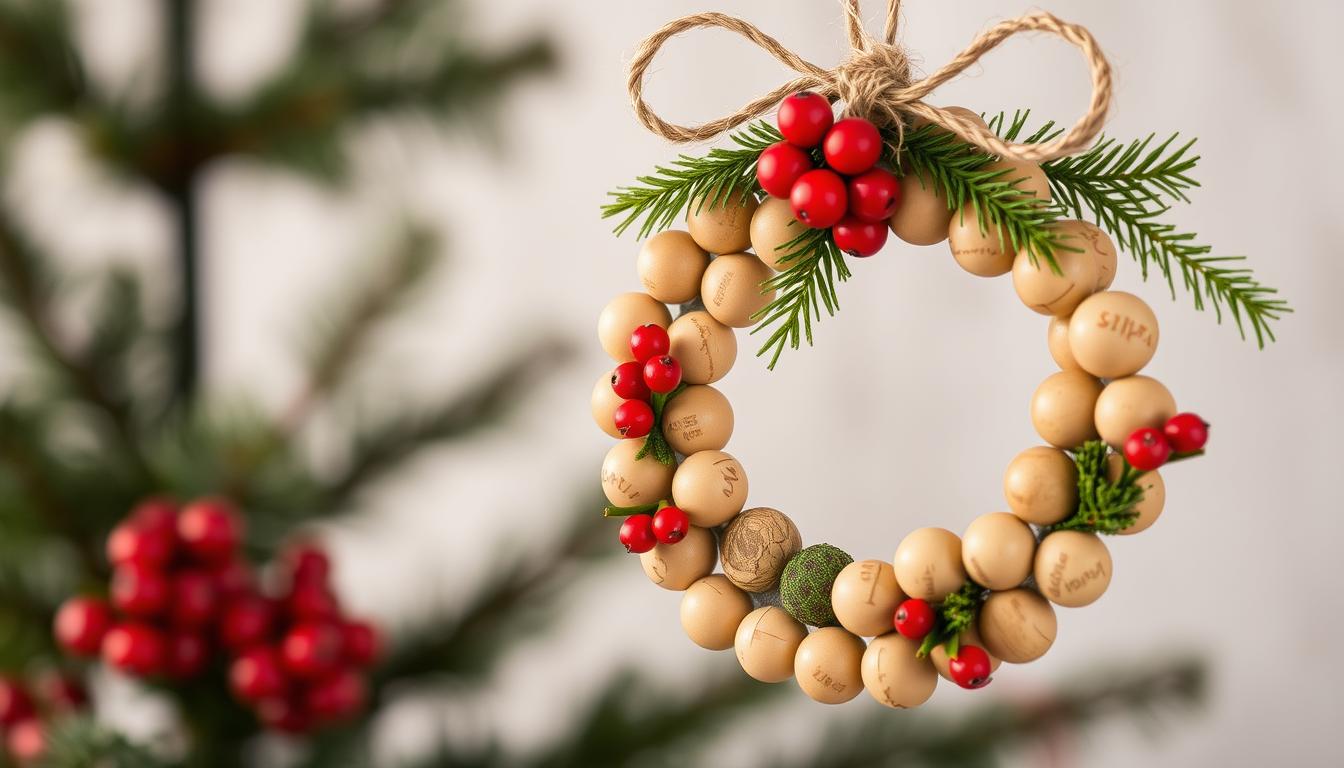
Make your holiday decor shine with wood bead wreath ornaments. These rustic crafts bring a modern, minimalist vibe to any festive setting. Start by picking various wood beads in sizes and shapes for a visually appealing ornament.
Bead Selection Guide
For a farmhouse look, use 14-18mm wood beads. These beads strike a perfect balance, making your wreath ornament substantial yet delicate. Mix round, oval, and irregular beads for depth and texture.
Assembly Techniques
To make the wreath, thread beads onto a flexible wire in a circle. When it’s the right size, tie off the wire ends. Add small jingle bells or ornaments for extra charm.
Decorative Finishing Touches
Finish with a ribbon or twine bow at the top for hanging. You can leave them natural or paint them to fit your holiday colours. Scented wood beads can also add a lovely aroma to your home.
Post your wood bead wreath creations on Pinterest and Facebook to share or save. These ornaments cost about $3 and take only 20 minutes to make, making them a fun, affordable project for the family.
Reclaimed Wood Gift Tag Ornaments
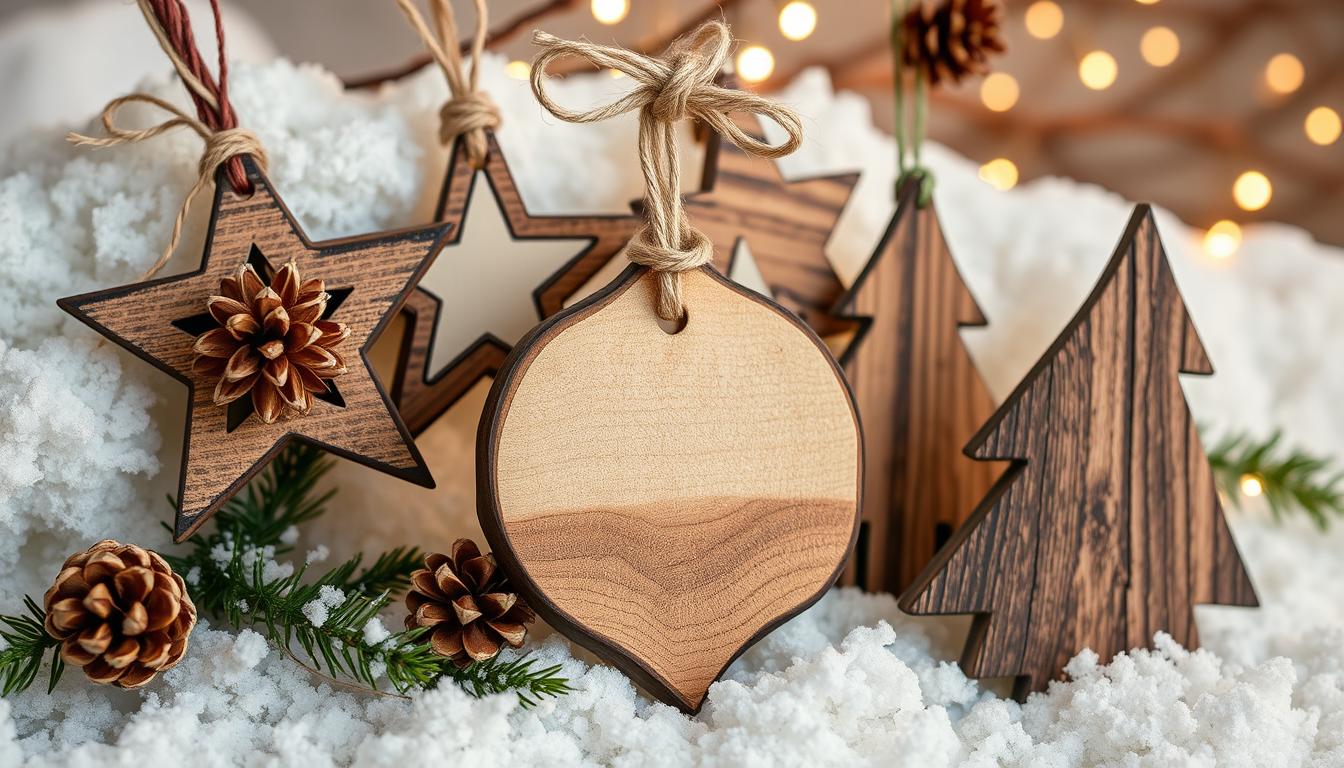
Make your holiday gifts special with these reclaimed wood gift tag ornaments. Turn small pieces of salvaged wood into personalised tags that also decorate your tree. Sand the wood smooth, cut it into tag shapes, and add names or designs with wood burning tools or paint. A small hole at the top lets you hang them with a ribbon or twine.
Use different types of reclaimed wood for varied colors and textures, making your display stunning. These ornaments bring rustic charm to your holiday decor and serve as personalised gift tags, blending style and function.
- Handmade reindeer Christmas gift tags, pack of 10
- Laser-engraved Wood Christmas gift tags
- Each set of wooden gift tags includes four tags: 1. Something To Read 2. Something To Wear 3. Something You Want 4. Something You Need
- Farmhouse Tags Hand Painted Ornaments (6 in a set)
- Personalised Stocking Name Tags made to order with personalisation
- Wood beaded stocking tags with a total of 3 natural/neutral beads
- Wood Christmas gift tags with bead accents and a red, green, and white bow
These ornaments are a hit, with a video getting over 12,000 views and 1,100 reactions. They add a personalised and eco-friendly touch to your holiday gifts, sure to please your loved ones.
When making these ornaments, use stencils about 3 inches in size. The tags are 2.5 inches by 3.5 inches, perfect for your designs. Use acrylic paint for a vibrant and lasting finish, applying two coats on each side.
The stencil set has 80 different designs, offering a wide range of festive patterns. Add glitter or gemstones to make your designs pop. With a cost of about $25, these ornaments are a budget-friendly and thoughtful holiday craft.
“These rustic gift tag ornaments are a hit on Pinterest, with 349 shares, and have garnered 2 shares on Facebook, showcasing their popularity and appeal.”
Bring warmth and charm to your holiday with these unique gift tag ornaments. They add rustic elegance to your decor and make special keepsakes for your loved ones.
Wood Burning Christmas Designs
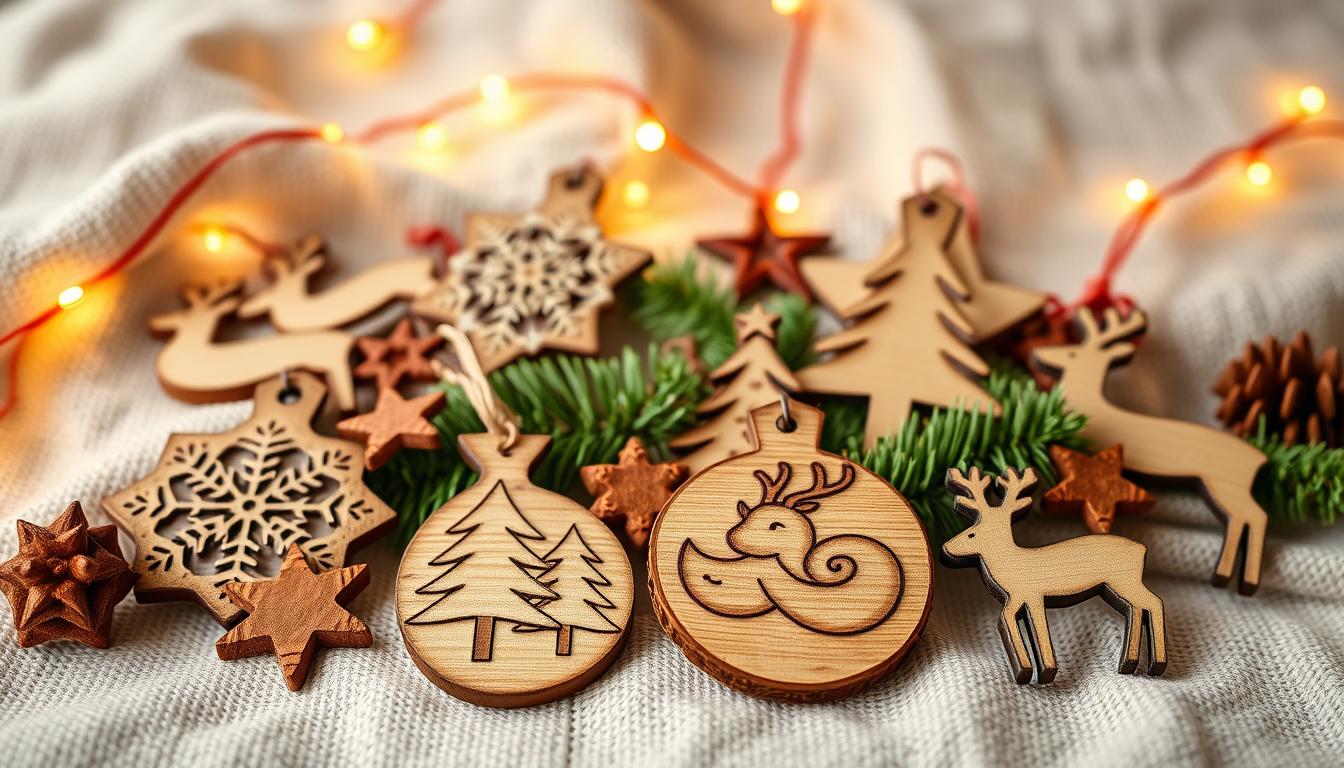
Make your DIY wood Christmas ornaments special with wood burning. This rustic method adds detailed, personal touches. It turns simple wooden pieces into unique holiday decorations. Whether you’re new to crafting or experienced, wood burning lets you create beautiful, unique ornaments for your Christmas tree.
Pattern Selection
Wood burning offers endless design options. Start with simple designs like snowflakes, stars, or Christmas trees for beginners. As you get better, try more complex patterns and add text or monograms for a personal touch.
Wood Burning Techniques
To make your designs come alive, use a good wood-burning tool with different tips. Try different techniques to get shading, texture, and depth. After your design is done, sand the wood lightly to smooth out edges. Then, apply a clear sealer to protect your work and make the rustic finish pop.
With practice and creativity, you can turn plain wooden ornaments into beautiful DIY Christmas decorations. Impress your friends and family with your wood-burning skills. Your unique, handmade ornaments will be the highlight of the season.
Mason Jar Lid and Wood Accent Ornaments
Make your holiday season more rustic with DIY wood Christmas ornaments. Use mason jar lids and wooden pieces to create unique ornaments. This project is fun and won’t break the bank, making your home look festive and farmhouse-style.
Start by collecting your materials: 3 mason jar lids, jute twine, fabric scraps, Scrabble tiles, buttons, ribbons, and tiny deer or trees. You’ll need scissors and a hot glue gun to make these ornaments in no time.
- Trace and cut fabric to fit the mason jar lid, then glue it in.
- Add decorations like Scrabble tiles, buttons, or small holiday figures.
- Wrap the metal rim with jute twine or ribbon for texture and look.
- Put a loop of twine or ribbon on top for hanging.
These ornaments can match your style or your home’s holiday theme. They’re great gifts or add a rustic feel to your tree.
Upcycling mason jar lids with wood and twine creates unique ornaments. This project is perfect for early holiday crafting, helping you start decorating early.
| Supplies Needed | Percentage |
|---|---|
| Matte Decou-Page, Mason Jar Lid Rim, Mini Cream Bottle Brush Tree, Fine Glitter in White Gold, Green Mini Garland, Red and White Baker’s Twine, Mini Star or Snowflake in silver or gold, Glue gun and gluesticks, Cream Cardstock, Gold Pen, Clear Acrylic Spray Sealer |
These ornaments fit many holiday decor styles, from traditional to modern. They can match your cosy rustic or sleek modern holiday look.
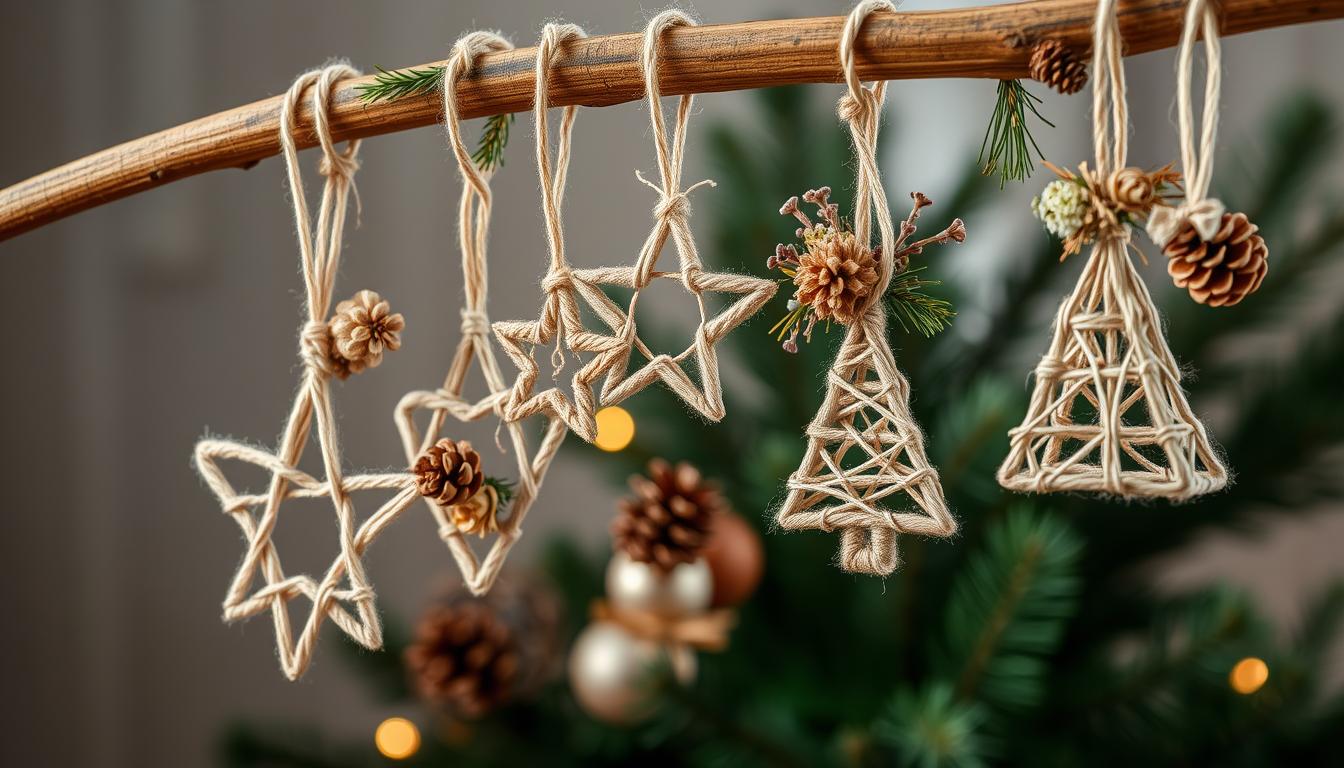
Natural Twig and Branch Creations
This holiday season, bring nature’s charm to your Christmas tree with twig ornaments. Collect sturdy twigs and small branches from your backyard. It’s eco-friendly and lets you make unique natural decorations.
Collecting and Preparing Materials
Begin by gathering twigs and branches, about 3.75 inches long on average. Clean and dry them well to remove dirt or debris. Use 11 twigs for each ornament to look cohesive.
Design Ideas and Assembly
Get creative with your twig arrangements. Try making stars or tiny trees. Use a hot glue gun to stick them together.
Add rustic charm by distressing the ornament. Decorate with bows, glittery stars, and other Christmas items to make it personal.
For a cosy look, wrap parts with twine or sprinkle fake snow. These ornaments can decorate walls, be part of vignettes, or hang in wreaths. They bring a natural, woodland feel to your decor.
Make your Christmas special with DIY twig ornaments. These rustic crafts will make your home festive and show off your style and love for nature.
Miniature Wooden Sledge Ornaments
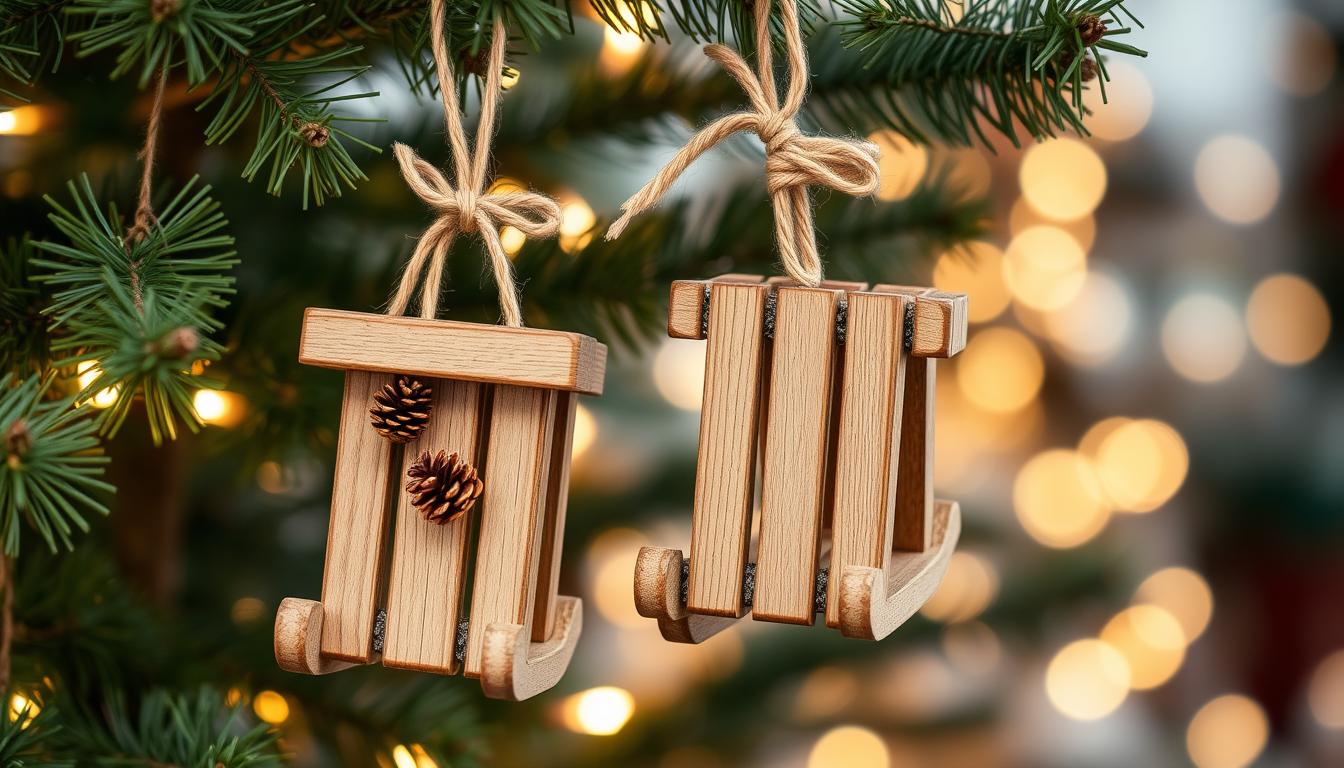
Bring the holiday magic to life with miniature wooden sleigh ornaments. Use popsicle sticks or thin wooden craft strips to make these cute DIY ornaments. Glue the wood pieces together to form a sledge shape, then add a thin twine or ribbon for the pull rope.
Get creative by decorating these ornaments with tiny evergreen sprigs, miniature presents, or a small teddy bear. You can stain the wood for a warm look or keep it natural for a rustic feel.
These ornaments bring back winter memories and add fun to your holiday tree. Making these decorations is a great way to make your home feel cosy. Enjoy the joy of making your holiday decor and show off your creativity with these wooden sleigh ornaments.
| Feature | Value |
|---|---|
| Selling Price | US $7.99 |
| Condition | Used |
| Estimated Delivery | Mon, Dec 23 – Mon, Dec 30 |
| Returns Policy | 30-day window, seller pays return shipping |
| Payment Methods | Diners Club |
| Seller Ratings | 5.0 average for accurate description, reasonable shipping cost, shipping speed, and communication |
| Project Time | 1 hour and 30 minutes |
| Materials Used | Mini Wood Pallet, Metallic Paints, Gel Stain, Botanical Collage Kit, Adhesive Stencil |
| Embellishments | Flowers, Jingle Bells, Leather, Gold Paint, Corrugated Paper |
| Item Number | 176019392095 |
| Seller Location | Green Bay, Wisconsin, United States |
Wood and Twine Rustic Combinations
Bring rustic charm to your Christmas with DIY wood ornaments and twine. Mixing wood and twine adds warmth and texture to your decor. Making these ornaments is simple, taking just 3 hours and costing only $1.
Choose wood shapes like circles or stars. Wrap them with twine, securing it with hot glue. Try different twine thicknesses and colors for a unique look. Add wooden beads or buttons for extra flair.
After twining, apply Mod Podge Sparkle or Gloss for shine. Sprinkle glitter on wet Mod Podge for extra sparkle. This creates a beautiful ornament that combines wood and twine’s natural beauty.
Display these ornaments in many ways, like on the tree or in a bowl. With various paint colors and patterns, you can customise them endlessly. Let your creativity shine for a unique Christmas decor touch.
| Project Details | Value |
|---|---|
| Average Rating | 4.67 out of 5 stars |
| Prep Time | 5 minutes |
| Active Time | 45 minutes |
| Dry Time | 2 hours and 30 minutes |
| Total Time | 3 hours and 20 minutes |
| Yield | 1 ornament |
| Cost | $1 for materials |
You’ll need glass ornaments, Mod Podge Sparkle or Gloss, and twine for this project. Also, a hot glue gun, glue sticks, scissors, and a paintbrush are key. Clean the glass ornament, then wrap it with twine and hot glue. Use Mod Podge and glitter for sparkle. Once dry, your ornament is ready to display.
“Add a touch of rustic charm to your holiday decor with these DIY wood and twine ornaments.”
🎄 Make More Than Just Ornaments—Craft a Holiday to Remember

Access 16,000+ Step-by-Step Woodworking Plans – From Tiny Decor to Space-Saving Furniture!
Whether you’re crafting charming Christmas ornaments or dreaming up compact furniture for your cozy home—Ted’s Woodworking gives you everything you need to succeed.
📌 Why Creators Love Ted’s Woodworking:
- 🪵 Perfect for Small Spaces – Build shelves, organisers, and compact furniture with minimal tools
- 📐 Beginner-Friendly Blueprints – Clear, hold-you-by-the-hand instructions make every project doable
- 🎁 Includes Crafts, Gifts & Decor Plans – Ornaments, wooden toys, keepsake boxes, and holiday projects
- 🛠️ Exact Cutting Lists & 3D Diagrams – No guesswork—just beautiful, precise results
- 💡 Includes Monthly Plan Updates + Custom Project Requests
- 🎥 150+ Pro Video Tutorials + 4 Bonus Guides
- ✅ One-Time Fee – Lifetime Access – 60-Day Money-Back Guarantee
👉 Start Building Holiday Magic with Ted’s Plans »
Conclusion
Making DIY wood Christmas ornaments is a fun way to make your holiday decor special. It brings a cosy, rustic feel to your home. These projects are easy to do and cost about $40 for the materials.
They’re perfect for anyone who loves crafting. You can start a holiday tradition by making these ornaments. They become a collection of unique decorations that show off your style and creativity.
There are many ways to decorate wood slices for Christmas. You can paint bright designs or burn patterns into the wood. The author has shared many tutorials on this, showing how versatile wood slices are.
These ornaments can add warmth and charm to your holiday. You can choose a classic look or try something new. Either way, they bring a natural beauty to your celebration.
Starting your DIY wood Christmas ornament project is exciting. It lets you be creative and bond with family and friends. With the right tools and safety, you can make beautiful ornaments that last for years.
These ornaments can make your holiday season more special. They add a rustic elegance to your home. So, get creative and make these DIY wood Christmas ornaments.
FAQ
What are the benefits of making DIY wood Christmas ornaments?
Making your own wood Christmas ornaments lets you make your holiday decor special. It’s a way to create lasting memories and add a cosy feel to your home. Handmade wooden decorations bring a warm, rustic charm to the holiday season.
What essential tools and materials do I need for DIY wood ornament projects?
You’ll need X-acto knives, hot glue guns, paint brushes, and wood crafting tools. You’ll also need wood slices, beads, twine, felt, and paint. Always handle sharp tools carefully and use hot glue guns safely.
How do I get started with DIY wood Christmas ornament projects?
First, gather your materials and plan your designs. Use different wood types like pine, cedar, or reclaimed wood. Set up your workspace with tools and start with simple projects like wood slice ornaments or wooden stars. This will help you build confidence for more complex designs.
What techniques can I use to create unique wood slice ornaments?
For wood slice ornaments, pick slices with interesting grain patterns or bark edges. Use acrylic paints to draw designs like snowflakes, Christmas trees, or festive messages. Try stencils or freehand painting, and seal with clear varnish to protect the design and enhance the wood’s beauty.
How do I make rustic wooden star ornaments?
To make wooden star ornaments, arrange five wooden craft sticks or reclaimed wood in a star shape and glue them together. Wrap the star with twine or yarn for texture. Add small pinecones, berries, or buttons for a festive look.
What are some unique ideas for wood bead wreath ornaments?
For wood bead wreath ornaments, pick wooden beads in different sizes and shapes. Thread them onto a wire to make a wreath shape. Add small jingle bells or miniature ornaments as accents. You can leave them natural or paint them to match your holiday colors.
How can I create personalised gift tag ornaments from reclaimed wood?
Turn small pieces of reclaimed wood into gift tag ornaments. Sand the wood smooth, cut into tag shapes, and add names, designs, or messages with wood burning tools or paint. Drill a hole at the top for a ribbon or twine hanger, making personalised ornaments that also serve as gift tags.
What are the basics of wood burning for Christmas ornaments?
Wood burning adds detailed designs to wooden ornaments. Start with simple patterns like snowflakes, stars, or Christmas trees. Use a wood-burning tool with different tips to create shading and texture. Lightly sand the wood and apply a clear sealer to protect the design.
Can I upcycle Mason jar lids into unique ornaments?
Yes, you can upcycle Mason jar lids into ornaments. Wrap the metal rim with twine or ribbon, and cut small wooden shapes like stars or trees to fit inside. Secure the wood pieces with hot glue and add miniature decorations like pinecones or berries for a farmhouse-inspired look.
How can I make ornaments using natural materials like twigs and branches?
Collect sturdy twigs and branches from your backyard to make natural ornaments. Form shapes like stars or trees by arranging and glueing the twigs together. Embellish with pinecones, berries, or small ornaments, and wrap sections with twine or add fake snow for a wintry effect.


Pingback: DIY Christmas Wood Crafts to Make and Sell in 2024