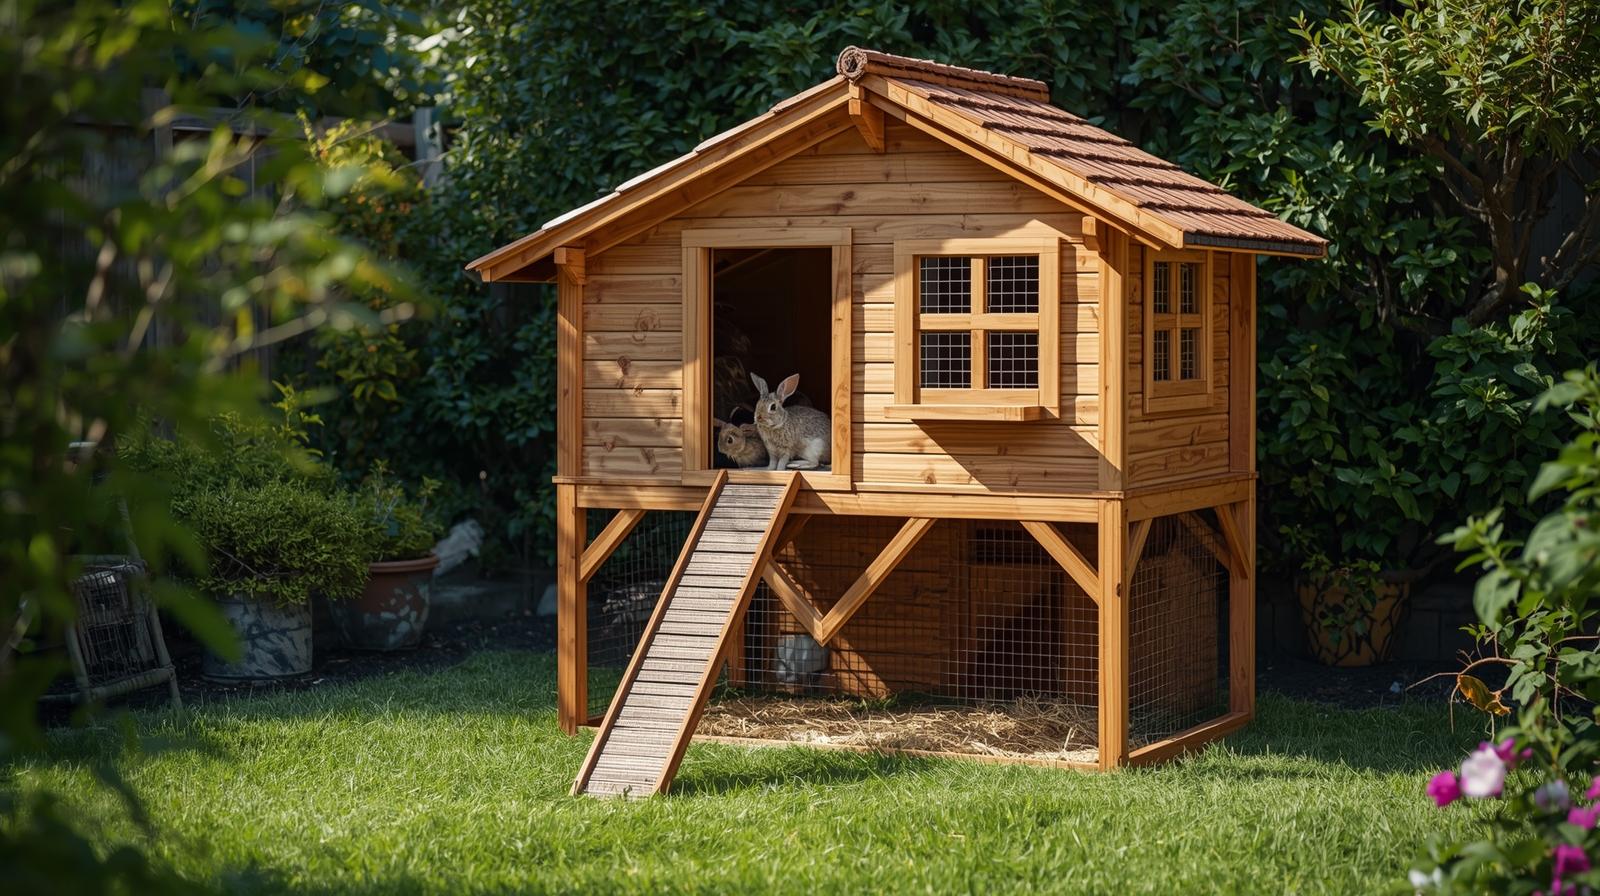
Creating a spacious and engaging environment for your pet is crucial for their health and happiness. Did you know that rabbits are natural climbers and love to explore vertical spaces? Providing a multi-level enclosure can significantly enhance their quality of life.
Building a two-story rabbit house with a ramp not only gives your pets the space they need to move around but also adds an element of fun and stimulation to their daily lives. It’s a project that combines functionality with the joy of watching your pets thrive in their new surroundings.
Key Takeaways
- Multi-level enclosures benefit rabbits by providing them with space to climb and explore.
- A well-designed rabbit house can enhance your pet’s physical and mental health.
- Incorporating ramps and multiple levels can make the enclosure more engaging.
- Building a luxury bunny mansion requires careful planning and consideration of your rabbit’s needs.
- The project can be a fun and rewarding experience for pet owners.
Why Your American Rabbits Deserve a Two-Story Rabbit House with a Ramp
A two-story rabbit house with a ramp is essential for your rabbits’ health and happiness. It offers a spacious, multi-level environment. This lets your rabbits engage in natural behaviours and exercise, which is key to their well-being.
Health and Exercise Benefits of Vertical Living
A multi-level rabbit hutch has many health benefits. Rabbits are naturally active, enjoying hopping, jumping, and climbing. A two-story house encourages this, helping them stay active and healthy.
Exercise strengthens their muscles and improves their heart health. The ramp between levels is fun and keeps them active. It’s a great way to prevent obesity and other health problems.
Natural Behaviour and Mental Enrichment
Rabbits are smart and need mental stimulation to avoid boredom and stress. A double-level bunny shelter offers plenty of mental challenges. The different levels and ramps keep them curious and engaged.
Exploring different heights and areas satisfies their instincts. This reduces stress and boosts their well-being. Adding toys and hiding spots on different levels also enriches their environment.
Maximising Space in Your Backyard
A raised rabbit cage with a ramp makes the most of your backyard space. Building upwards creates a spacious area for your rabbits without using too much ground.
This is great for those with small backyards. It lets you provide a comfortable, engaging space for your rabbits without losing room for other activities or garden areas.
Long-Term Value of a Luxury Bunny Home
Investing in a high-quality, two-story rabbit house is a long-term investment. A well-built luxury bunny mansion can last many years, offering a safe, comfortable home for your rabbits.
Also, a well-designed rabbit house can beautify your garden. Choosing durable materials and a thoughtful design creates a functional, beautiful space for your rabbits.
Planning Your Double-Level Bunny Shelter Design
When planning a double-level bunny shelter, think about your rabbit’s needs and how to make their space great. An elevated rabbit enclosure with a ramp keeps your rabbits happy and healthy.
Calculating Space Requirements for Your Rabbit Breed
First, figure out how much space your rabbit needs. This depends on their breed, size, and how active they are. Bigger rabbits need more room to move.
| Rabbit Breed | Minimum Space Requirement |
|---|---|
| Small Breeds (e.g., Netherland Dwarf) | 2×4 feet |
| Medium Breeds (e.g., Holland Lop) | 2.5×6 feet |
| Large Breeds (e.g., Flemish Giant) | 3×8 feet |
Selecting the Ideal Outdoor Location
Choosing the right spot for your rabbit’s living space with a ramp is key. Find a place that’s partly shaded and has good drainage to avoid water problems.

Climate Considerations and Weather Protection
Your elevated rabbit enclosure with a ramp must handle different weather. Make sure it’s safe from strong winds, rain, and extreme temperatures.
Ventilation and Natural Lighting Design
Good air flow and sunlight are crucial for a healthy two-tier rabbit habitat. Use windows or mesh panels to let in air and sunlight.
Sketching Your Custom Floor Plan
After thinking about these points, draw a custom floor plan for your rabbit’s living space with a ramp. This will help you see the layout and make changes before you start building.
Complete Materials List for Your Multi-Level Rabbit Hutch
Building a multi-level rabbit hutch needs careful planning and the right materials. To make sure your bunny house with a staircase is safe and fun for your rabbits, choose high-quality materials. These should be able to handle outdoor weather.
Pressure-Treated Lumber and Framing Wood
The base of your dual-level rabbit cabin needs strong lumber. Pressure-treated wood fights off rot and bugs. You’ll need:
- 2x4s for the frame
- 2x6s for extra support
- Posts for the legs and corners
Make sure all lumber is safe for outdoors and treated to resist decay.
Exterior-Grade Plywood and Flooring
For the floor and some walls, use exterior-grade plywood. It’s tough and can handle moisture. Think about:
- 3/4 inch plywood for flooring
- 1/2 inch plywood for walls

Galvanised Wire Mesh and Hardware Cloth
Wire mesh is key for air and protection from predators. For a double-story rabbit shelter, you’ll need:
- 1×2 inch galvanized wire mesh for enclosure
- Hardware cloth (1/2 inch or 1 inch mesh) for extra safety
Galvanised coatings prevent rust, keeping your hutch strong for a long time.
Screws, Nails, and Heavy-Duty Fasteners
To put your hutch together, you’ll need different fasteners:
- 2-inch exterior-grade screws
- 1-1/2 inch galvanised nails
- Heavy-duty hinges and latches
The right fasteners keep your structure solid.
Roofing Materials and Waterproof Sealants
A waterproof roof keeps your rabbits dry. Consider:
- Asphalt shingles or metal roofing
- Waterproof sealants for gaps and edges
Choose roofing that’s durable and made for outdoors.
Hinges, Latches, and Door Hardware
For easy access and safety, get:
- Heavy-duty hinges
- Secure latches
- Door handles or knobs
These make your rabbit hutch useful and safe.
| Material | Quantity | Purpose |
|---|---|---|
| Pressure-Treated Lumber | As needed | Frame and support |
| Exterior-Grade Plywood | 2 sheets | Flooring and walls |
| Galvanized Wire Mesh | 1 roll | Enclosure and ventilation |
| Screws and Nails | Various | Assembly |
| Roofing Materials | As needed | Roofing |
| Hinges and Latches | 2-3 sets | Doors and access |
Essential Tools and Safety Equipment
When building a large rabbit enclosure, safety comes first. You need the right tools to ensure your safety and the quality of your rabbit house.
Power Tools Required
To build a strong and cosy rabbit house with a ramp, you’ll need some power tools. These include:
- Circular saw for cutting lumber
- Drill press for precise drilling
- Jigsaw for curved cuts
- Sander for smoothing wood surfaces
- Impact driver for driving screws and fasteners
Quality power tools make the building process easier and help you get professional results for your DIY rabbit mansion.
Hand Tools and Measuring Instruments
You’ll also need hand tools and measuring instruments. These include:
- Tape measure for accurate measurements
- Level to ensure the structure is properly aligned
- Hammer for tapping pieces into place
- Pliers and wrenches for gripping and bending
- Square to verify right angles
Having these hand tools will help you finish the details of your large rabbit plans.
Personal Protective Equipment
Personal protective equipment (PPE) is key to keeping you safe while building. Essential PPE includes:
- Safety glasses to protect your eyes from debris
- Hearing protection to prevent damage from loud power tools
- Dust mask to avoid inhaling sawdust and other particles
- Work gloves to protect your hands from splinters and cuts
- Steel-toed boots to safeguard your feet from heavy objects
By using the right PPE, you can build a high-quality rabbit house with a ramp safely.
Experts say, “Safety isn’t just about avoiding accidents; it’s about creating a culture where safety is everyone’s responsibility. This shows how important safety is in your construction project.
Building the Foundation for Your Raised Rabbit Cage with Ramp
The foundation of your modern rabbit enclosure is crucial for its stability and longevity. A solid base ensures your rabbits have a safe and comfy place to live. It also prevents problems like sagging or collapse.

Step 1: Preparing and Levelling the Ground
Start by preparing and levelling the ground for your rabbit hutch. Clear the area of debris, vegetation, and any obstructions. Use a shovel to remove grass or weeds, then level the ground with a spirit level and rake.
Step 2: Cutting and Installing Support Legs
Cut four support legs to the height you want for your raised rabbit cage. These legs will support your hutch. Use pressure-treated lumber to avoid rot and insect damage. Place the legs at the corners of your hutch, ensuring they are level and securely anchored.
Step 3: Assembling the Base Frame
The base frame adds more support and spreads the hutch’s weight evenly. Cut the frame parts according to your plans, then assemble them with screws or nails. Ensure the frame is square and sturdy.
Step 4: Adding Cross Bracing for Stability
To make your hutch more stable, add cross bracing between the legs. Cut more lumber and attach it diagonally between the legs. Cross bracing prevents the hutch from swaying or collapsing.
Step 5: Treating Wood for Weather Resistance
Lastly, treat the wood with a weather-resistant sealant or stain. This protects the wood from moisture, UV damage, and insects. It keeps your modern rabbit enclosure durable and safe for years.
By following these steps, you can create a strong foundation for your raised rabbit cage with a ramp. This provides a safe and comfortable home for your rabbits.
Constructing the First Floor Living Space
Building the first floor of your rabbit house is key to a cosy and safe spot for your pets. This area will be where they spend most of their time. So, it’s important to make it just right.

Step 1: Installing the First Floor Platform and Flooring
Start by setting up the first floor platform. Choose exterior-grade plywood for its strength. The platform must hold the weight of your rabbits and any extra features like nesting boxes.
Step 2: Building and Attaching Wall Frames
Then, build the wall frames with pressure-treated lumber. Make sure they are square and well attached to the platform.
Step 3: Securing Wire Mesh to Wall Frames
Next, cover the frames with galvanised wire mesh. This will let in air and keep predators out. Use heavy-duty staples to fix the mesh in place.
| Material | Quantity | Purpose |
|---|---|---|
| Exterior-grade Plywood | 1 sheet | First Floor Platform |
| Pressure-Treated Lumber | 4 pieces | Wall Frames |
| Galvanized Wire Mesh | 1 roll | Wall Covering |
Step 4: Framing and Hanging the Access Door
Make a secure door using wood framing and wire mesh. Add hinges and a latch for easy access and safety.
Step 5: Adding Ventilation Panels
Put in ventilation panels to improve air flow. This helps keep the temperature right and cuts down on moisture.
Step 6: Installing the Interior Partition Wall
Lastly, add an interior partition wall. This wall will divide the space into different areas. It helps keep things organised and gives your rabbits their own spots for different activities.
By following these steps, you’ll make a safe, cosy, and useful first floor for your rabbits in your two-story rabbit house.
Building the Second Story of Your Two-Tier Rabbit Habitat
Now that you’ve built the first floor, it’s time to start the second story. This step is key. It gives your rabbits more space to play, exercise, and enjoy their surroundings.
Step 1: Creating the Second Floor Platform
The second-floor platform is the base of the upper level. To make it, you need to:
- Cut the lumber as needed for your design.
- Build the frame, making sure it’s strong and level.
- Attach exterior-grade plywood to finish the platform.
Step 2: Installing Second-Floor Support Joists
Support joists keep your habitat stable. Make sure to:
- Place the joists 16 inches apart.
- Secure them to the first-floor walls and the second-floor platform.
Step 3: Building Upper-Level Wall Frames
The wall frames shape your second story. To build them:
- Cut the lumber to the right height.
- Build the frames on the second-floor platform.
- Check that the corners are square and the frames are level.
Step 4: Attaching Wire Mesh to Upper Walls
Wire mesh is crucial for air and protection. To attach it:
- Cut the mesh to size, leaving extra around the edges.
- Secure it to the frames with wire or staples.
- Make sure it’s tight to prevent gaps.
Step 5: Constructing the Roof Frame
The roof frame is essential for your habitat. To build it:
- Design the frame for your roof style (e.g., gable or shed).
- Cut the lumber and assemble the frame.
- Make sure it’s strong and watertight.
Step 6: Installing Shingles or Metal Roofing
The last step is to put on your chosen roofing. To do this:
- Follow the manufacturer’s instructions for installation.
- Ensure the roofing is watertight and securely attached.
Step 7: Cutting the Floor Opening for Ramp Access
To let your rabbits move between floors, cut an opening for the ramp. To do this:
- Measure and mark the area for the ramp.
- Cut out the marked section carefully.
- Smooth the edges to prevent injury to your rabbits.
By following these steps, you’ll build the second story of your two-tier rabbit habitat. It will be a safe and fun space for your pets.
Constructing the Interior Ramp Connection
Building a sturdy ramp is key to your rabbit’s safety and ease of movement between levels. A well-made ramp lets your rabbit move comfortably and safely between floors. This makes their life in the two-story rabbit house better.
Step 1: Measuring and Calculating the Ramp Angle
The first step is to measure and figure out the best ramp angle. This is important for your rabbit’s comfort while climbing. The angle should be gentle to avoid hurting your rabbit’s back and legs.
Tip: A ramp angle between 30 and 40 degrees is safe and comfy for rabbits.
Step 2: Cutting Ramp Side Rails to Size
After finding the right angle, cut the side rails to the right length. It’s important to make accurate cuts for a perfect fit between levels.
Use a saw or the right tool for clean cuts. Sanding the edges can stop splinters.
Step 3: Attaching Cross Slats for Rabbit Traction
Cross slats are crucial for your rabbit’s grip on the ramp. Place them at regular intervals and make sure they’re securely attached to avoid accidents.
Tip: Choose strong material for the cross slats that won’t break or splinter easily.
Step 4: Installing Side Walls for Security
Adding side walls to the ramp makes it safer. It keeps your rabbit from falling off as they climb.
The side walls should be high enough to be safe but not too high to block your rabbit’s way.
Step 5: Securing the Ramp to Both Floor Levels
After building the ramp, attach it firmly to both floors. This is key to keeping the ramp stable and safe.
Use strong fasteners and make sure the ramp is level and well-attached to prevent any movement or detachment.
Step 6: Testing Ramp Stability and Safety
The last step is to check if the ramp is stable and safe. Make sure it can hold your rabbit’s weight without any issues.
Watch your rabbit using the ramp to see if they can climb up and down easily and safely.
By following these steps, you can make a safe and secure ramp for your rabbit’s two-story home. This will improve their living space and overall happiness.
Adding Finishing Touches to Your Modern Rabbit Enclosure
Now that you’ve built the basic structure of your diy rabbit mansion, it’s time to add the finishing touches. These will make it a comfortable and stimulating home for your rabbits.
Pet-Safe Finishing Options
Apply a pet-safe wood stain or sealant to protect the wood. This will extend the lifespan of your modern rabbit enclosure.
Comfort and Enrichment Features
Install removable nesting boxes for a safe and cosy space. Set up feeding and watering stations that are easy to clean. Create cosy hideaway corners using natural materials like wood or plants.
Stimulating Environment
Add enrichment features and toys to keep your rabbits engaged and active. This can include tunnels, chew toys, and climbing structures. They will challenge and entertain your pets.
By incorporating these finishing touches, you’ll create a diy rabbit mansion that is both functional and enjoyable. It will provide your rabbits with a happy and healthy environment.
Build Your Two-Story Rabbit House the RIGHT Way (Without Guesswork!)
Why struggle with confusing sketches or incomplete plans?
With Ted’s Woodworking, you get access to the world’s largest collection of 16,000 step-by-step woodworking plans — including detailed rabbit house blueprints.
Here’s Why Smart Woodworkers Choose Ted’s:
- ✅ 16,000 “Done-For-You” Woodworking Plans
- ✅ Step-by-Step A–Z Instructions (No Guesswork!)
- ✅ Exact Cutting & Materials Lists (Save Money & Reduce Waste)
- ✅ Detailed Schematics + Multiple Angle Views
- ✅ Beginner to Pro Friendly
- ✅ Lifetime Free Monthly New Plans
- ✅ Request Custom Plans
- ✅ 150 Premium Woodworking Videos (FREE Bonus)
- ✅ DWG/CAD Plan Viewer (FREE Bonus)
- ✅ 60-Day 100% Money-Back Guarantee
And right now…
💰 Get Lifetime Access for a One-Time Fee of Just $67
(No Monthly Fees Ever)
Ready to Build Like a Pro?
Stop wasting time figuring things out on your own.
Click below and get instant access to 16,000 proven woodworking plans — so your two-story rabbit house turns out PERFECT the first time.
👉 Get Instant Access To Ted’s Woodworking Now
⚠️ Limited-time offer. Price may increase anytime.
FAQ
What are the benefits of building a two-story rabbit house with a ramp?
A two-story rabbit house with a ramp gives your rabbits lots of exercise. It also keeps them mentally sharp and happy. This setup is great for their health and happiness.
How do I calculate the space requirements for my rabbit breed?
First, think about your rabbits’ size and breed. Then, allocate 2-4 square feet of floor space to each. Add more space for hiding spots, toys, and moving around.
What materials are needed to build a multi-level rabbit hutch?
You’ll need pressure-treated lumber and exterior-grade plywood. Also, galvanised wire mesh, screws, nails, roofing materials, and waterproof sealants. These materials will make a strong and safe hutch.
How do I ensure proper ventilation and natural lighting in my rabbit enclosure?
For optimal ventilation, consider adding ventilation panels and windows. Place the enclosure in a spot with partial shade and direct sunlight. This will give your rabbits natural light.
What are the essential tools required to build a raised rabbit cage with a ramp?
You’ll need power tools like a circular saw, drill, and impact driver. Also, hand tools such as a tape measure, square, and level. These tools will help you build a raised cage with a ramp.
How do I secure the ramp to both floor levels in my two-tier rabbit habitat?
Attach the ramp to the floor frames with screws or nails. Make sure it’s sturdy and safe. Test the ramp to ensure it’s stable.
What are some tips for adding finishing touches to my modern rabbit enclosure?
Apply pet-safe wood stain or sealant to finish the enclosure. Install removable nesting boxes and set up feeding and watering stations. Add enrichment features and toys for a cosy and engaging space.
Can I customise the design of my double-level bunny shelter?
Yes, you can customise the design to fit your rabbits’ needs and your backyard. Consider climate, ventilation, and natural lighting when designing.
How do I protect my rabbit house from weather conditions?
Use waterproof roofing materials and sealants. Also, choose weather-resistant wood to protect your rabbit house from rain, snow, and extreme temperatures.
What safety precautions should I take when building a rabbit house?
Always wear protective gear like gloves, safety glasses, and a dust mask. Handle tools safely to avoid accidents when building your rabbit house.

