Did you know that search interest for handmade “river” furniture has surged by over 400% in recent years? You can find gorgeous examples of these functional art pieces on Instagram and Etsy today. Many crafters start their creative journey by making small, unique items for their living spaces.
This epoxy resin coaster with wood tutorial helps you scale down the grand look of a river-style coffee table into something manageable. You can combine natural lumber grains and colourful casting fluids to create a unique set for your dining room. Crafting small items first is a smart way to learn the chemistry behind the pour.
Starting small allows you to master the mixing process and avoid wasting expensive supplies. This tutorial ensures you get a crystal-clear finish every single time. Your guests will definitely love using these unique pieces during your next dinner party.
Key Takeaways
- Blend natural materials with modern casting fluids for a luxury look.
- Master basic pouring skills before attempting large furniture projects.
- Create professional, high-gloss finishes for your home decor.
- Save money by crafting personalised, high-end gifts.
- Find artistic inspiration from trending social media designs.
- Gain confidence in measuring and mixing your supplies correctly.
Why You Should Make Wood and Resin Coasters
Wood and resin coasters are not just useful; they also add beauty to your home. Making your own coasters means they’ll last longer and protect your furniture. Plus, you can make them your own way.
Creating wood and resin coasters lets you be creative. You can try out different woods, resin colours, and more. It’s fun and rewarding, whether you’re new to crafting or not.
Epoxy resin crafts are getting more popular. People share their work on Pinterest and Instagram. You can find inspiration or come up with your own ideas. Making these coasters is a fun way to be creative and make something useful.
Here are some key benefits of making your own wood and resin coasters:
| Benefit | Description |
|---|---|
| Customizability | You can choose the type of wood, resin color, and additives to create unique coasters. |
| Durability | Wood and resin coasters are long-lasting and can withstand daily use. |
| Creative Expression | This project allows you to experiment with different materials and techniques. |
By making your own wood and resin coasters, you create something special. You’ll also make your home look better. With a bit of practice, you’ll make beautiful, lasting pieces that you’ll love for years.
Essential Materials for Your Resin Coaster Project
To start your epoxy resin coaster project, you need to prepare the right materials and tools. It’s important to know how each part works in your wooden epoxy coaster tutorial.
Epoxy Resin Supplies
Epoxy resin is key to your project. Picking the right one is crucial for a good finish and durability.
Choosing the Right Epoxy Resin
When picking an epoxy resin, think about its viscosity, pot life, and UV resistance. Alumilite’s Amazing Quick Coat Epoxy is ideal for coasters due to its ease of use and high-quality appearance.
“The key to a successful epoxy project is selecting a high-quality epoxy resin that suits your specific needs.”
Hardeners and Mixing Ratios
Hardeners are as important as the epoxy resin. The right mix of resin and hardener is key; the wrong mix can ruin the curing or weaken the product. Always follow the maker’s instructions for the right mix.
Wood Materials and Selection
The wood you choose affects the look and strength of your coasters. Consider the wood’s appearance and texture.
Recommended Wood Species
For your wooden epoxy coaster project, walnut, maple, or cherry are good choices. They look great and last long. Your choice depends on the design you want.
Wood Thickness and Dimensions
The wood’s thickness and size depend on the coaster size you want. A 1/4 inch thickness is usually best for a good balance.
| Wood Species | Thickness (inches) | Dimensions (inches) |
|---|---|---|
| Walnut | 1/4 | 4×4 |
| Maple | 1/4 | 4×4 |
| Cherry | 1/4 | 4×4 |
Tools and Equipment You’ll Need
Having the right tools makes your epoxy resin coaster project easier and faster.
Measuring and Mixing Tools
Accurate measuring cups and stir sticks are key to mixing the resin correctly. Digital scales help with precise measurements.
Moulding and Shaping Equipment
A mould is needed to shape your coasters. You can use silicone moulds or make your own. Make sure your mould is level and clean before adding the resin.
Safety Guidelines for Working with Epoxy Resin
Making epoxy resin coasters can be fun, but safety is key. Knowing how to work with epoxy resin safely is important. This way, you can avoid risks and have a great time making your coasters.
Personal Protective Equipment
When you work with epoxy resin, wearing the right gear is essential. You’ll need nitrile gloves to keep your skin safe, safety goggles to protect your eyes, and a respirator mask to avoid breathing in fumes. Safety guides say that wearing this equipment can greatly reduce the chance of irritation and health problems.
- Nitrile gloves: Prevent skin contact and irritation
- Safety goggles: Protect eyes from splashes and spills
- Respirator mask: Minimise inhalation of epoxy fumes
Workspace Ventilation Requirements
Good air flow is crucial when working with epoxy resin. Make sure your workspace has enough air by opening windows or using a fan. Many beginner guides stress the importance of a well-ventilated area for safety.
“Proper ventilation is essential for safe handling of epoxy resin. It reduces the concentration of vapors and particles, creating a safer working environment.”
Epoxy Resin Safety Guide
Safe Chemical Handling Practices
When working with epoxy resin and its hardeners, safety is paramount. Always follow the instructions for mixing from the manufacturer. Also, keep chemicals in a cool, dry spot, away from sunlight and out of children’s and pets’ reach.
By following these safety tips, you can have a fun and safe time making your epoxy resin coasters. Remember, safety is not just about avoiding risks. It’s about making sure you can keep enjoying your hobby without harming your health.
Preparing Your Workspace for the Project

Before starting your DIY epoxy resin coaster project, get your workspace ready. A tidy workspace boosts your creativity and keeps you safe and efficient. It makes the project more enjoyable.
First, check your workspace and make any needed changes. You’ll need to set up a level surface and protect your work area from spills and damage. This way, you can focus on making your epoxy resin coasters without worries.
Setting Up a Level Surface
A level surface is key for epoxy resin work. It helps your coasters dry evenly and prevents warping. Use a levelling tool to check your surface. If it’s not level, adjust it or use shims for a perfect surface.
Also, think about using a rotating turntable or a lazy Susan. They make it easier to mix, pour, and work with the resin on all sides.
Protecting Your Work Area
It’s important to protect your workspace from spills and splatters. Use a disposable cover or silicone mat to make cleanup simple. You can also cover nearby areas with cardboard or old sheets.
Also, make sure your workspace has good ventilation. Open windows or use an exhaust fan to remove fumes and particles from the epoxy resin. This keeps your workspace safe.
By following these steps, you’re ready to start your DIY epoxy resin coaster project. A well-prepared workspace makes the process fun and helps your coasters look great.
Selecting and Preparing Wood for Your Coasters
The success of your wooden epoxy coaster project depends on the right wood choice and preparation. The wood type affects the coaster’s look and durability.
Best Wood Types for Resin Coasters
Many wood types work well for resin coasters, each with its own grain and colour. Walnut and oak are favourites in DIY projects, like those on Pinterest.
Think about the colour and grain you like. Choose woods with unique grains for interesting contrasts with the resin.
| Wood Type | Color | Grain Pattern |
|---|---|---|
| Walnut | Dark Brown | Coarse, Distinctive |
| Oak | Light to Medium Brown | Prominent, Porous |
| Maple | Light | Fine, Even |
Cutting Wood to Size
After picking your wood, cut it to coaster size. Use a saw to get the right dimensions for your mould or design.
Sanding and Sealing Wood Pieces
After cutting, sand the wood to smooth out edges and surfaces. This step is key to a strong bond with the resin.
Grain Direction Considerations
When sanding, sand with the wood grain. This avoids scratches and gives a smoother finish.
Pre-Sealing Techniques
Pre-seal the wood before mixing it with resin. This prevents uneven resin absorption. Use a wood sealant and follow the instructions for application and drying.
By choosing and preparing your wood well, you’re on your way to making beautiful, durable wood and resin coasters.
Epoxy Resin Coasters with Wood Tutorial: Step-by-Step Process

This guide will show you how to make beautiful epoxy resin coasters with wood. They are both useful and pretty. You’ll go through several steps, from making your mould to pouring the epoxy resin.
Step 1: Create Your Mould
The first thing to do is make a mould. This mould will shape and size your coasters.
Using Silicone Moulds
Silicone moulds are great for epoxy resin projects. They are flexible and easy to remove the resin from. You can find them in many shapes and sizes online or in craft stores.
Benefits of Silicone Moulds:
- Flexible and easy to demold
- Available in various shapes and sizes
- Reusable
Building Custom Moulds with Tape and Plastic
If you can’t find a silicone mould, you can make one with tape and plastic. This lets you customise your coaster’s size and shape.
Step 2: Position Wood Elements
After your mould is ready, place the wood elements inside. This is where you can be creative with your coaster’s design.
Arrangement Techniques
You can arrange the wood in many patterns or designs. Think about the wood’s colour and texture when choosing your design.
Securing Wood in Place
To keep the wood steady while pouring the resin, you need to secure it. Use a little epoxy or a temporary adhesive for this.
| Method | Description | Advantages |
|---|---|---|
| Using Epoxy | Apply a small amount of epoxy to hold the wood in place. | Strong hold, integrates with the final product |
| Temporary Adhesive | Use a temporary adhesive like wax or clay. | Easy to remove, doesn’t interfere with the resin |
Step 3: Mix Your Epoxy Resin
Mixing the epoxy resin is very important. It needs precision and care.
Accurate Measuring Methods
To get the right cure, you must measure the epoxy accurately. Follow the mixing ratio given by the resin carefully.
Proper Mixing Techniques
After measuring, mix the components well. Make sure to scrape the sides and bottom to avoid unmixed parts.
Tip: Mix slowly and carefully to avoid air bubbles in the resin.
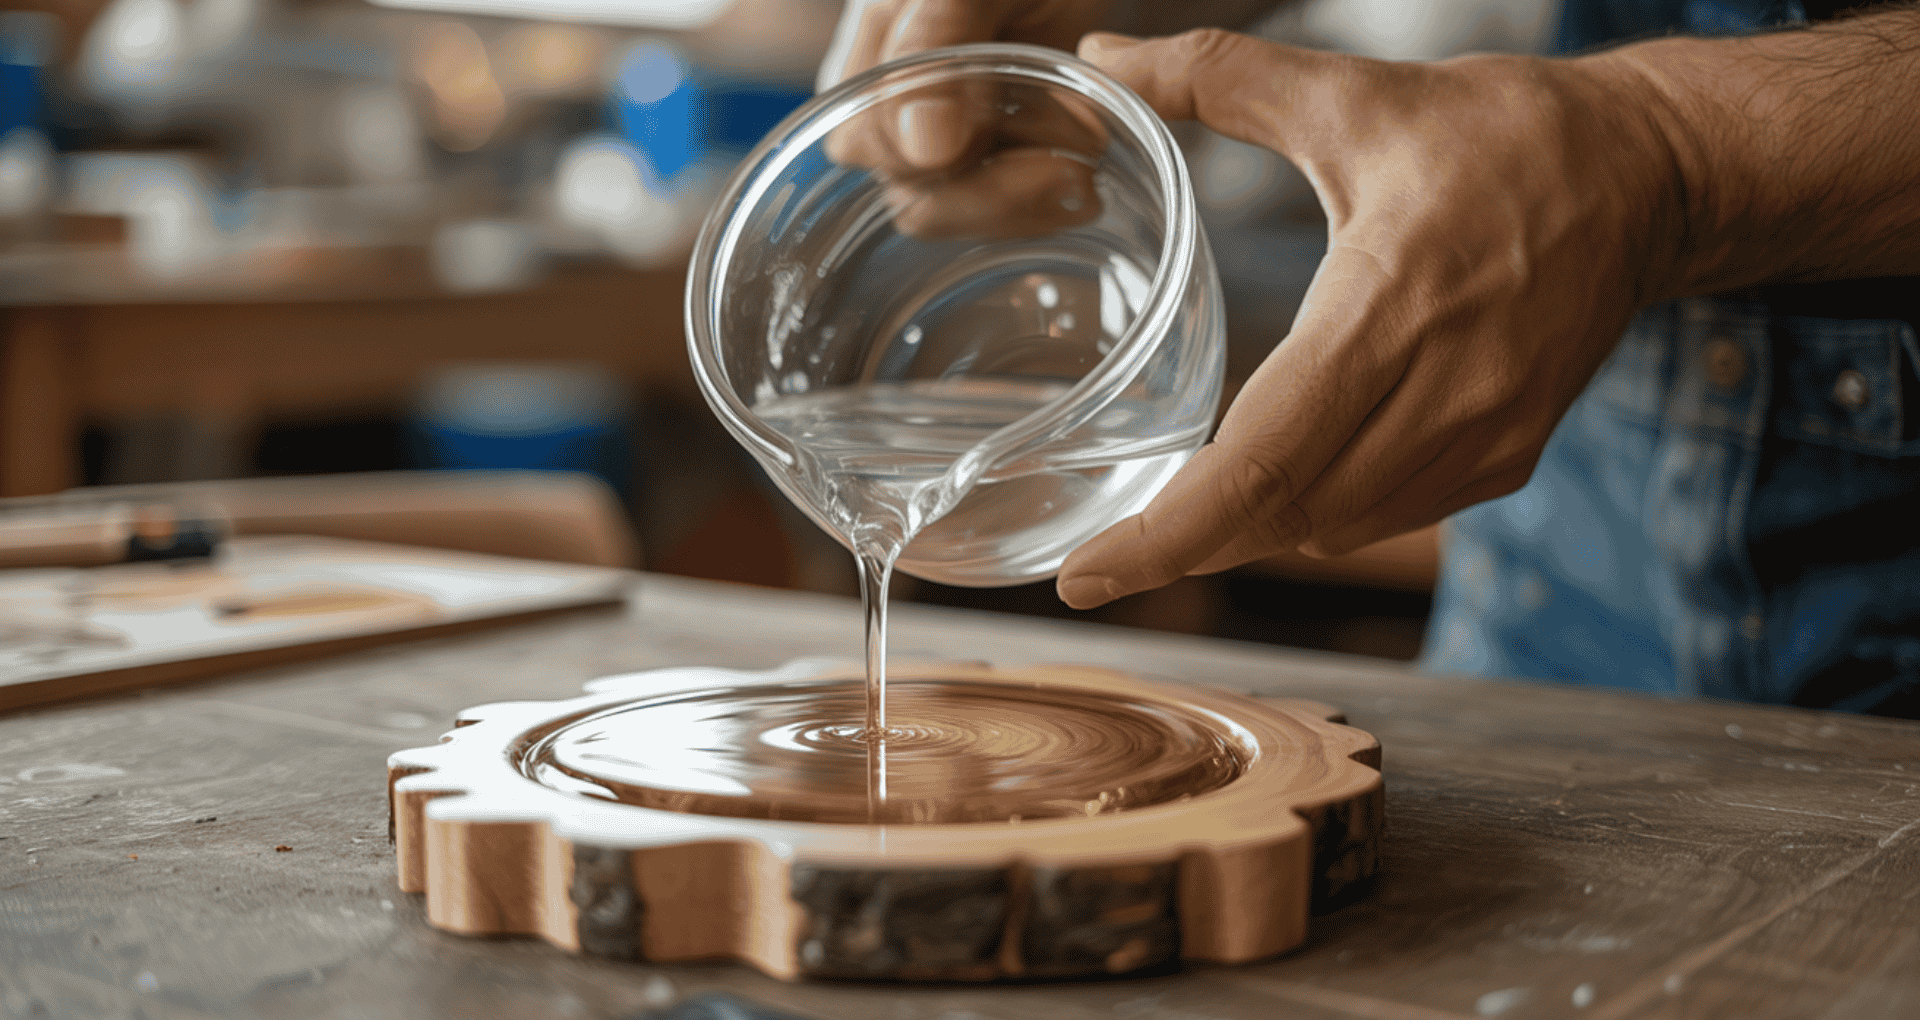
Pouring and Layering Techniques for Resin Coasters
Creating stunning resin coasters involves pouring and layering techniques. These steps are key to making beautiful, professional-looking coasters.
First Pour: Creating the Base Layer
The first pour is vital as it sets the base layer. To get a flawless base, ensure even coverage and avoid air pockets.
Achieving Even Coverage
Pour resin slowly and steadily into the mould. Start from the centre and move outwards. This prevents resin from pooling on one side.
Eliminating Air Pockets
To get rid of air pockets, gently blow on the surface or use a heat gun. Remember,
Adding Colour and Pigments
Adding colour to your resin coasters can really enhance their look. You can use resin dyes or mica powders for different colours and effects.
Resin Dyes and Mica Powders
Resin dyes create transparent, vibrant colours. Mica powders add a metallic sheen. Mixing them can lead to unique designs.
Creating Swirls and Effects
To make swirls and effects, layer different colours and use tools like toothpicks or skewers. As one artist says,
“The beauty of resin art lies in its unpredictability and the unique effects you can achieve.”
Second Pour: Achieving Depth
A second pour adds depth to your coasters, making them more appealing. This layer can be clear or colored, depending on your preference.
Mastering pouring and layering techniques lets you create functional yet artistic resin coasters. Whether you’re new or experienced, making resin coasters is both enjoyable and rewarding.
Curing and Demolding Your Wooden Epoxy Coasters

The curing process turns your epoxy resin coasters from liquid to solid. It’s important to get the right hardness and shine.
Understanding Cure Times
Cure times for epoxy resin vary. Always check the manufacturer’s instructions for the best times. Cure times can range from a few hours to days.
Temperature and Humidity Factors
Temperature and humidity are key in curing. Higher temperatures speed up curing, but avoid very high temperatures. Low temperatures slow it down. High humidity can make the finish cloudy or soft.
Safe Demolding Techniques
After curing, it’s time to demold your coasters. Make sure they’re fully cured before demolding. Use a soft tool like a silicone spatula or credit card for a gentle pry. Avoid sharp objects and too much force to prevent damage.
Controlling curing factors and using safe demolding techniques help make durable, beautiful epoxy resin coasters.
Finishing Touches for Professional-Looking Coasters
To get your resin coasters looking professional, you need more than just pouring the resin. You must add finishing touches. These steps turn your coasters into polished, durable, and beautiful pieces.
Sanding the Edges and Surface
Sanding is key in the finishing process. It smooths out the edges and surface. It also removes any imperfections or bubbles from the curing process.
Wet Sanding vs. Dry Sanding
When sanding your resin coasters, you can choose wet or dry sanding. Wet sanding helps get a high-gloss finish by avoiding scratches. Dry sanding is good for removing big imperfections first.
Progressive Grit Progression
For a smooth finish, use grits in order. Start with a coarse grit (120-150) to remove big imperfections. Then, use finer grits (220, 320, 400, and more) for a polished look.
Polishing for a Glass-Like Finish
Polishing your coasters after sanding makes them look like glass. This step is important for showing off the resin’s depth and clarity.
Buffing Compounds and Techniques
Choosing the right buffing compounds and techniques is crucial for a glossy finish. Use a polishing compound on a buffing wheel and gently work it on your coasters. Always follow the manufacturer’s instructions for the best results.
| Polishing Compound | Application | Result |
|---|---|---|
| Ceramic-based | Use with a soft buffing wheel | High-gloss finish |
| Aluminum Oxide | Apply with moderate pressure | Excellent cut and shine |
Adding Protective Backing
Adding a protective backing makes your coasters more functional and professional.
Felt or Cork Application
You can use felt or cork for the backing, depending on your preference and the coasters’ use. Cut the material to size and apply adhesive to stick it to the coaster.
Creative Design Ideas for Epoxy Resin Crafts

Epoxy resin crafts open up a world of creativity. You can make stunning pieces that protect surfaces and look beautiful. The versatility of epoxy resin lets you try new techniques and materials, making each project special.
River Pour Techniques Inspired by Epoxy River Coffee Tables
The epoxy river coffee table trend has inspired many. Crafters are now trying river pour techniques in their projects. You can make beautiful coasters that look like a river coffee table.
Creating the River Effect
To get the river effect, mix different epoxy resin colours. Carefully pour them into your mould. Use layering or swirling to create a unique pattern.
Scaling Down Large Projects
Scaling down large projects like epoxy river coffee tables is key. Keep the proportions and details that make the larger piece appealing. For coasters, use smaller moulds and adjust the resin amount.
Incorporating Natural Elements
Adding natural elements to your epoxy resin crafts makes them more beautiful and unique. Use materials like dried flowers, leaves, or metallic flakes for stunning designs.
Dried Flowers and Leaves
Dried flowers and leaves can be embedded in epoxy resin for delicate designs. Make sure the elements are dry before adding them to the resin.
Metallic Flakes and Glitter
Metallic flakes or glitter add luxury and sparkle to your crafts. Mix them into the resin or sprinkle on top for a different look.
Colour Combinations and Patterns
Try different colour combinations and patterns to personalise your crafts. Use contrasting colours for a bold look or harmonious colours for a subtle effect.
| Color Combination | Effect |
|---|---|
| Harmonious Colours (e.g., different shades of blue) | Bold and eye-catching |
| Harmonious Colors (e.g., different shades of blue) | Subtle and soothing |
| Metallic and Transparent | Luxurious and modern |
Exploring these creative ideas can elevate your epoxy resin crafts. You can create unique pieces that show off your style and creativity.
Troubleshooting Common Resin Coaster Problems
Even with careful planning, resin coaster projects can sometimes go awry. But don’t worry, we’ve got you covered. You might face issues like bubbles, uneven surfaces, or leaks. Knowing how to troubleshoot these problems is key to achieving professional-looking results.
Dealing with Bubbles
Bubbles are a common issue in resin projects. They can be caused by improper mixing, trapped air, or the resin being too thick.
Prevention Strategies
To minimise bubbles, mix your epoxy resin slowly and thoroughly. Use a mixing cup with a spout to reduce air introduction. Also, consider using a pressure pot or a vacuum chamber to remove trapped air bubbles.
Removal Techniques Using Heat
If bubbles do form, you can try removing them using heat. A heat gun or a torch can gently heat the surface. This causes the bubbles to rise and pop. Be cautious not to overheat the resin, as this can cause it to cure too quickly or unevenly.
Fixing Uneven Surfaces
Uneven surfaces can occur if the mould is not level or if the resin is not poured evenly. To fix this, sand the coasters once they are fully cured. Start with coarse-grit sandpaper and progress to finer grits for a smooth finish.
As one expert notes,
“Sanding is a crucial step in achieving a professional finish. It’s worth taking the time to do it properly.”
Preventing Leaks and Spills
Leaks and spills can be prevented by ensuring your mould is properly sealed. This is crucial, even more so if you’re using a silicone mould.
Mould Sealing Tips
To seal your mould, apply a thin layer of wax or petroleum jelly to the edges and corners. This will help prevent the resin from seeping out. You can also use tape to reinforce the mould’s seams.
By following these troubleshooting tips, you can overcome common issues and create beautiful, professional-looking epoxy resin coasters.
🔥 Build Stunning Wood + Resin Projects WITHOUT Guesswork

Tired of confusing plans and wasted materials?
Now you can create professional-quality projects like epoxy resin coasters with confidence!
👉 Get Instant Access to 16,000+ Step-by-Step Woodworking Plans
✅ Why Smart DIYers Choose Ted’s Woodworking:
- ✔️ 16,000+ tested & proven plans – no guesswork, no mistakes
- ✔️ Step-by-step instructions + exact measurements (even beginners can follow)
- ✔️ Complete materials & cut lists – buy exactly what you need
- ✔️ Works with basic tools & small workspace
- ✔️ Search & find any project in minutes
- ✔️ Lifetime access + new plans every month (FREE)
- ✔️ Bonus: Videos, CAD software & money-making guide included
🚀 Don’t Just Read… START BUILDING TODAY
💡 Imagine turning your ideas into real products you can use, gift, or even sell…
👉 Click Here to Unlock 16,000 Woodworking Plans Now
Conclusion
You now know how to make beautiful epoxy resin coasters with wood. This guide has shown you how to mix wood and resin for unique coasters. You can now explore many design options with these materials.
Looking for inspiration? Check out crafting communities and social media. Makers there share their projects and finished coasters.
Now, you’re ready to try new things. You can do river pours and add natural elements. This will help you make coasters that show off your style.
FAQ
What are the primary benefits of following a diy epoxy resin coaster tutorial?
Creating your own wood and resin coasters is a great way to make something durable and beautiful. You can choose colours and wood types that fit your home perfectly. Using top brands like TotalBoat or ProMarine Supplies helps you get the best results.
How to make resin coasters with wood that won’t rot or warp over time?
To keep your coasters stable, use kiln-dried hardwoods like Black Walnut or Live Edge Maple. Before pouring resin, seal the wood with a thin layer. This step keeps moisture and air bubbles out.
What is the most important safety step in a step-by-step resin coaster tutorial?
Safety is key when working with epoxy resin. Always work in a well-ventilated area and wear protective gear. Use a NIOSH-approved respirator, nitrile gloves, and safety goggles to avoid accidents.
According to a professional resin coaster-making guide, how do I prevent wood from floating in the resin?
To stop wood from floating, apply a small amount of resin to the wood’s bottom. Then, “tack” them down to your mould. Let this “glue” layer set for an hour before the main pour.
What tools are recommended in an epoxy resin coaster tutorial for removing unsightly surface bubbles?
For a clear finish, use a culinary torch or a heat gun like the Wagner HT1000. Briefly heating the resin surface will pop bubbles. This step is crucial for beginners to achieve a professional look.
How do I achieve a glass-like finish for my diy epoxy resin coaster ideas?
After curing, sand your coasters with 3M Wetordry Sandpaper. Start with 80 grit and go up to 3000 grit. Then, apply a polishing compound or a food-safe finish to get a mirror shine.
What should I do if my coaster remains tacky or sticky after the suggested curing time?
If your resin is still tacky, it might be due to wrong mixing or blending. Scrape off the bad resin and pour a new layer. Make sure to use the right mixing cups and follow the manufacturer’s instructions for the best results.

