
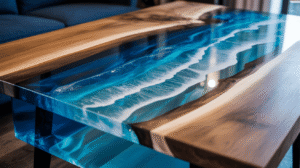
Did you know the market for custom kitchen tools has grown by 30% lately? People love adding flair to their homes with natural timber and colorful diy crafts. This epoxy resin cutting board tutorial shows you how to mix wood with liquid plastic for a stunning piece.
Lee Valley Tools says these creations are perfect for any kitchen. You can use your finished project as a charcuterie display or a sleek serving tray for guests. Mastering this hobby lets you make high-quality gifts that last.
Learning this woodworking style opens a world of creative options for your home. You’ll learn how to prep the timber and pour the mixture for a flawless finish. Mastering this skill means you can make custom goods that show off your unique personality.
Key Takeaways
- Multi-purpose use as a platter or prep surface.
- High customisation with various colours and timber types.
- Increased durability compared to standard wooden blocks.
- Ideal for creating professional-grade gifts at home.
- Step-by-step guidance for a smooth, bubble-free finish.
- Transform raw materials into functional kitchen art.
What You’ll Need for Your Epoxy Resin Cutting Board Project
To start your epoxy resin project, gather the right materials and tools. Craft Resin stresses the need for proper materials and safety gear. This ensures a smooth and successful project.
Essential Materials for Wood and Resin Cutting Boards
Choosing the right wood and epoxy resin is key to a beautiful cutting board. The wood should be safe for food, durable, and resistant to damage. Popular wood options include:
- Maple
- Walnut
- Cherry
For the epoxy resin, pick a food-safe product made for cutting boards. It should meet FDA standards.
Required Tools and Equipment
You’ll need various tools to work on your wood and apply the resin. Here’s a list:
- A table saw, or circular saw, for cutting wood
- A drill press for precise holes
- A sander for a smooth wood surface
- A mixing cup and stir stick for the resin
- A heat gun or torch for air bubble removal

Safety Gear You Must Have
Working with epoxy resin demands safety precautions. You’ll need:
- Gloves to protect your skin
- A respirator mask for fume protection
- Safety glasses for eye protection
- A well-ventilated workspace
Craft Resin emphasises the importance of safety gear. With these precautions, you’re ready to make a stunning epoxy resin cutting board.
Choosing the Right Wood for Your Resin Cutting Board

Choosing the right wood for your cutting board is key. It affects both how it looks and how well it works. The wood you pick will make your cutting board look great and be safe for food.
Best Wood Types for Food-Safe Cutting Boards
For a cutting board used with food, pick wood that’s safe and strong. Here are some top picks:
- Maple: It’s hard and won’t scratch or stain easily.
- Walnut: A dense wood that’s tough and looks good.
- Cherry: It has a rich colour and fine grain, making it a favourite for cutting boards.
These woods are not just pretty but also safe for food. They’re perfect for your resin kitchen projects.
Wood Grain Patterns and Aesthetic Considerations
The wood grain can really make your cutting board stand out. Think about these when picking wood:
- Grain direction: Picking the right direction can make it look even.
- Pattern variation: Mixing patterns can add interest.
- Colour contrast: Different colours can make a bold statement with resin.
Trying out different grain patterns can give your cutting board a unique look.
Preparing and Conditioning Your Wood Pieces
Before you start your project, make sure your wood is ready. This means:
- Drying the wood: Make sure it’s dry to avoid warping or cracking.
- Sanding: Sand it smooth for a better finish.
- Sealing: Use a food-safe sealant to protect and make it last longer.
Getting your wood ready right will help your resin cutting board turn out great.
Selecting and Understanding Epoxy Resin for Cutting Boards

Choosing the right epoxy resin is key to a durable and safe cutting board. The resin you pick will impact the board’s look, function, and how long it lasts.
Food safety is very important when picking an epoxy resin for your cutting board. You need a resin that’s safe for food.
Food-Safe Epoxy Resin Requirements
To make sure your cutting board is safe, pick a food-safe epoxy resin. These resins meet standards that prevent harmful chemicals from getting into food. Craft Resin emphasises the need for a food-safe epoxy resin.
When looking for epoxy resin, find products labelled as “food-safe” or “non-toxic.” It’s also good to check if they follow FDA rules for food contact.
Understanding Resin Cure Times and Working Periods
Knowing the cure and working times of your epoxy resin is crucial. The working time is when you can work with the resin. The cure time is when it fully hardens.
Epoxy resins have different working and cure times. Some give you more time to mix colours or adjust the resin. Others cure faster. Picking the right one for your project is important.
Colour Additives and Pigments for Custom Designs
Working with epoxy resin lets you create unique designs. You can use colour additives and pigments for custom looks.
Make sure the colour additives you choose are safe for food and work well with your resin. Some resins have recommended colours that match well.
Trying out different colours and techniques can make your cutting board look amazing. But, test your colour mixes first to get the right look.
Preparing Your Workspace and Materials

To start making an epoxy resin cutting board, first prepare your workspace. A clean and organised area boosts your creativity. It also lowers the chance of accidents and mistakes.
Setting Up a Safe and Clean Work Area
Before starting, make sure your workspace is clean, dry, and well-ventilated. Use plastic or cardboard to protect your surface from spills. Always have a fire extinguisher nearby and keep flammable materials away.
Safety gear is essential when working with epoxy resin. Wear gloves, safety glasses, and a mask to protect yourself from skin contact and fumes. Craft Resin’s video tutorial emphasises the importance of a clean and safe workspace for great results.
Cutting and Arranging Your Wood Pieces
Cut your wood into the shapes and sizes you need for your cutting board. Use different wood grain patterns for a unique look. Place the wood pieces on a flat surface to plan your design before applying the epoxy resin.
Think about the wood’s colour and texture when arranging the pieces. You can choose a symmetrical or asymmetrical design. Take your time to get the arrangement just right.
| Wood Type | Grain Pattern | Color |
|---|---|---|
| Oak | Straight | Light Brown |
| Maple | Curved | White |
| Walnut | Irregular | Dark Brown |
Creating Your Mould or Form
To make a mould or form, use silicone, melamine, or MDF boards. Make sure the mould is level and secure to avoid leaks or wood movement during curing.
Apply a release agent to the mould for easy removal after curing. Use a spray or wax-based agent, depending on your mould type.
Epoxy Resin Cutting Board Tutorial: Step-by-Step Process

It’s time to make your epoxy resin cutting board come to life. This detailed tutorial will guide you through each step. Creating an epoxy resin cutting board is a detailed process that needs patience and focus. By following these steps, you’ll make a cutting board that will impress anyone in the kitchen.
Step 1: Seal Your Wood to Prevent Air Bubbles
Before pouring the epoxy resin, seal your wood to avoid air bubbles. Use a thin coat of resin or a wood sealer to fill the wood pores. This step helps get a smooth finish and stops bubbles from forming.
Step 2: Mix Your Epoxy Resin Properly
Mixing the epoxy resin correctly is key to a good finish and avoiding defects. Follow the instructions for the right resin-to-hardener ratio. Mix well for 2-3 minutes until it’s clear and streak-free.

Step 3: Pour the First Layer of Resin
Pour the mixed resin into your mould, covering the bottom evenly. Use a credit card to remove air bubbles. This layer helps seal the wood and create a strong bond.
Step 4: Arrange Wood Pieces and Add Additional Resin
Place your wood pieces in the mould, making sure they’re evenly spaced and fully covered in resin. Pour more resin to fill the mould, reaching the top.
Step 5: Remove Air Bubbles and Level the Surface
Use a heat gun or torch to remove air bubbles. Hold the flame 6 inches away, moving it slowly to get rid of bubbles. Use a levelling tool to make the surface even.
Step 6: Allow Proper Curing Time
Let the epoxy resin cure for 24 to 72 hours, depending on the product and conditions. Keep the area clean and away from sunlight for a smooth finish.
Here’s a summary of the curing times for different epoxy resin brands:
| Epoxy Resin Brand | Curing Time (Hours) |
|---|---|
| Brand A | 24 |
| Brand B | 48 |
| Brand C | 72 |
By following these steps and allowing the proper curing time, you’ll create a stunning epoxy resin cutting board. It will be both functional and beautiful.
Finishing Your Epoxy Resin Cutting Board
After your epoxy resin cutting board is fully cured, it’s time for the finishing touches. These steps will make your wood and resin cutting board smooth, durable, and safe for food. The finishing process includes several important stages that will improve your board’s look and lifespan.
Removing the Cutting Board from the Mould
Start by carefully taking the cutting board out of the mould. If you used a silicone mould, this should be easy. Just flex the mould a bit and then lift the board out. If your mould is stiffer, you might need to apply a bit more force. But be careful not to harm the board.
Sanding and Smoothing the Surface
Sanding is key to getting a smooth finish. Begin with coarse-grit sandpaper to remove big imperfections. Then, move to finer grits for a shiny finish.
Choosing the Right Grit Progression
For resin woodworking projects, like your cutting board, start with 120 or 150 grit sandpaper. Then, go up to 220, 320, and finish with 400 or 600 grit for a glossy finish. It’s important to go up gradually, making sure each step is done before moving on.
Wet Sanding for a Flawless Finish
For an even smoother finish, try wet sanding with 800 or 1200 grit sandpaper. Sand with the paper in water to cut down on dust and get a perfect surface. Dry the board well after wet sanding.
Applying Food-Safe Finish Coats
Once your cutting board is sanded to your liking, it’s time for a food-safe finish. You can use mineral oil, beeswax, or specialised cutting board oils. Follow the manufacturer’s instructions for applying the finish, making sure it’s fully absorbed before use.
Final Polishing for a Professional Look
The last step is polishing. Use a high-quality polish made for resin surfaces to buff the cutting board to a shine. This not only looks great but also protects against scratches and wear.
By following these steps, you’ll have a beautifully finished cutting board. It will show off your resin woodworking skills and be safe for food prep.
Caring for and Maintaining Your Resin Cutting Board
Proper care keeps your epoxy resin cutting board valuable in your kitchen. Regular upkeep lets you enjoy your DIY resin kitchen project for years.
Daily Cleaning and Care Instructions
Wash your cutting board with mild soap and warm water after each use. Don’t use abrasive cleaners or scouring pads, as they can harm the resin.
Daily cleaning tips:
- Wipe down the cutting board with a soft cloth.
- Use a gentle cleaning product.
- Dry the board thoroughly to prevent water spots.
Long-Term Maintenance Tips
Apply a food-safe oil to the wood parts of your cutting board periodically. This keeps the wood conditioned and prevents cracking.
Maintenance schedule:
| Maintenance Task | Frequency |
|---|---|
| Clean with soap and water | After each use |
| Apply food-safe oil to wood | Every 1-3 months |
| Inspect for damage | Every 6 months |
What to Avoid to Preserve Your Cutting Board
Avoid extreme temperatures to keep your cutting board in good shape. Don’t use it as a serving platter for hot dishes.
Avoid:
- Extreme temperatures.
- Abrasive cleaners.
- Direct sunlight for prolonged periods.
By following these care and maintenance tips, your epoxy resin projects will last longer. Regular maintenance keeps your cutting board looking great and durable.
Troubleshooting Common Issues and Other Resin Projects
Even with careful planning, issues like air bubbles or uneven surfaces can arise during your epoxy resin cutting board project. Fortunately, many of these problems have straightforward solutions. These solutions can enhance your crafting experience and the final product.
Fixing Air Bubbles and Cloudy Resin
Air bubbles and cloudy resin are common issues that can affect the clarity and quality of your epoxy resin cutting board. To fix air bubbles, use a heat gun or a torch to gently heat the surface. This allows the bubbles to rise and pop. For cloudy resin, ensure your workspace is dust-free and that you’re mixing the resin thoroughly. Sometimes, a cloudy finish can result from improper mixing or contamination.
Tips for Preventing Air Bubbles:
- Mix your resin slowly and carefully to minimise introducing air.
- Use a mixing cup with a spout to pour the resin, reducing the chance of creating bubbles.
- Tap the mixing cup gently on the work surface after pouring to release any trapped air.
Dealing with Uneven Surfaces or Warping
Uneven surfaces or warping can occur due to improper curing conditions or uneven resin distribution. To address this, ensure your workspace is level and that the resin is evenly distributed in the mould. If warping occurs, you can try to flatten the cutting board by applying even pressure or using a clamp.
| Issue | Cause | Solution |
|---|---|---|
| Air Bubbles | Improper mixing, trapped air | Use heat gun or torch, mix slowly |
| Cloudy Resin | Dust contamination, improper mixing | Use a heat gun or torch, mix slowly |
| Uneven Surfaces | Uneven resin distribution, improper curing | Ensure a dust-free workspace, mix thoroughly |
Applying These Techniques to Epoxy Resin Coasters
Epoxy resin coasters are a great way to apply the techniques you’ve learned from making a cutting board. The process involves mixing resin with pigments or dyes, pouring it into coaster moulds, and allowing it to cure. You can add decorative elements, such as glitter or dried flowers, to create unique designs.
Other DIY Resin Kitchen Projects to Try
Besides cutting boards and coasters, there are numerous other DIY resin kitchen projects you can explore. Consider creating resin-coated wooden utensils, resin-topped tabletops, or decorative wall art featuring resin. The versatility of epoxy resin makes it a great material for a wide range of creative projects.
Experimenting with different resin colours and additives can lead to unique and personalised kitchen decor items.
🔥 Ready to Build Your Own Epoxy Resin Cutting Board Like a Pro?

Stop guessing measurements and wasting wood on trial & error…
👉 Get 16,000+ step-by-step woodworking plans that actually work!
✅ Why Smart Woodworkers Choose This:
- ✔️ 16,000+ tested & proven woodworking plans (not random drafts)
- ✔️ Step-by-step instructions + exact measurements (no confusion)
- ✔️ Complete materials & cutting lists – buy exactly what you need
- ✔️ Works even with basic tools & small workspace
- ✔️ Lifetime access + new plans every month (no extra cost)
- ✔️ Includes 150+ premium videos & bonus guides FREE
🚀 👉 Click Here to Access All 16,000 Woodworking Plans Now
Start building like a pro — even if you’re a beginner!
💡 Don’t just read tutorials… build stunning projects with confidence!
Conclusion
By following this epoxy resin cutting board tutorial, you’ve learned how to make an epoxy resin cutting board. It’s both functional and visually stunning. The process involves carefully selecting the right wood and epoxy resin.
Preparing your workspace is also key. Then, you execute a step-by-step pouring and curing process.
Working with epoxy resin and wood offers endless possibilities for creativity and customisation. You can experiment with different wood grain patterns, colours, and resin effects. This way, you can create unique kitchen accessories that reflect your personal style.
In this guide, you’ve seen the importance of attention to detail and patience. With practice, you’ll be able to tackle more complex projects. This includes epoxy resin coasters or other DIY resin kitchen accessories.
Now that you’ve completed your epoxy resin cutting board, enjoy the satisfaction of having created something beautiful and functional for your kitchen. Feel free to explore new designs and techniques to continue improving your craft.
FAQ
Is the resin used in this epoxy resin cutting board tutorial safe for food?
Yes, if you pick a resin that’s FDA-compliant for food contact, like TotalBoat TableTop or ArtResin. Make sure it’s fully cured (usually 7-30 days) before it touches food.
What is the best way to avoid bubbles in resin woodworking?
Sealing the wood edges first is key. Also, use a Heat Gun to pop bubbles and pour in thin layers (except with deep-pour resin) for a clear finish.
Can I use these resin art techniques for other household items?
Absolutely. These skills work for many diy resin crafts. You can make epoxy resin coasters, trivets, or even big projects like river tables and countertops.
How do I fix a scratch on my wood and resin cutting board?
Minor scratches can be buffed out. For deeper marks, sand from 220-grit up to 400 or higher. Then, re-apply a food-safe finish like Odie’s Oil or Walrus Oil.
What are some other diy resin kitchen projects for beginners?
Beginners like making resin-poured tray handles, decorative wine stoppers, or small serving platters. These projects use similar steps as the cutting board tutorial.
Why is my resin still tacky after 48 hours?
This issue often comes from wrong mixing ratios or not mixing enough. Use graduated mixing cups for accurate mixing.
Do I need special equipment for epoxy resin woodworking ideas?
Basic tools are okay, but a random orbit sander and table saw are recommended. For top results, a level workspace and quality safety gear like a 3M respirator are key.

