
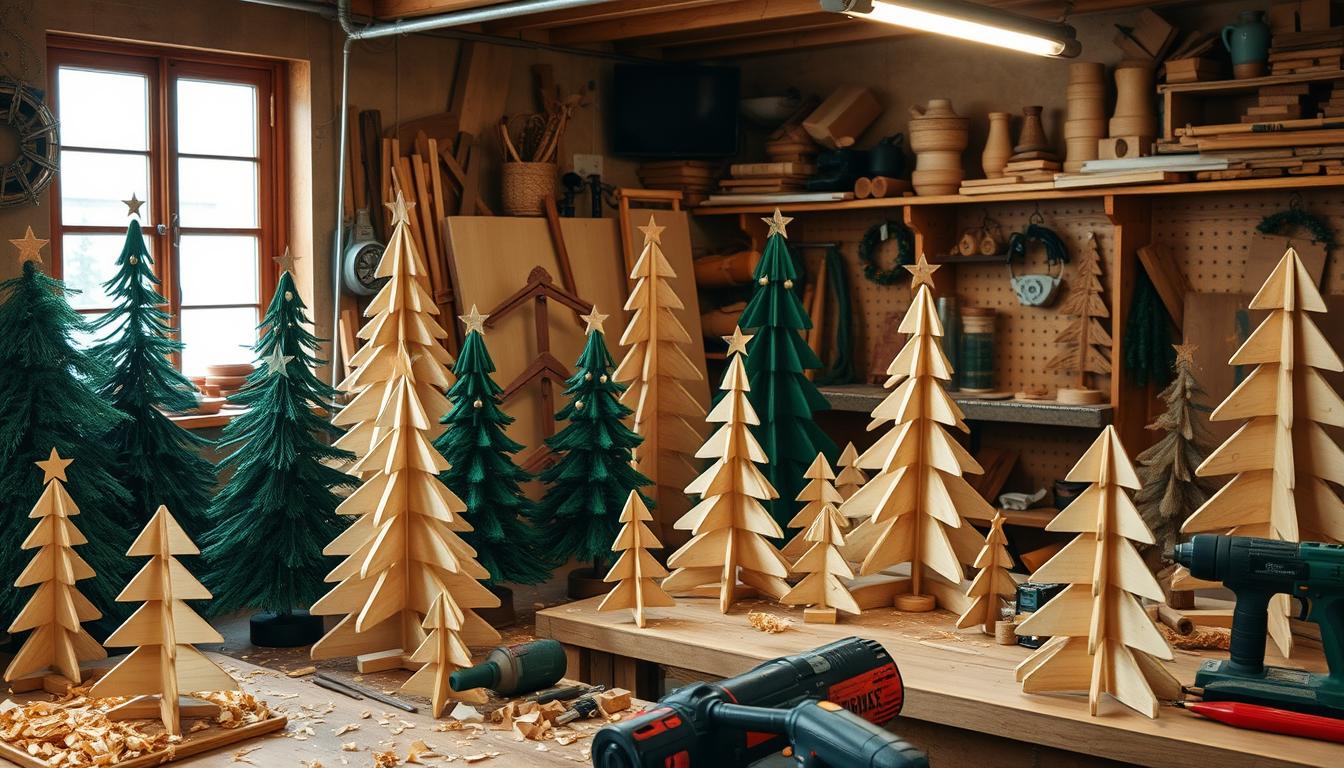
Did you know you can make a mini wooden Christmas tree in just 2 days? It only takes about 4 hours of work and costs $50-60 for all the materials. Making your holiday decorations is a fun and affordable way to add a personal touch to your home. You can choose from modern, farmhouse, or traditional styles and customise the colors and finishes to fit your home.
Pine wood is a great choice for these DIY trees because it’s affordable and easy to work with. You’ll need tools like pine boards, wood glue, and a mitre saw to make these decorations. The process is simple, with just measurements, cuts, and assembly. Even beginners can do it. With a little creativity, you’ll have beautiful decorations for your holiday season, perfect for mantels or tables.
Key Takeaways
- Complete your mini wooden Christmas trees DIY project in just 2 days with only around 4 hours of active work time.
- Use affordable pine wood, costing about $50-60 for all necessary materials.
- Create unique, customizable decorations for any home decor style.
- Basic tools required include pine boards, wood glue, and a mitre saw.
- Perfect for various placements, from mantels to central tablepieces.
Introduction to Mini Wooden Christmas Trees
Mini wooden Christmas trees add a charming touch to your holiday decor. They’re great for small spaces like tabletops and mantels. You can make them fit your home’s style by customising them.
To start your DIY project, you’ll need a few things. You’ll need a 1x2x8 and a 1×4 board, and a wood dowel from Home Depot. You’ll also need tools like a mitre saw, back saw, power drill, and measuring tape. These are available at Amazon and Home Depot. You’ll also need wood glue or super glue, matte black paint, sandpaper, and a paintbrush.

First, cut your wooden pieces to the right sizes and angles. For example, you might cut them to 26″ long sides, 12″ bottom side, and a 5.5″ base plate. You’ll also need to make specific angle cuts, like a 76.75-degree back cut for the top of the long sides.
After cutting, glue the pieces together. You might need clamps to hold them in place if using slow-drying glue.
You can add your special touches to your mini wooden Christmas trees. For example, you can use dowels to hang ornaments. Drilling holes in the branches for these dowels is a good idea. Sanding and repainting can also make them look better. You can choose to leave them natural, stain them, or paint them.
In conclusion, these wooden Christmas trees are great mini crafts. They offer a fun crafting experience and a beautiful result. By making these DIY trees, you add a personal touch to your holiday decor.
Materials Needed for Your DIY Project

Creating your own mini wooden Christmas trees is a fun and creative holiday project. You’ll need the right materials and tools to get started.
Essential Tools
You’ll need a few key tools to make your wooden Christmas trees. A mitre saw or circular saw, is important for cutting wood accurately. This ensures each piece fits perfectly in your design.
Wood glue is also crucial for putting the pieces together securely. Sandpaper or an electric sander helps make your wood surfaces smooth. For extra strength, consider using a pin nailer or pneumatic nail gun. These tools will help bring your rustic Christmas decor ideas to life.
Optional Tools
There are also optional tools that can make your project easier. Tack cloths help remove dust and debris, making your work area cleaner. A foldable multi-tool can be handy for various woodworking tasks.
Woodworking clamps offer extra support and stability when glueing pieces together.
Wood Selection and Budgeting
Choosing the right wood is important, considering your budget and design. Pine boards are affordable, while exotic woods like purpleheart add a unique look but cost more. Determine how much wood you need based on your tree’s size.
For example, cutting boards at 45-degree angles of different lengths create varied sizes. This makes your design more interesting. By planning your design and calculating wood needs, you can stay within your budget.
| Material | Purpose | Cost |
|---|---|---|
| Pine Boards | Budget-friendly option | $$ |
| Purpleheart Wood | Exotic, high aesthetic value | $$$$ |
| Scrap Wood | Cost-saving and sustainable | $ |
Step-by-Step Guide: Cutting Your Wood Pieces
Creating DIY mini wooden Christmas trees requires precise cutting. This ensures all pieces fit together perfectly. By following a few steps, you can make beautiful small wooden tree decorations. These will add to your holiday décor.
Measurements and Specifications
Determine the dimensions of your DIY mini wooden Christmas trees first. Large trees are about 22″ wide by 40″ high. Small trees are 18″ wide by 29″ high.
Use a mitre saw set at specific angles for the classic look. Cut the pieces at 40 degrees off square and 25 degrees off square. A 6″x6″ base is recommended for stability.
Techniques for Accurate Cuts
A mitre saw is key for precise cuts in your DIY mini wooden Christmas trees. Cut the pieces at angles of 25 degrees, 28 degrees, and 32 degrees. Make sure the wood is clamped well to avoid splintering and ensure accuracy.
A dual bevel sliding mitre saw makes angled cuts easy. Keep consistent pressure and focus on detail. This ensures each piece fits perfectly, making assembly easy.
How to Assemble Your Mini Wooden Christmas Trees
After cutting your pieces, assembling your mini wooden Christmas trees is easy. We’ll show you how to use wood glue and nails. This way, your mini Christmas crafts will be strong and last longer.
Using Wood Glue
Wood glue is key to strong bonds between your pieces. Apply it where needed, but don’t use too much to avoid a mess. Let it dry well for the best results.
When you make holiday woodworking crafts, good glue makes your project stable and long-lasting.
Nailing for Extra Strength
Nailing adds strength to parts that might break or carry more weight. Use a pin nailer to place nails correctly, so you don’t split the wood. This makes your mini wooden Christmas trees not just pretty but also strong.
Glueing and nailing your pieces together makes a solid base for your mini Christmas crafts. Remember, being precise and patient is important in holiday woodworking crafts.
Sanding and Preparing Your Trees for Paint
After you’ve made your mini wooden Christmas trees, sanding is the next big step. It’s important to sand right to get a smooth finish. This step removes rough spots and gets the surface ready for paint or stain.
Start by lightly sanding all sides and edges of the triangles. Use an electric sander or sanding sponge to make the surfaces smooth. This helps prevent splinters and makes painting easier.
For a rustic look, try distressing the wood. Sand the edges or the whole surface after painting. This reveals layers of color, giving your trees a vintage charm.
It doesn’t matter if you’re using scrap wood or bought wood blocks. A well-sanded surface is crucial. It ensures a smooth finish and helps the paint stick better. For example, if you’re using decoupage tissue paper, a topcoat like Gator Hide is needed.
By applying a waterproof topcoat after sanding and painting, your trees can go indoors or outdoors. This makes your decorations more versatile.
Adding special touches like distressing can make your trees stand out. When sanded and prepared well, they become beautiful pieces of holiday decor. They show off the effort and skill you put into your DIY projects.
Painting Techniques to Customise Your Trees

Making your DIY mini wooden Christmas trees pop with paint can take your holiday decorations to the next level. Whether you’re following a mini tree ornament tutorial or going solo, knowing the right painting techniques is key.
Choosing Paint Colors
Picking the right paint colors is vital. Think about colors that match your holiday decor. Classic Christmas colors like red, green, and gold are timeless. But feel free to try out unique colors to match your theme. Use top-notch craft paint, as you’ll likely need two coats for a glossy finish.

Application Tips for a Smooth Finish
For a smooth finish, use the right tools and methods. High-quality brushes and rollers help paint evenly. For texture, dabbing or stippling can add a special touch. For a polished look, go for smooth strokes. Remember, you might need extra coats and Mod Podge for a final seal.
Using these painting tips can highlight your wooden Christmas tree DIY project. Your customised trees will surely impress, whether they’re part of your holiday display or a mini tree ornament tutorial.
Adding Unique Details and Decorations

Make your mini wooden Christmas trees stand out by adding special details and decorations. You can choose from cosy rustic or sleek minimalist styles. This personal touch makes your holiday decor truly special.
Rustic and Vintage Ideas
Love a nostalgic feel? Rustic and vintage ideas are perfect for you. Try burlap ribbons, distressed wood, or antique metallic paints for that look. A rustic kitchen with natural elements like evergreen branches creates a cosy atmosphere.
Adding antique items like wooden trays, vintage crates, and copperware enhances the rustic charm.
Wood block Christmas trees decorated with old maps are great for travellers. They add a unique twist to your decor. Vintage cutting boards and wooden spoons also add to the woodsy and vintage appeal.
Modern and Minimalist Approaches
Prefer a modern look? Go for simple designs with monochromatic colors and geometric shapes. A pallet wood tree needs precise measurements for a sleek look. Wood slice Christmas trees offer an elegant, understated look.
Using wood dowels and painted bases in colors like Bayberry and Picket Fence creates a chic, modern decor. These ideas can make your holiday decor stylish and contemporary.
Here’s a table with creative and rustic decor ideas:
| Decor Item | Description |
|---|---|
| Wooden Serving Tray with Snowy Tree | Perfect for travellers and offers a vintage charm |
| Vintage Crate with Faux Mini Tree | Acts as a tree skirt, decorated with natural elements |
| Wood Block Trees with Old Maps | Perfect for travellers and offers a vintage charm |
| Three-Dimensional Trees from Reclaimed Wood | Showcases creativity with leftover wood pieces; ideal for rustic decor |
| Geometric Wooden Christmas Trees | Simple design with monochromatic colors for a modern look |
By mixing rustic and modern ideas, you can create unique mini wooden Christmas trees. These crafts not only beautify your decor but also add a personal touch to your holiday celebrations.
Creating a Mini Winter Wonderland: Placement Ideas
To make your DIY mini wooden Christmas trees stand out, think about where you place them. You can put them in the middle of a table, on the mantel, or even outside. Where you put them can make your holiday decorations pop.
Central Tablepiece
Make your holiday crafts the main attraction with a central table display. Add candles, small ornaments, and other festive DIY projects around your mini trees. This creates a beautiful centrepiece that shows off your skills and brings everything together.
Mantel Decorations
Decorating your fireplace mantel with mini wooden Christmas trees can make it look amazing. Mix them with garlands, stockings, and vintage items for a cosy feel. This turns your living room into the heart of the holiday season.
Outdoor and Indoor Versatility
These wooden trees are great for inside, but they can also go outside. With the right finish, they can add charm to your porch or garden. Their size and shape make them easy to fit into any holiday setup, making your decorations both useful and lovely.
Using these ideas will make your DIY mini wooden Christmas trees a key part of your holiday decor. They appeal to both modern and traditional tastes. These ideas show off the beauty and versatility of your festive DIY projects.
🎄 Transform Your Festive Ideas into Stunning Tabletop Decorations! 🎄

Unleash your creativity this holiday season with Ted’s Woodworking – the ultimate woodworking resource! With over 16,000 expertly designed plans, including fun and festive crafts, you’ll easily create breathtaking mini wooden Christmas trees to bring your home to life.
✨ Why Choose Ted’s Woodworking?
- Step-by-step instructions for every project.
- Detailed cutting and materials lists to save time and money.
- Perfect for beginners and pros alike – no large workshop required!
🌟 Limited-Time Offer: Access all plans for a one-time fee of just $67!
🔗 Click Here to Start Your Festive Creations Today!
👉 Don’t miss out – bring your DIY dreams to life and make this holiday season unforgettable!
FAQ
What materials and tools do I need for DIY mini wooden Christmas trees?
You’ll need a mitre saw for clean cuts, wood glue for sticking parts together, and sandpaper for a smooth finish. You might also find a tack cloth and a foldable multi-tool handy. For the wood, pine is affordable, but if you want to splurge, try exotic woods like purpleheart.
How do I accurately cut the wood for my mini wooden Christmas trees?
Set your mitre saw to the right angles for a tapered look. Keep the pressure steady and the wood firm for cuts that are sharp and splinter-free.
What are some assembly tips for the mini wooden Christmas trees?
Use wood glue carefully to avoid a mess and ensure strong joints. Let it dry completely. For extra stability, use a pin nailer on parts that need extra support.
How should I sand and prepare my wooden trees for painting?
Sand the trees smooth after assembly to remove any rough spots. This step makes them look better and prepares them for painting or staining.
What paint colors work best for mini wooden Christmas trees?
Pick colors that match your holiday decor. Traditional Christmas colors like red, green, and gold are always festive.
What are some painting techniques for a smooth finish?
Use good brushes and rollers for even coverage. Try dabbing or stippling for texture, or smooth strokes for a polished look.
How can I create a rustic or vintage look for my Christmas trees?
Add burlap ribbons, distressed finishes, or antique metallic paints. These touches can give your trees a charming rustic or vintage look.
What are some creative ways to decorate my mini wooden Christmas trees for a modern look?
Go for simple designs with one color, geometric shapes, or plain surfaces. This minimalist approach creates a modern, sleek look.
Where can I place my mini wooden Christmas trees for the best festive effect?
Place them on tables, mantels, or as a centrepiece. They’re perfect for indoors, but with the right finish, they can also work outdoors.


Pingback: Wooden Christmas Tree Ideas for Small Spaces - DIY Guide